
MoeGo's Online Booking system is a powerful tool that allows your clients to view your service and submit appointment requests with you. It features a storefront website and an appointment booking flow. Be sure to check out our demo page for Online Booking here.
This guide is structured into 4 core sections to provide you with a comprehensive understanding of MoeGo's Online Booking system:
- Setting Up Online Booking Landing Page: Learn how to set up your business page and create an impressive online presence with MoeGo's customizable storefront page.
- Setting Up the Online Booking Flow for Your Customers: See what clients will experience during the booking process. It also explains how to set up the booking flow, including the necessary input info, agreements, and flexible payment requirements for all or specific clients.
- Managing Booking Requests: Find where and how to review, accept, or decline requests. Feel free to explore the automation settings that can streamline business operations. Additionally, discover how to check abandoned bookings and how to win them back.
- Online Booking Integrations: Enhance the booking managing experience with integrated features and third-party tools designed to make your operations smoother and more efficient.
1. Setting Up Your Online Booking Landing Page
Your business's digital storefront begins with a customizable landing page, which serves as the entrance to your business's online booking page. This page provides a space to showcase your brand, services, and other general info. Additionally, a "Book Now" button is available to allow customers to initiate the booking process.
To learn how to set it up and integrate it into your business website, visit: Learn how to set up your Landing Page.
2. Setting Up the Online Booking Flow for Your Customers
When a new customer goes to the booking page, they go through the following process to submit their booking request, please take the attachment as a reference.
Existing clients need their phone numbers on file to receive the verification code, and then enter the code to log in. Once logged in, they can submit the requests without going through the whole process of filling up the information.
This is the process of Online Booking for New Clients and Existing Clients:
New Clients
- Input their general information, including phone number, name, email, pet numbers, and address.
- Input the pet's basic information.
- Select service and staff.
- Select an available time slot.
- Answer booking questions for pets and pet parents.
- Sign agreements.
- Add a card to the client file/prepay for the booking request/pre-auth.
Existing Clients
- Input their phone numbers on file to receive the verification code, then enter the code to log in to online booking.
- Book again for the last finished appointment. Or book a new appointment
- Select service and staff.
- Select an available time slot.
- Sign agreements.
- Add a card to the client file/prepay for the booking request/pre-auth.
Below is a step-by-step, visual showcase of the whole Online Booking process that your customers go through and the corresponding steps to set up this flow.
Step 1: Input general information
What your customers need to input: phone number, name, email, pet numbers, and address.
Note: Existing client who already have profile in the system will be required to log in with a verification code after entering phone number. The existing information is already recorded, client don't have to fill in same information again to proceed on booking.
You can set up this required general information in Online Booking > Settings > Client.
- You can choose to accept both/either Existing client who have profile in the system and potential New visitors by check mark the accept client type.
- Here you can includes certain question as required for client to answer.
- If you'd like to include <Referral source> as the question, make sure to set up the options available for client to choose in the Setting>Business.
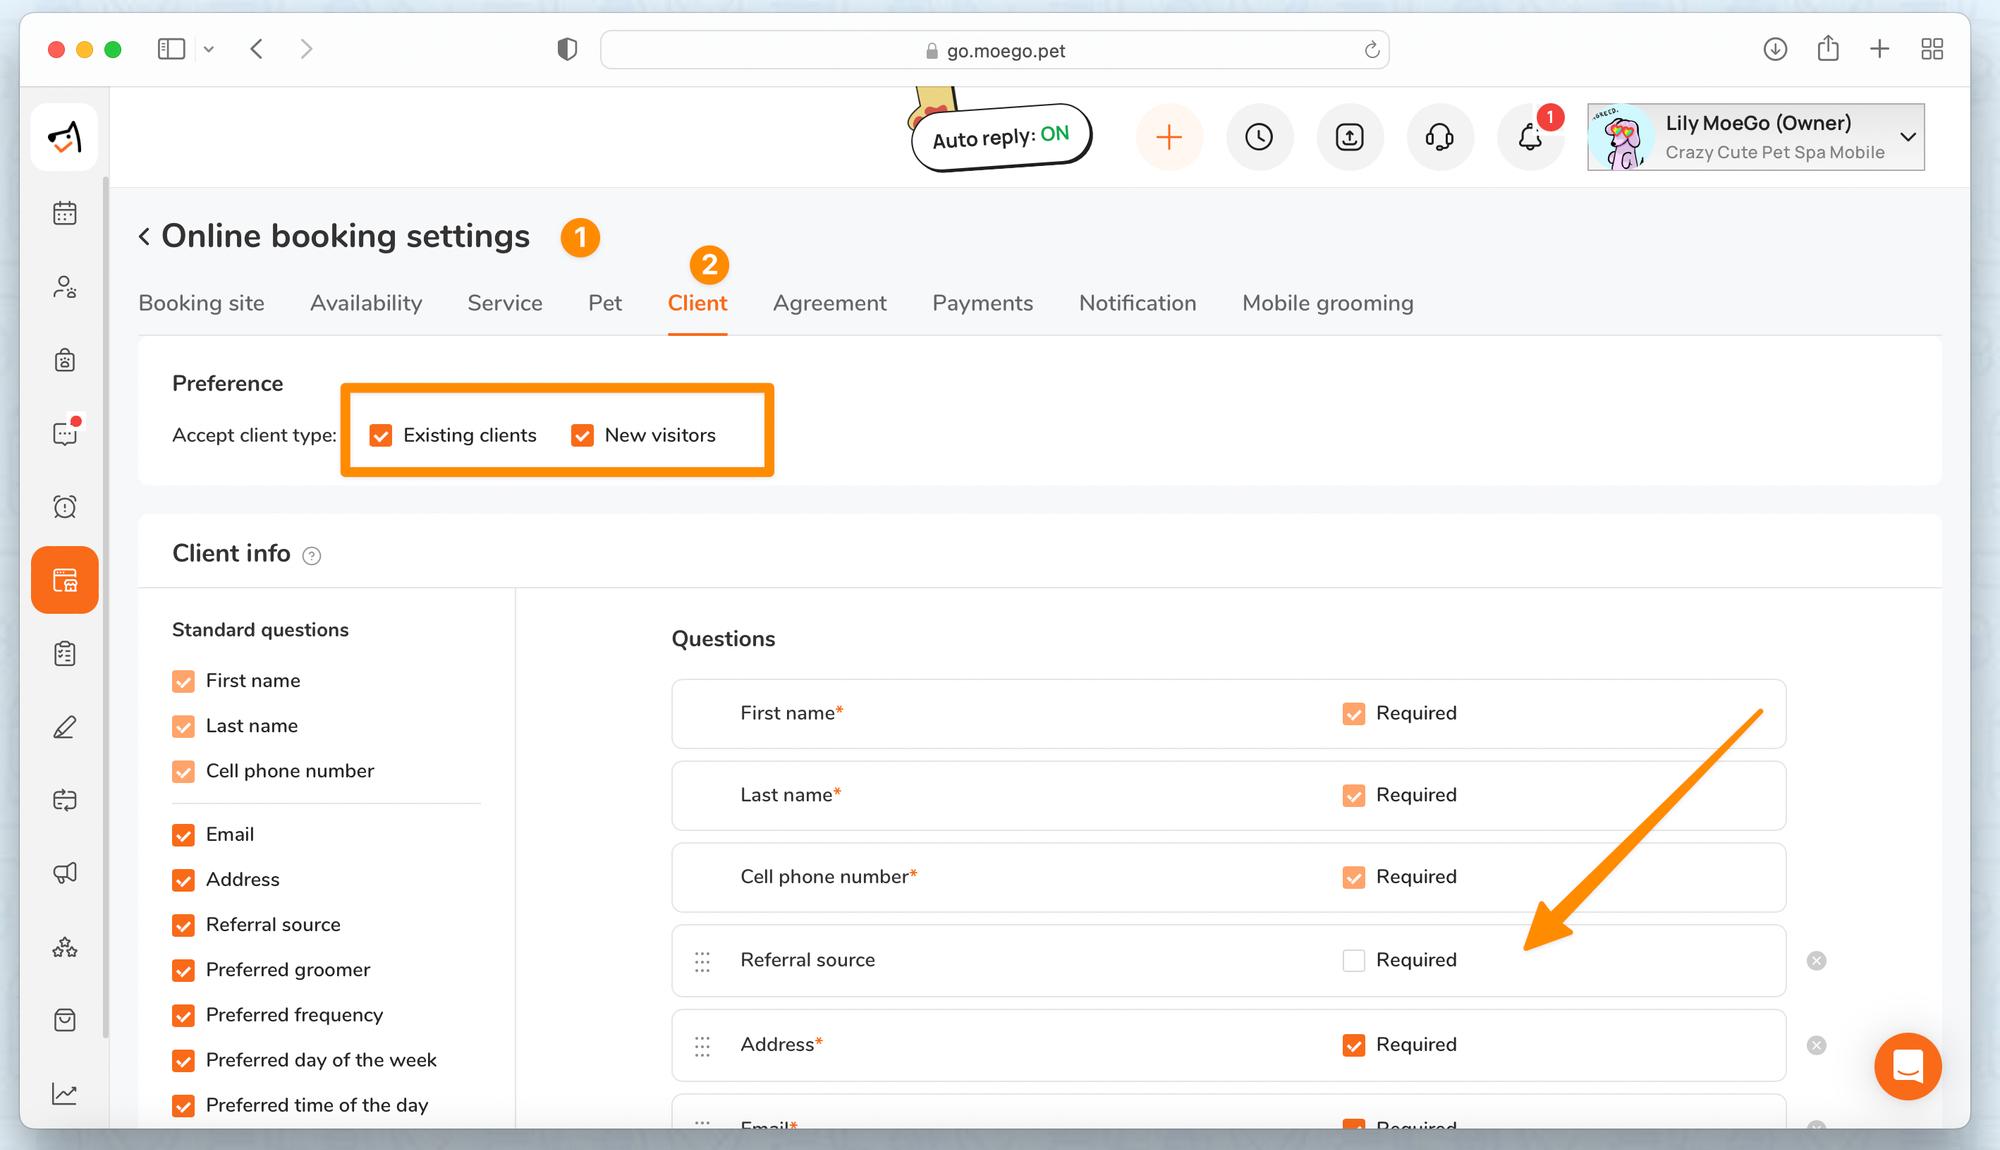
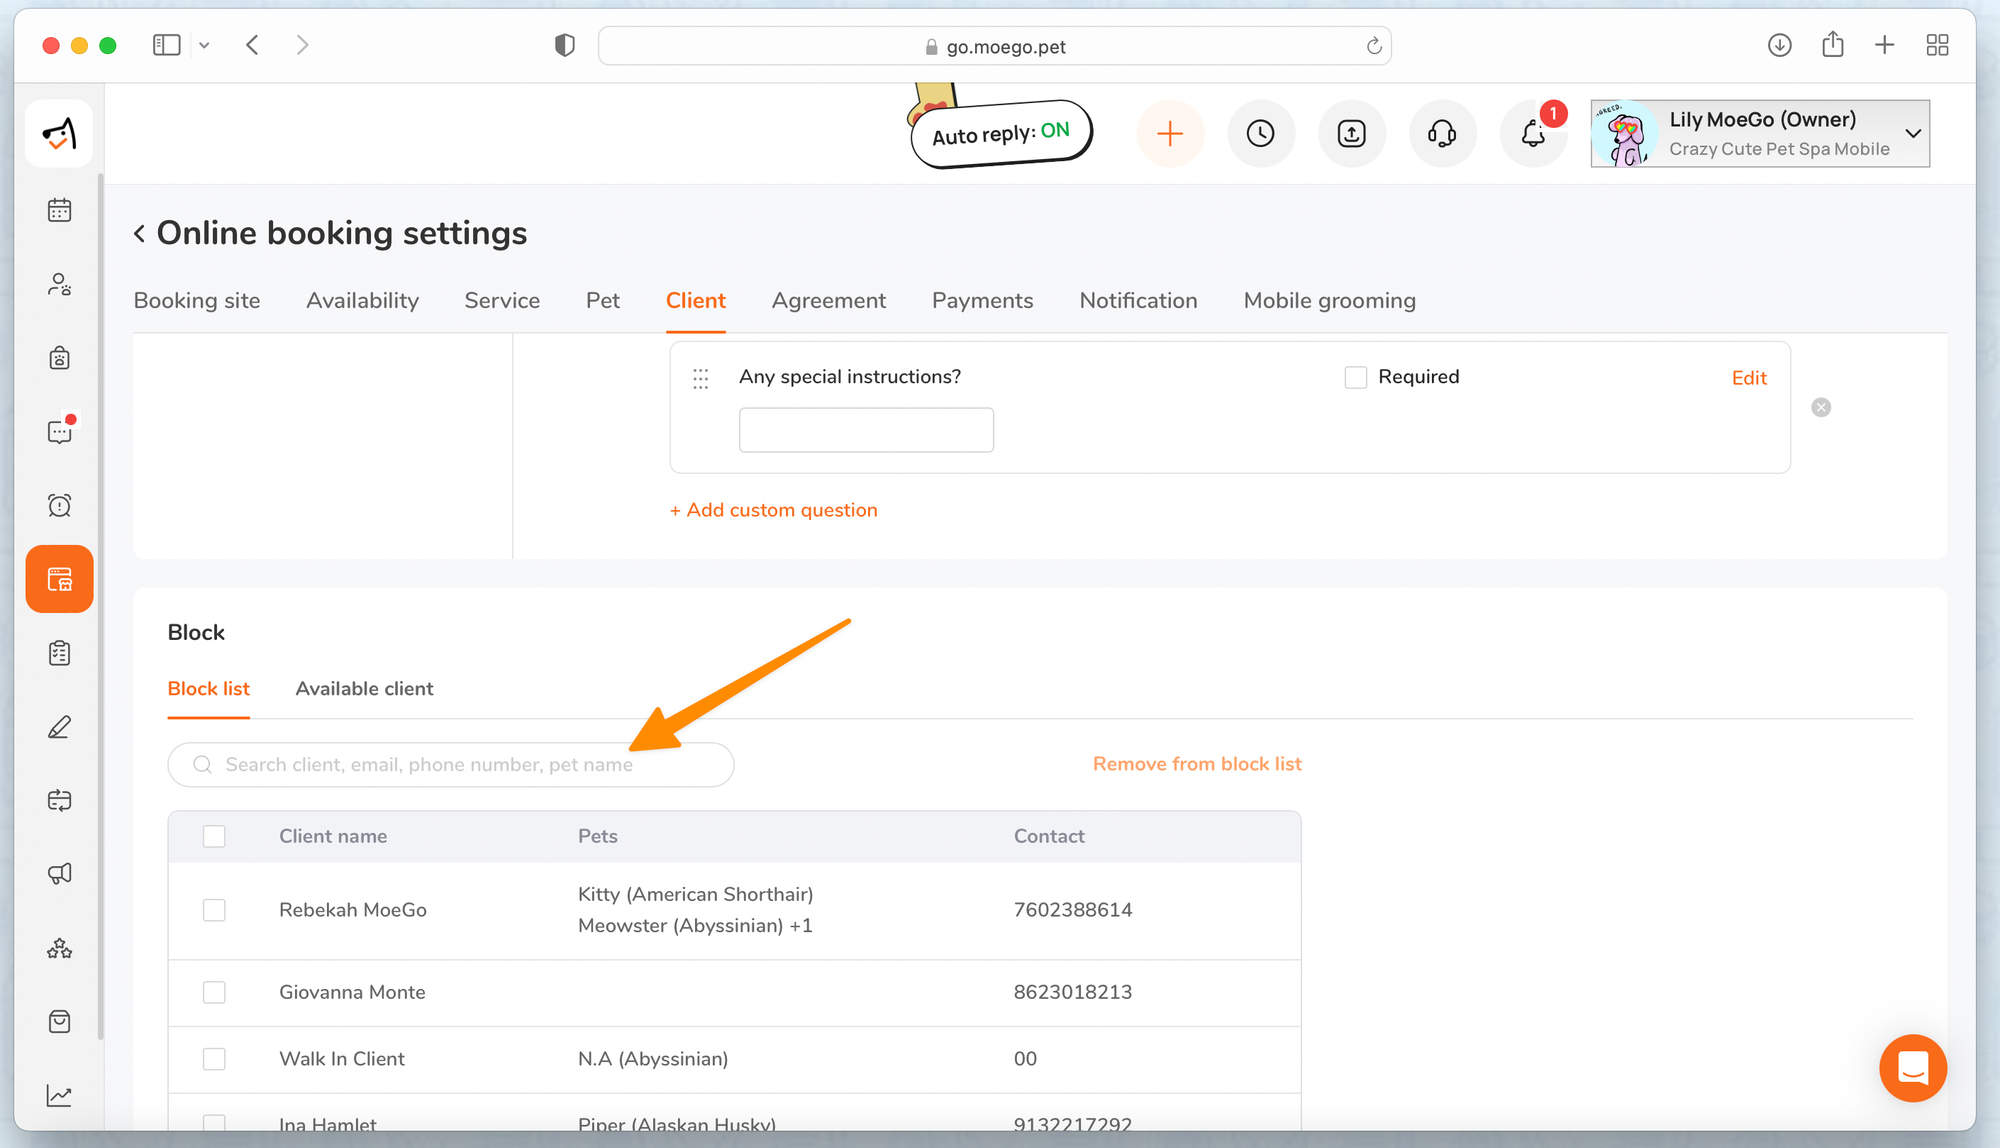
- There is a block list that you can add certain clients into the list to block from booking online
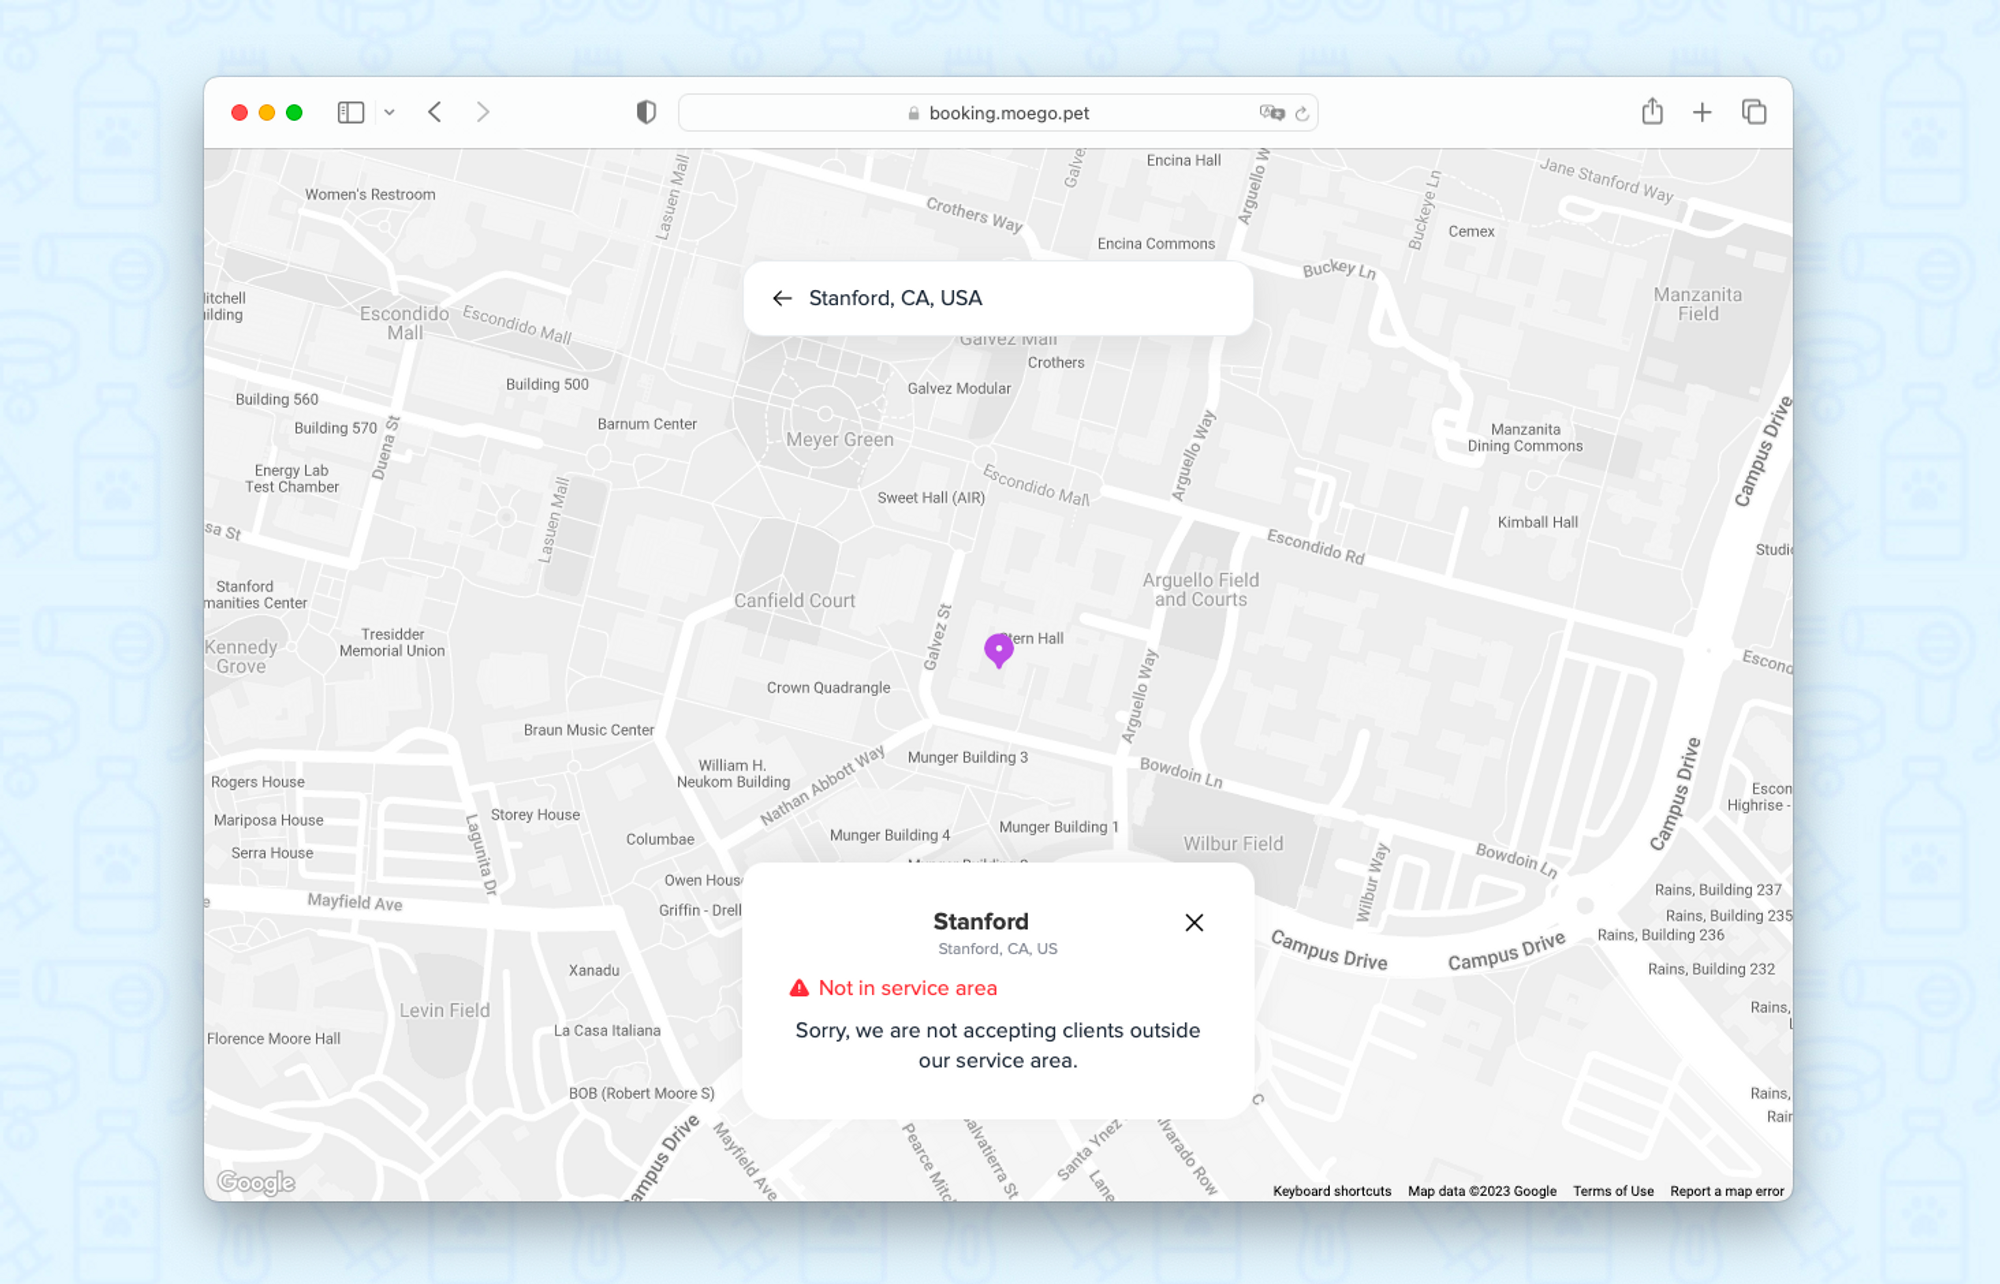
Online Booking Service Area for Mobile Booking
The address input step is only available when mobile grooming turns on the Require address for service area setup.
To learn how to set up your service area for Online Booking, visit Online Booking for Mobile Grooming.
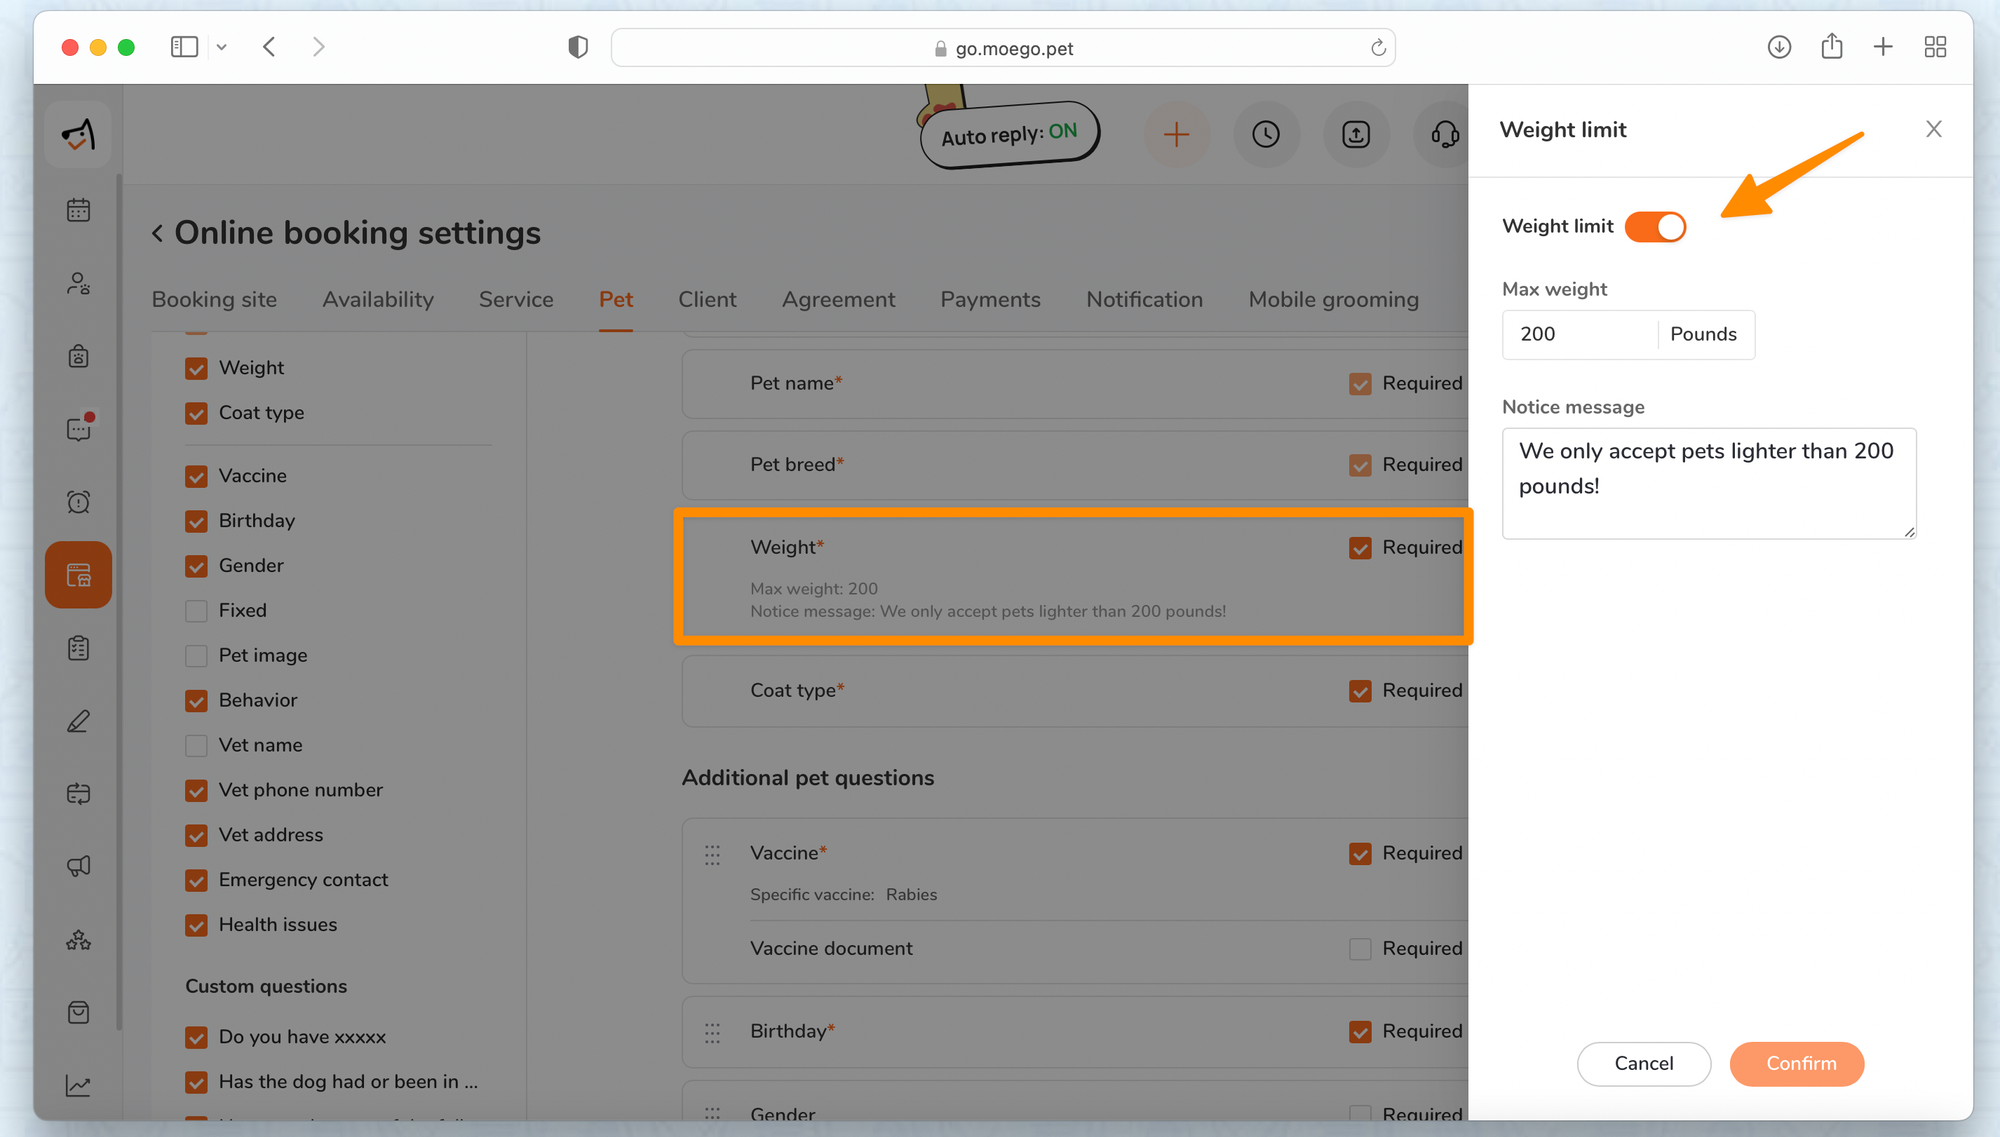
Step 2: Input the pet's basic information
What your customer will input: pet name, pet breed, pet type, weight, and coat type.
You can set up required pet information in Online Booking > Settings > Pet.
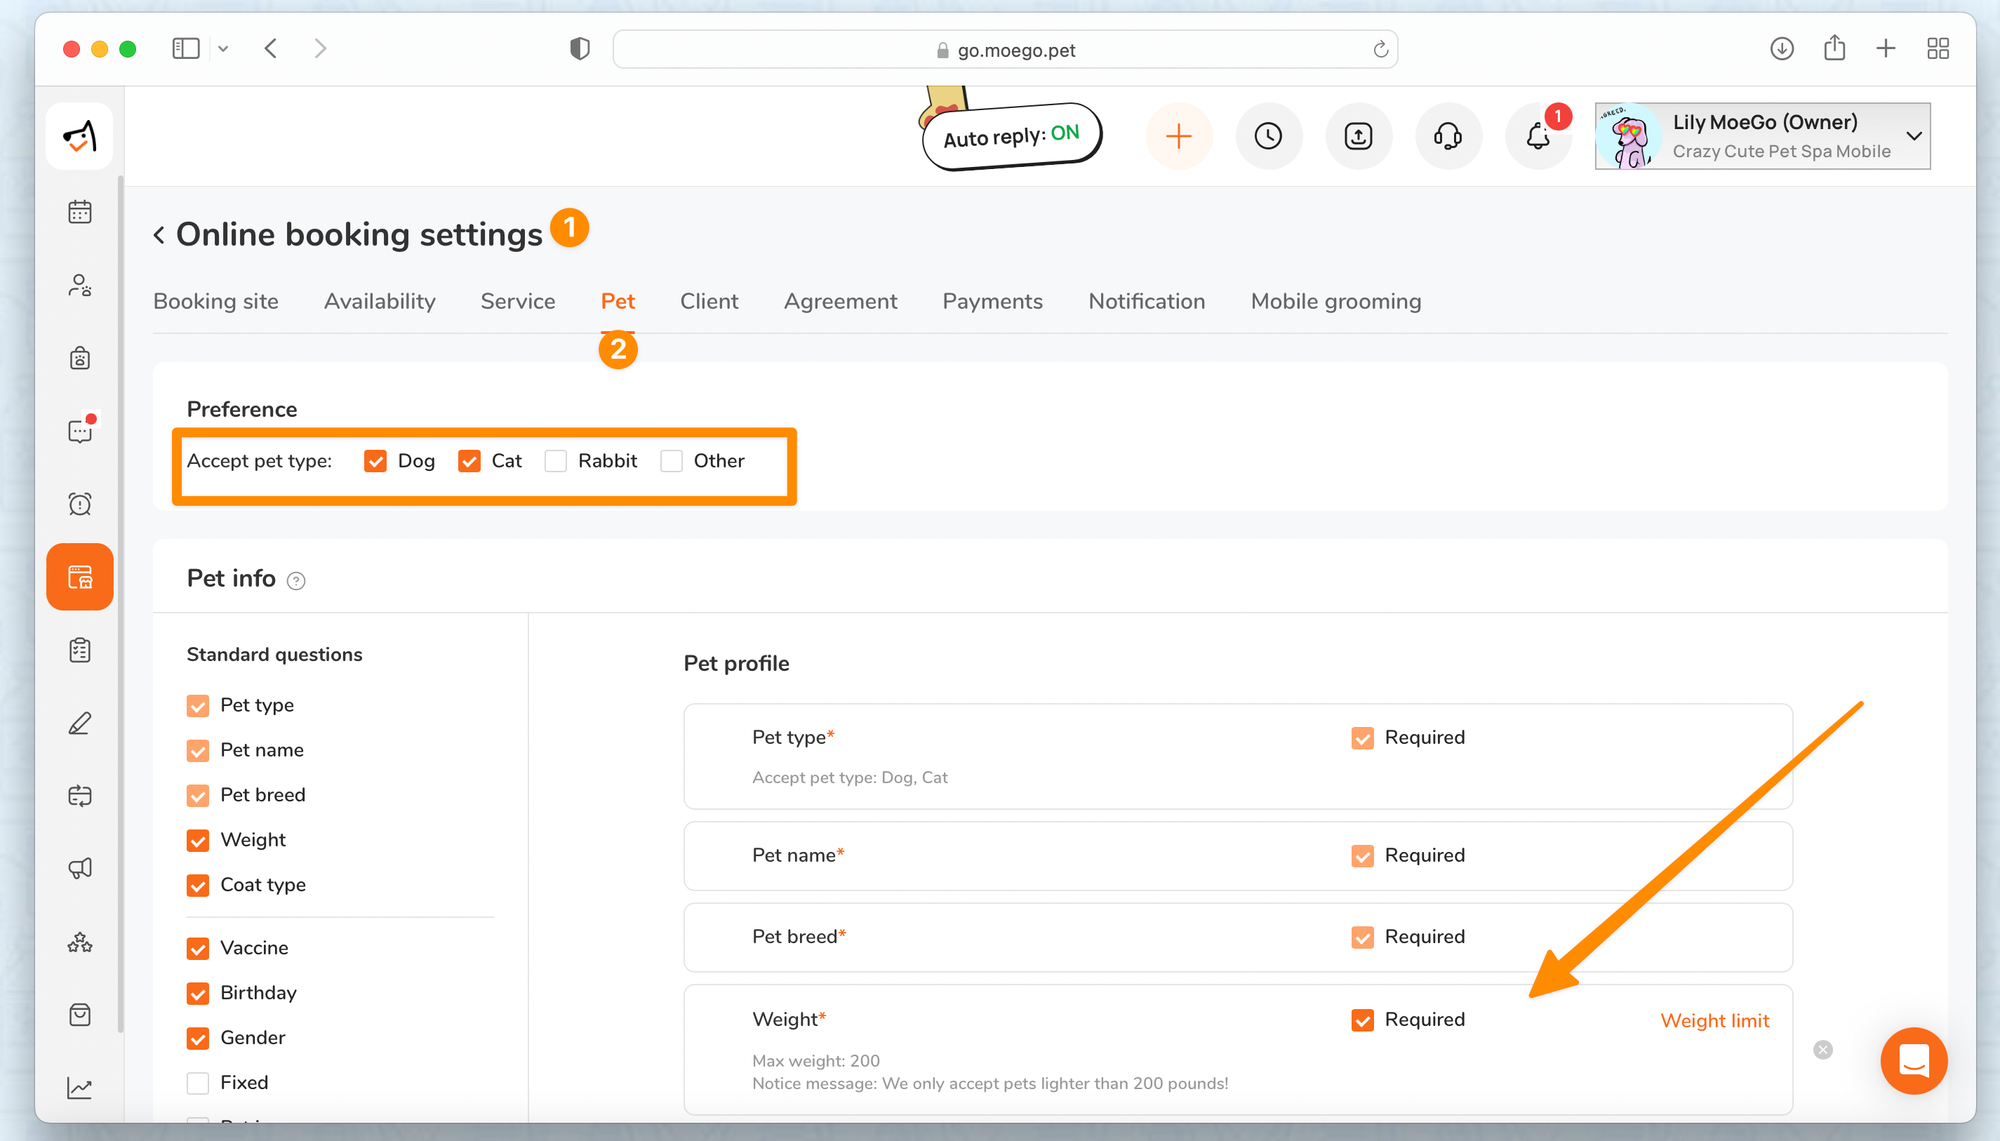
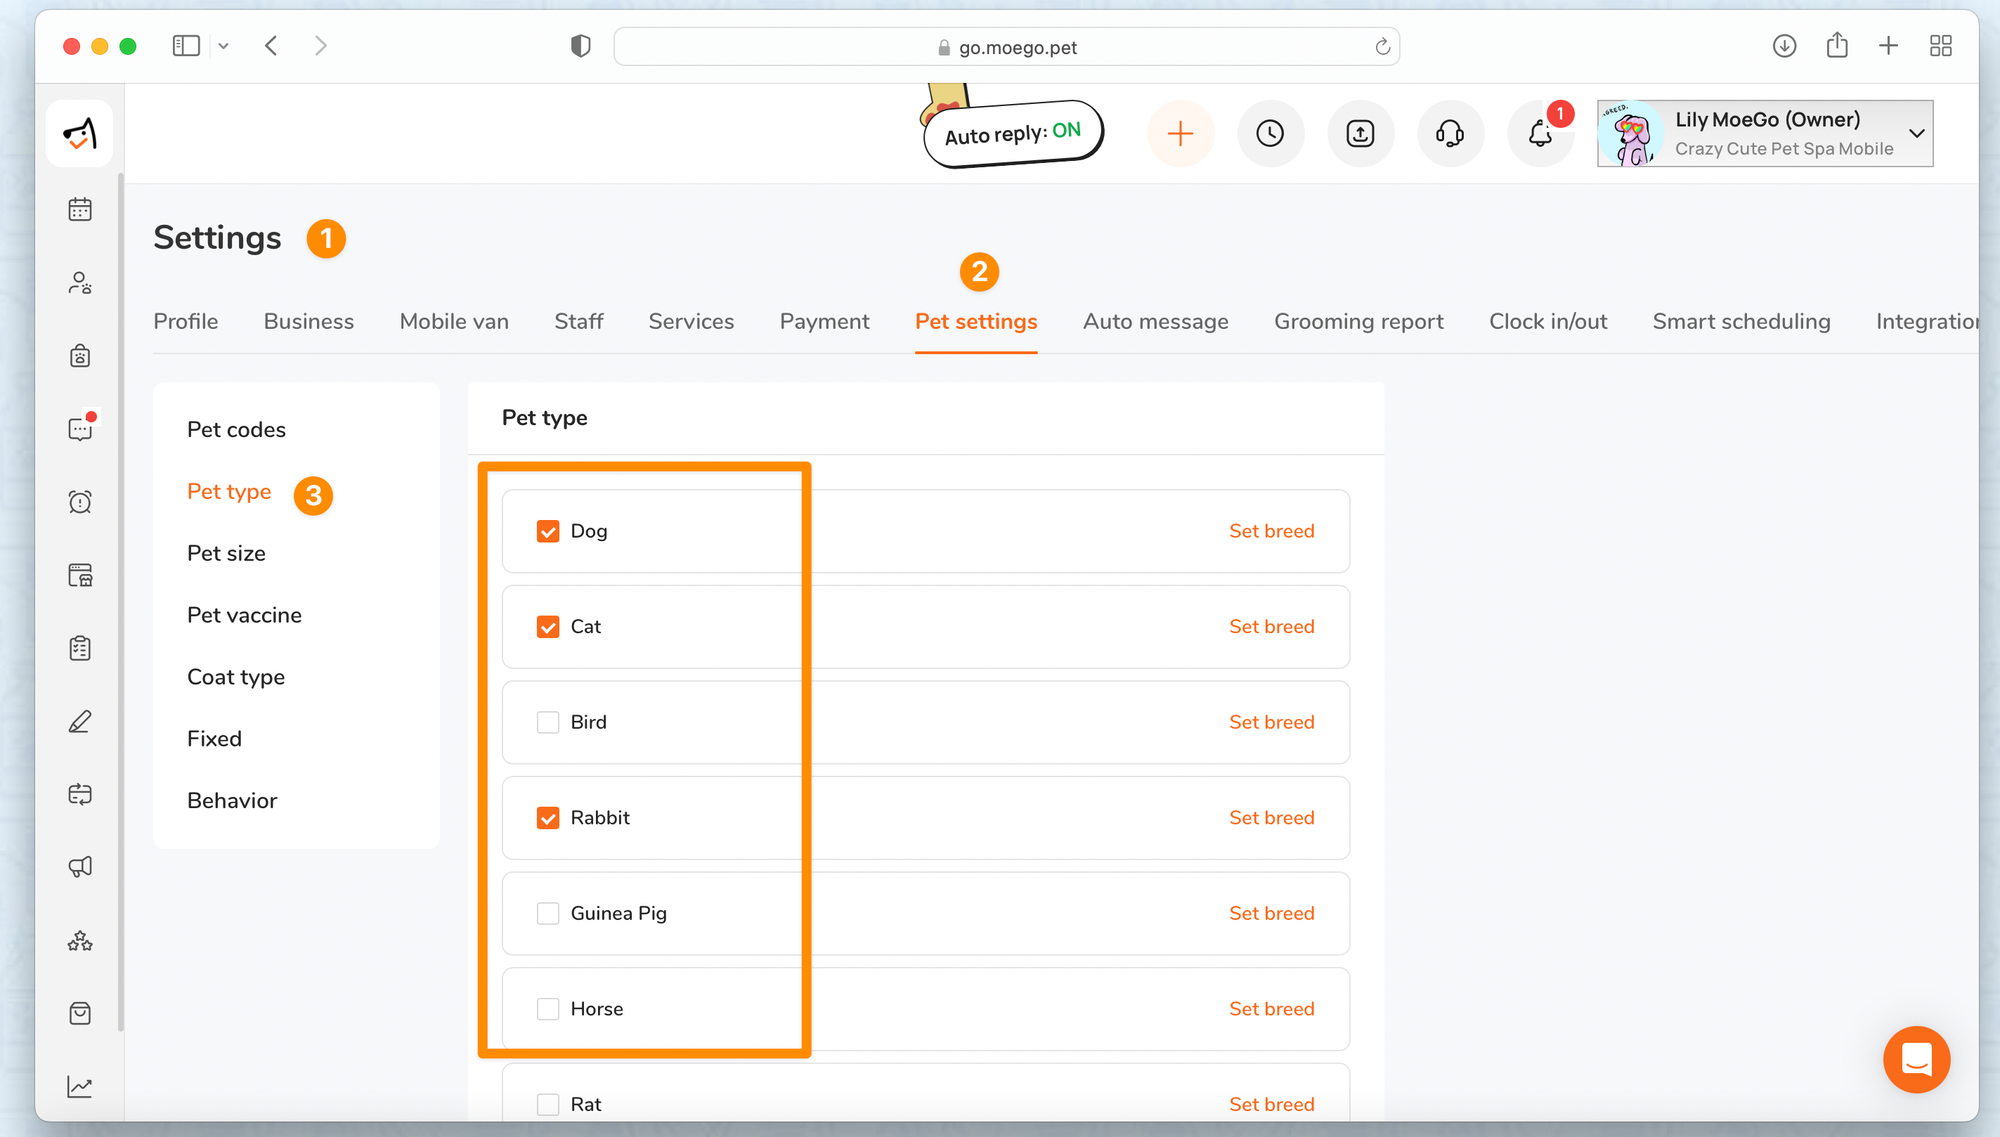
- You can choose the accept pet type with check mark the pet type (Note: this will also control the display of pet type for Intake form)
- Make sure to select the pet in the Setting>Pet settings>Pet type first for it to be display as an option in Online Booking setting.
- You can also set up weight limitation by click on <Weight limit> based on the maximum weight of pet you can take
Step 3: Select service and staff
If you need to restrict some of the services and add-ons available for online booking, and only allow certain staff members to be booked for specific services, you can customize your service menus to meet the unique needs of your business and customers. Visit Online Booking Service to learn how to do this.
Step 4: Select an available time slot
We provide a variety of availability settings to enhance your online booking experience, giving you the flexibility to meet your business needs and operational rhythm. This is especially important as more businesses have their ways of managing appointments. Check out our guide on how to set your Online Booking Availability by working hours and slots, as well as how to set limitations.
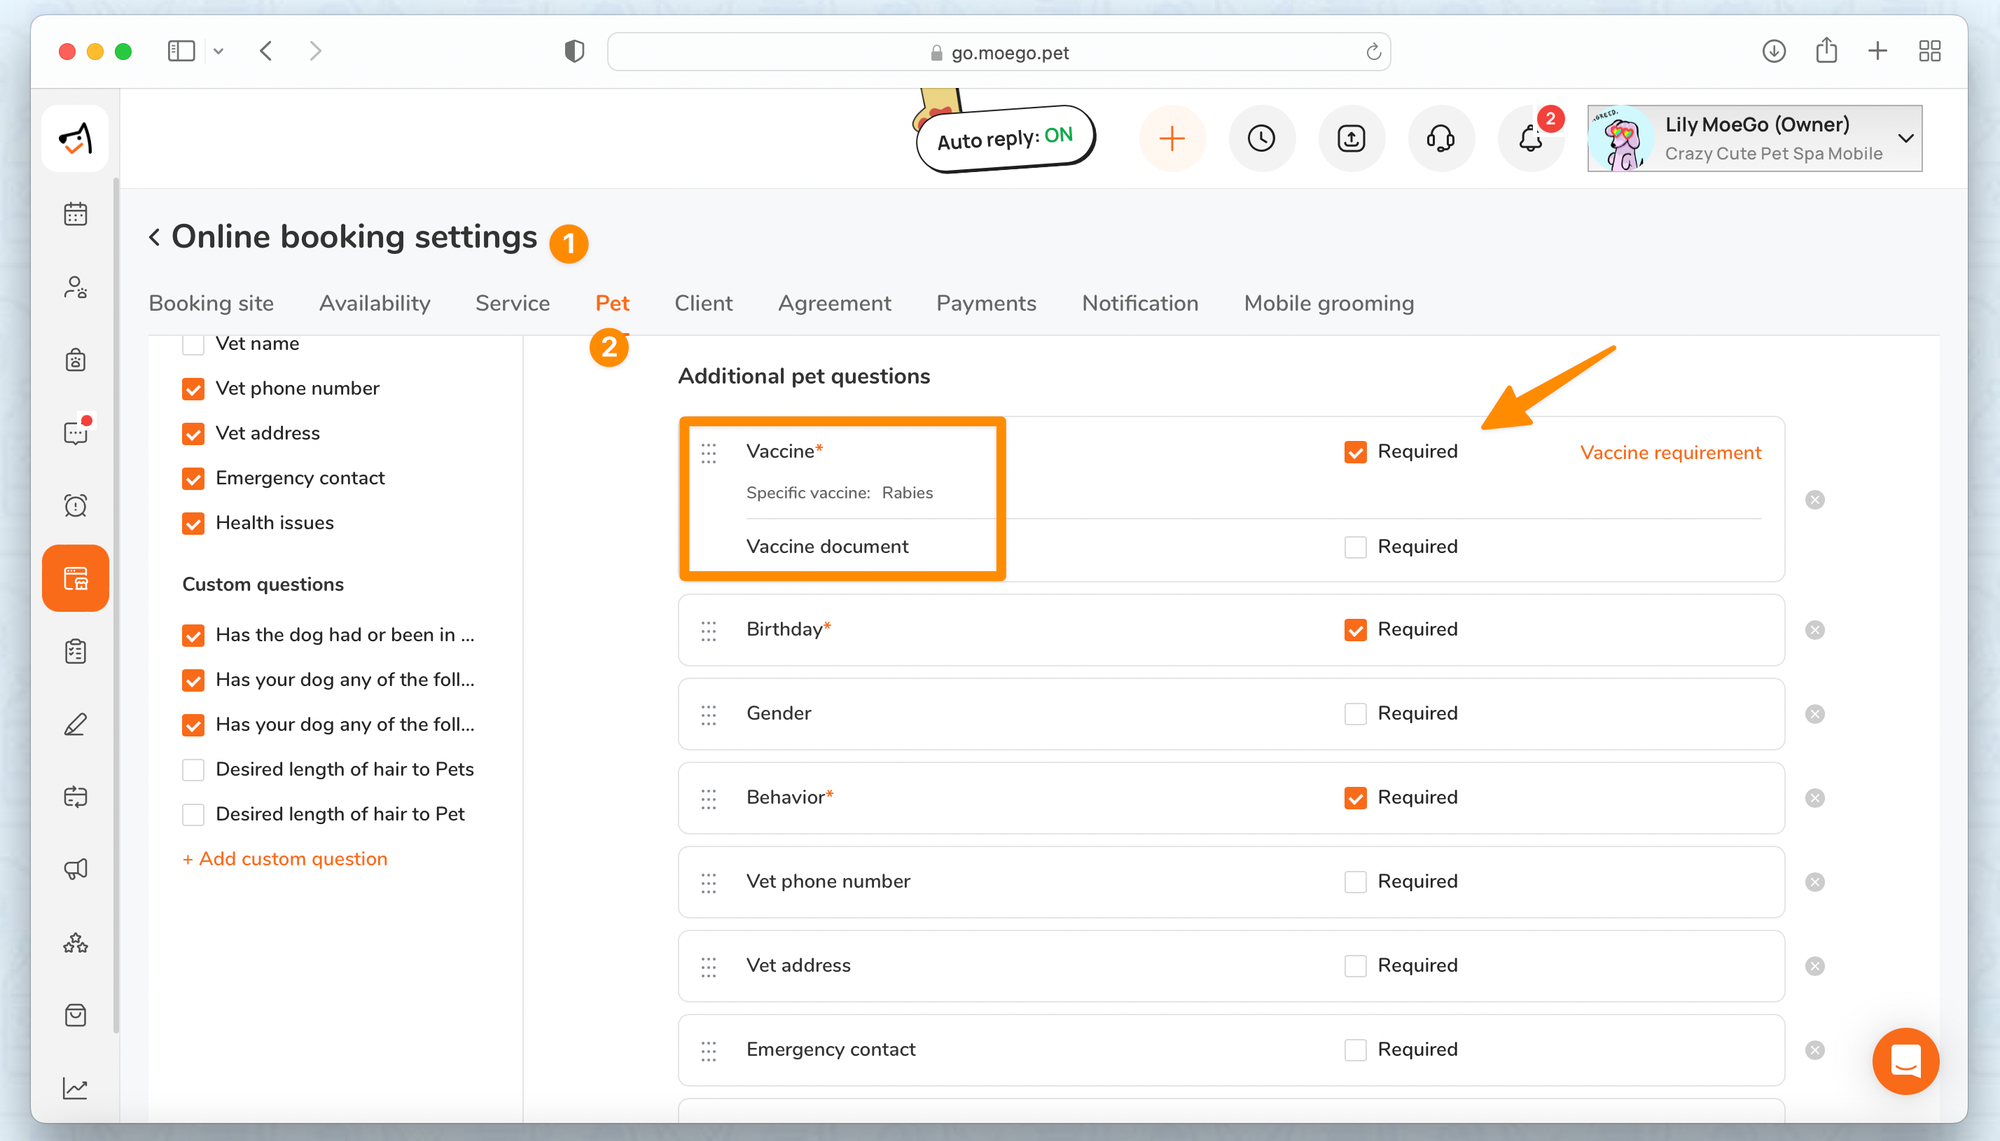
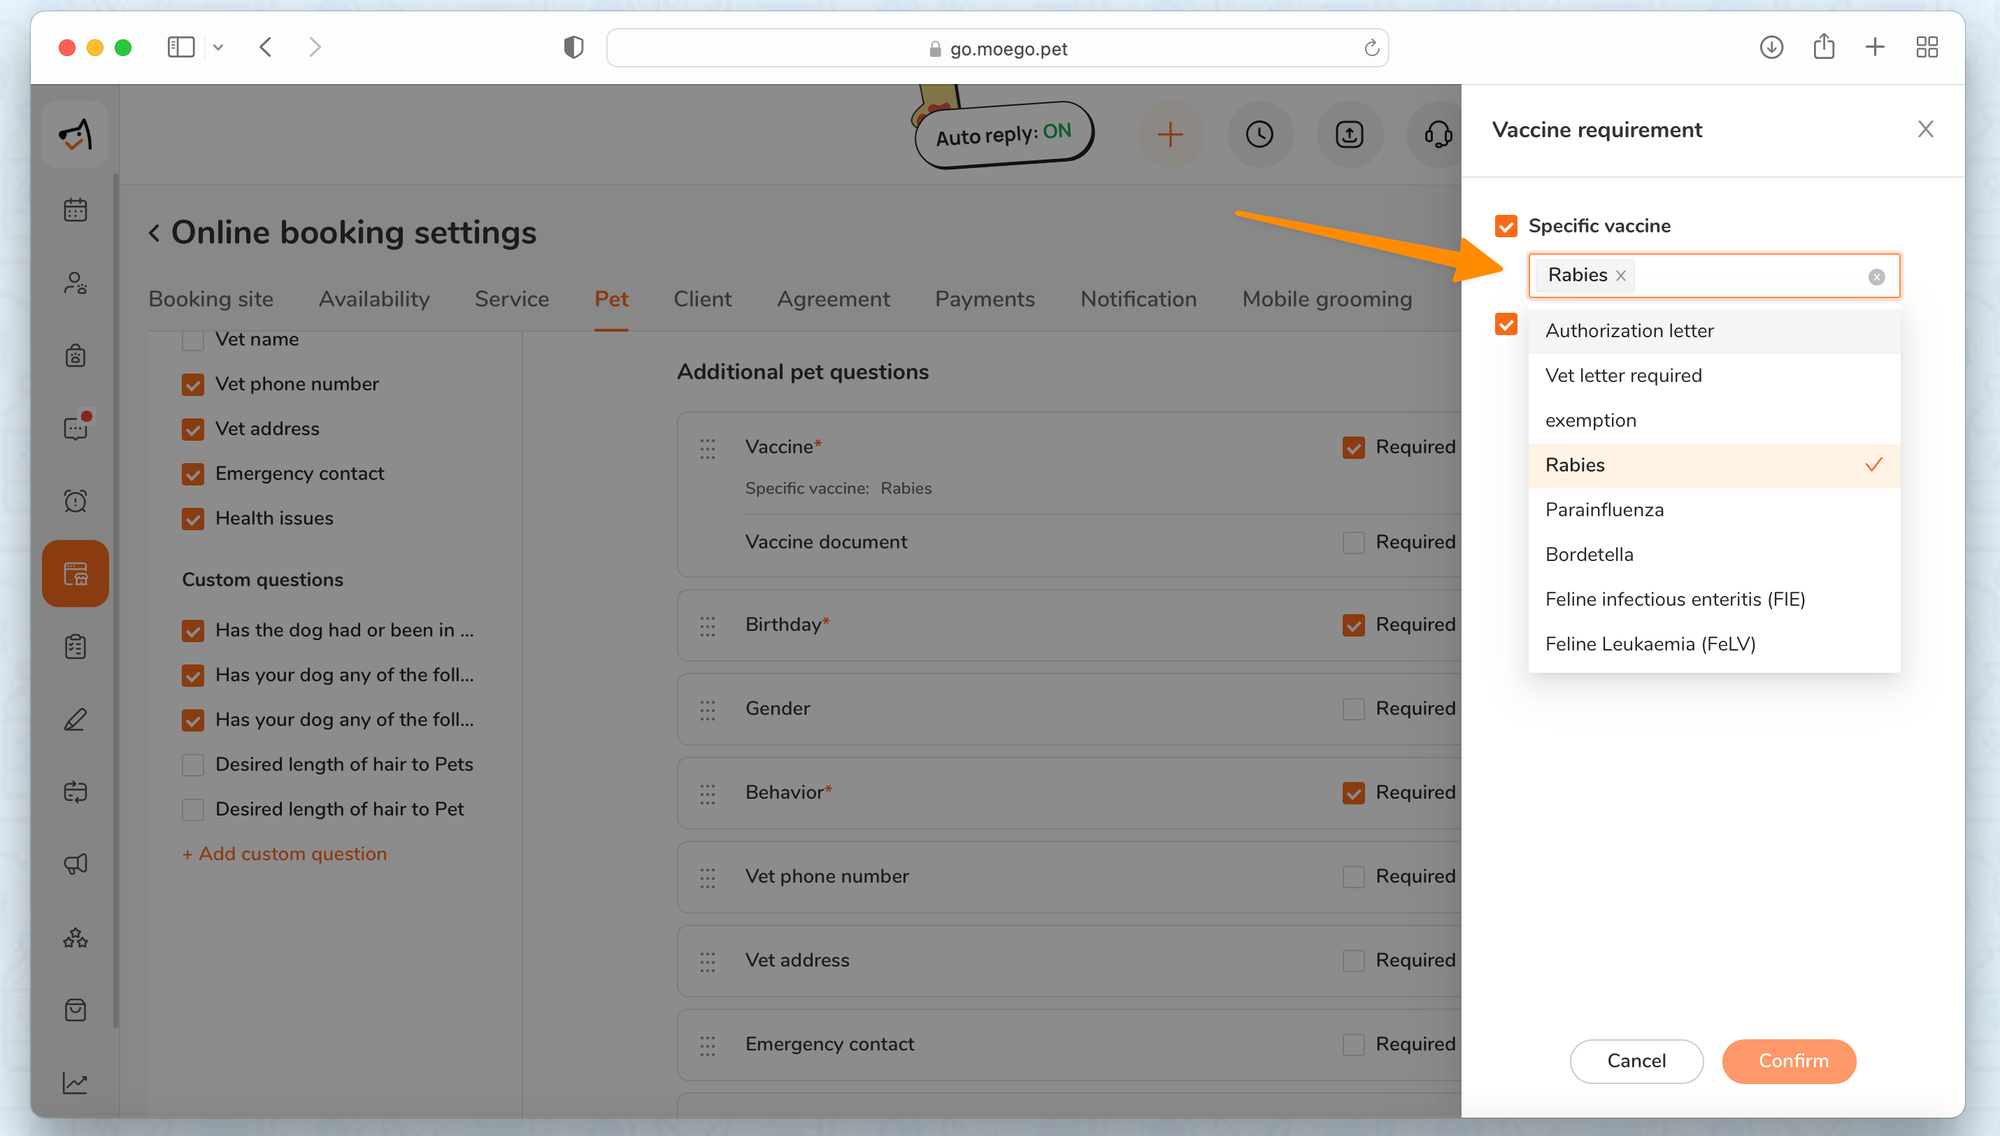
Step 5: Answer booking questions for pets and pet parents
In diverse business situations, the information you'll need to gather during the online booking process can vary widely. Whether it's vaccine records, grooming preferences, or health-related notes for your furry clients, MoeGo's adaptable booking system enables you to tailor your questionnaires to suit the unique needs of both pets and their owners.
- You can require specific vaccines and documents by click on <vaccine requirement>
- You can set up question as required with check mark <Required>, or only display the question but optional to answer
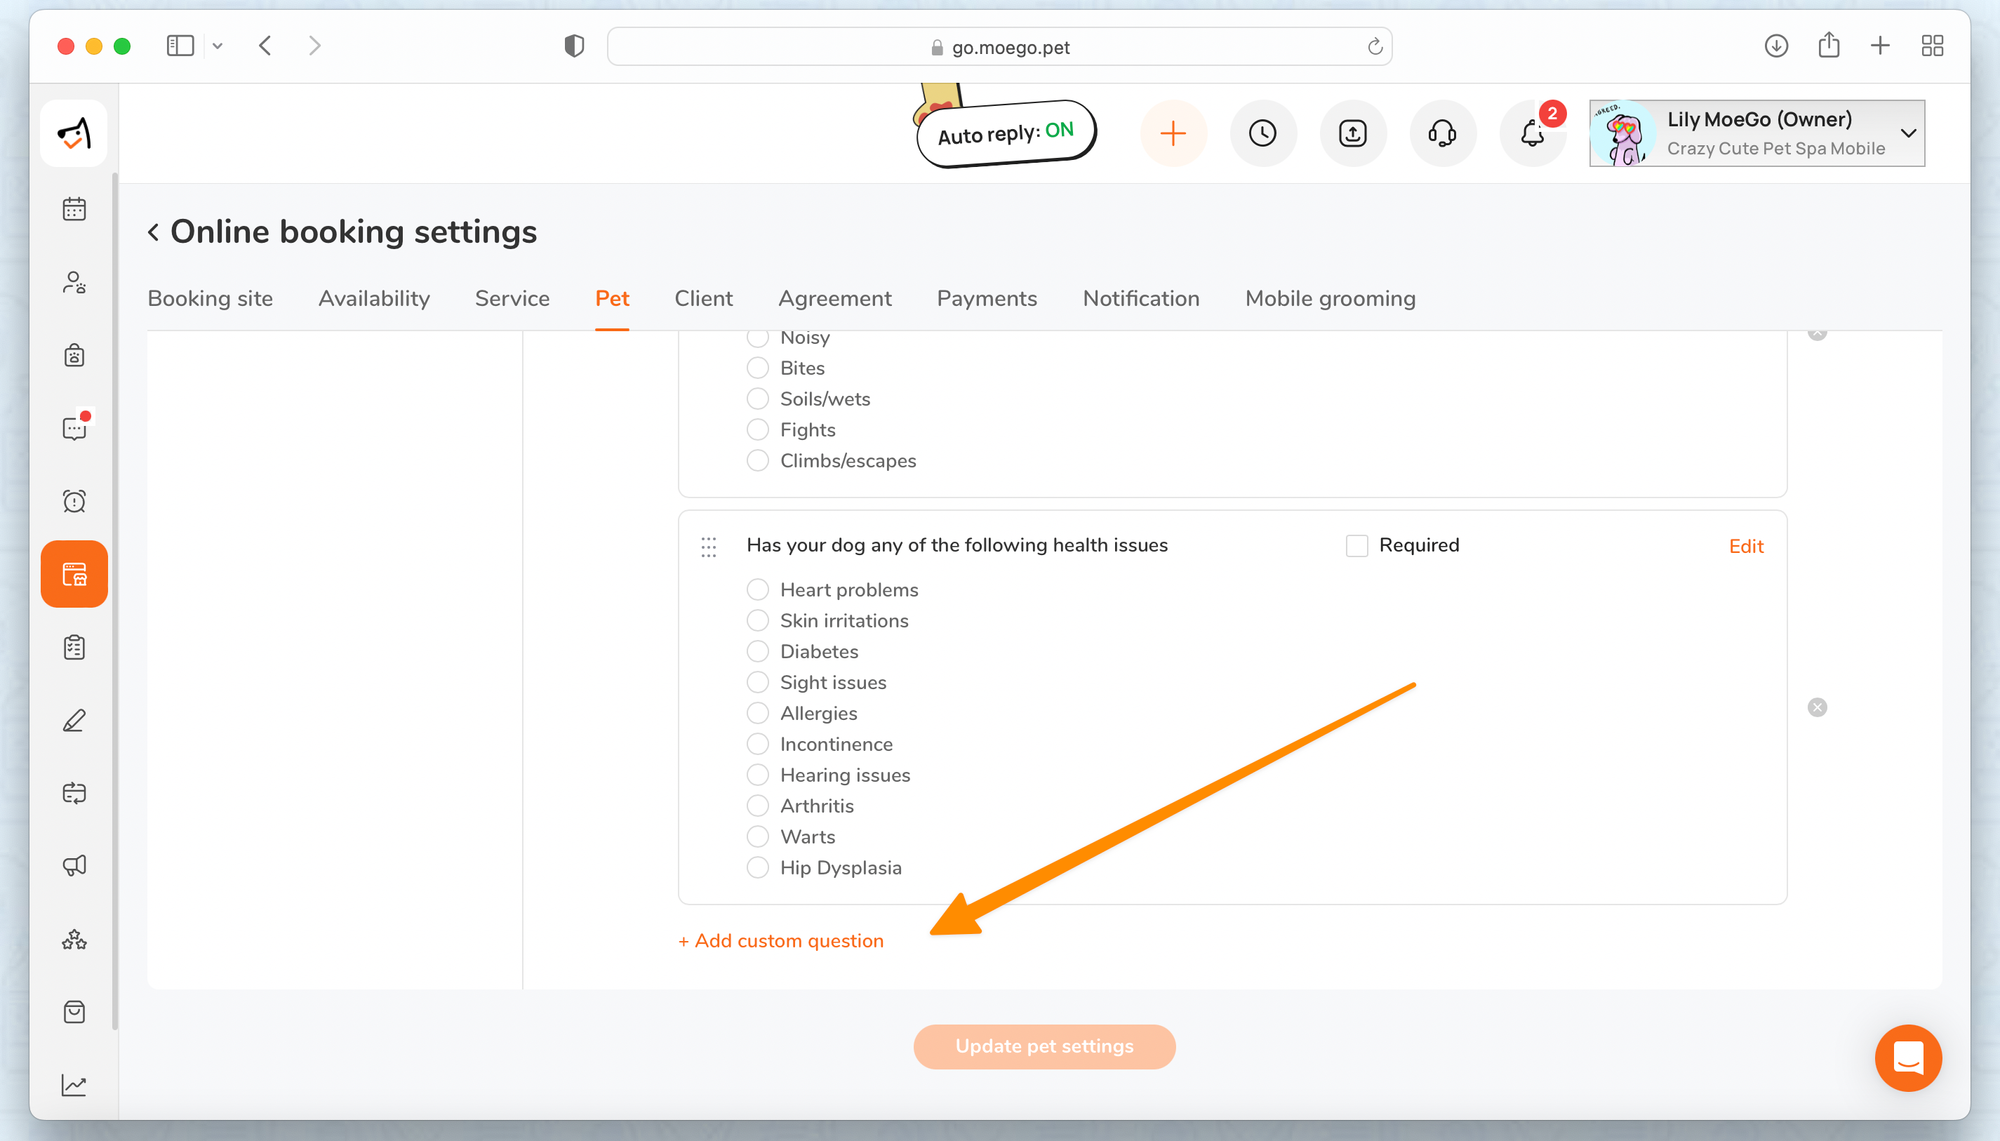
You can add more customized question, it will be stored in the Pet notes in client's profile.
Step 6: Signing Agreements
Check the guide for Agreement signature required for online booking to learn how to request customers to sign agreements (such as no-show agreements, service agreements, or model releases) when they book online.
For a general guide on customizing agreements, click here.
Step 7: Setting up Payment Requirements
What your customer will see depends on your settings for Payment Requirements and Customized Payment Options by Clients.
MoeGo's Online Booking system is designed to cater to the diverse needs of your business, ensuring financial security without compromising the seamless experience of your customers. To learn more about setting up Payment Requirements and Customized Payment Options by Clients in Online Booking, visit this guide.
Adding a card to a client's file is one of the methods to protect your revenue in cases of last-minute cancellations or no-shows. It also streamlines the payment process, making transactions swift, secure, and hassle-free. To seamlessly integrate saved cards during the booking process, allowing your customers to breeze through reservations without the hassle of re-entering payment details, follow these steps: Save cards during the booking process.
Additional Steps
Checking for outdated information for existing customers
Existing customers who want to share updates can edit existing pet information during the booking process. The system automatically checks for expired or missing vaccine records, prompting clients to update them if necessary. Click Client update information during Online Booking to learn how your clients can update their information during the booking process to keep your records accurate and up-to-date.
Enabling Online Bookings
Once you have completed the setup process, go to Online Bookings > Settings > Enabling online booking to make your online site live.

Online Booking Settings on MoeGo App
You can access some of the Online Booking Settings from your MoeGo App by following these steps:
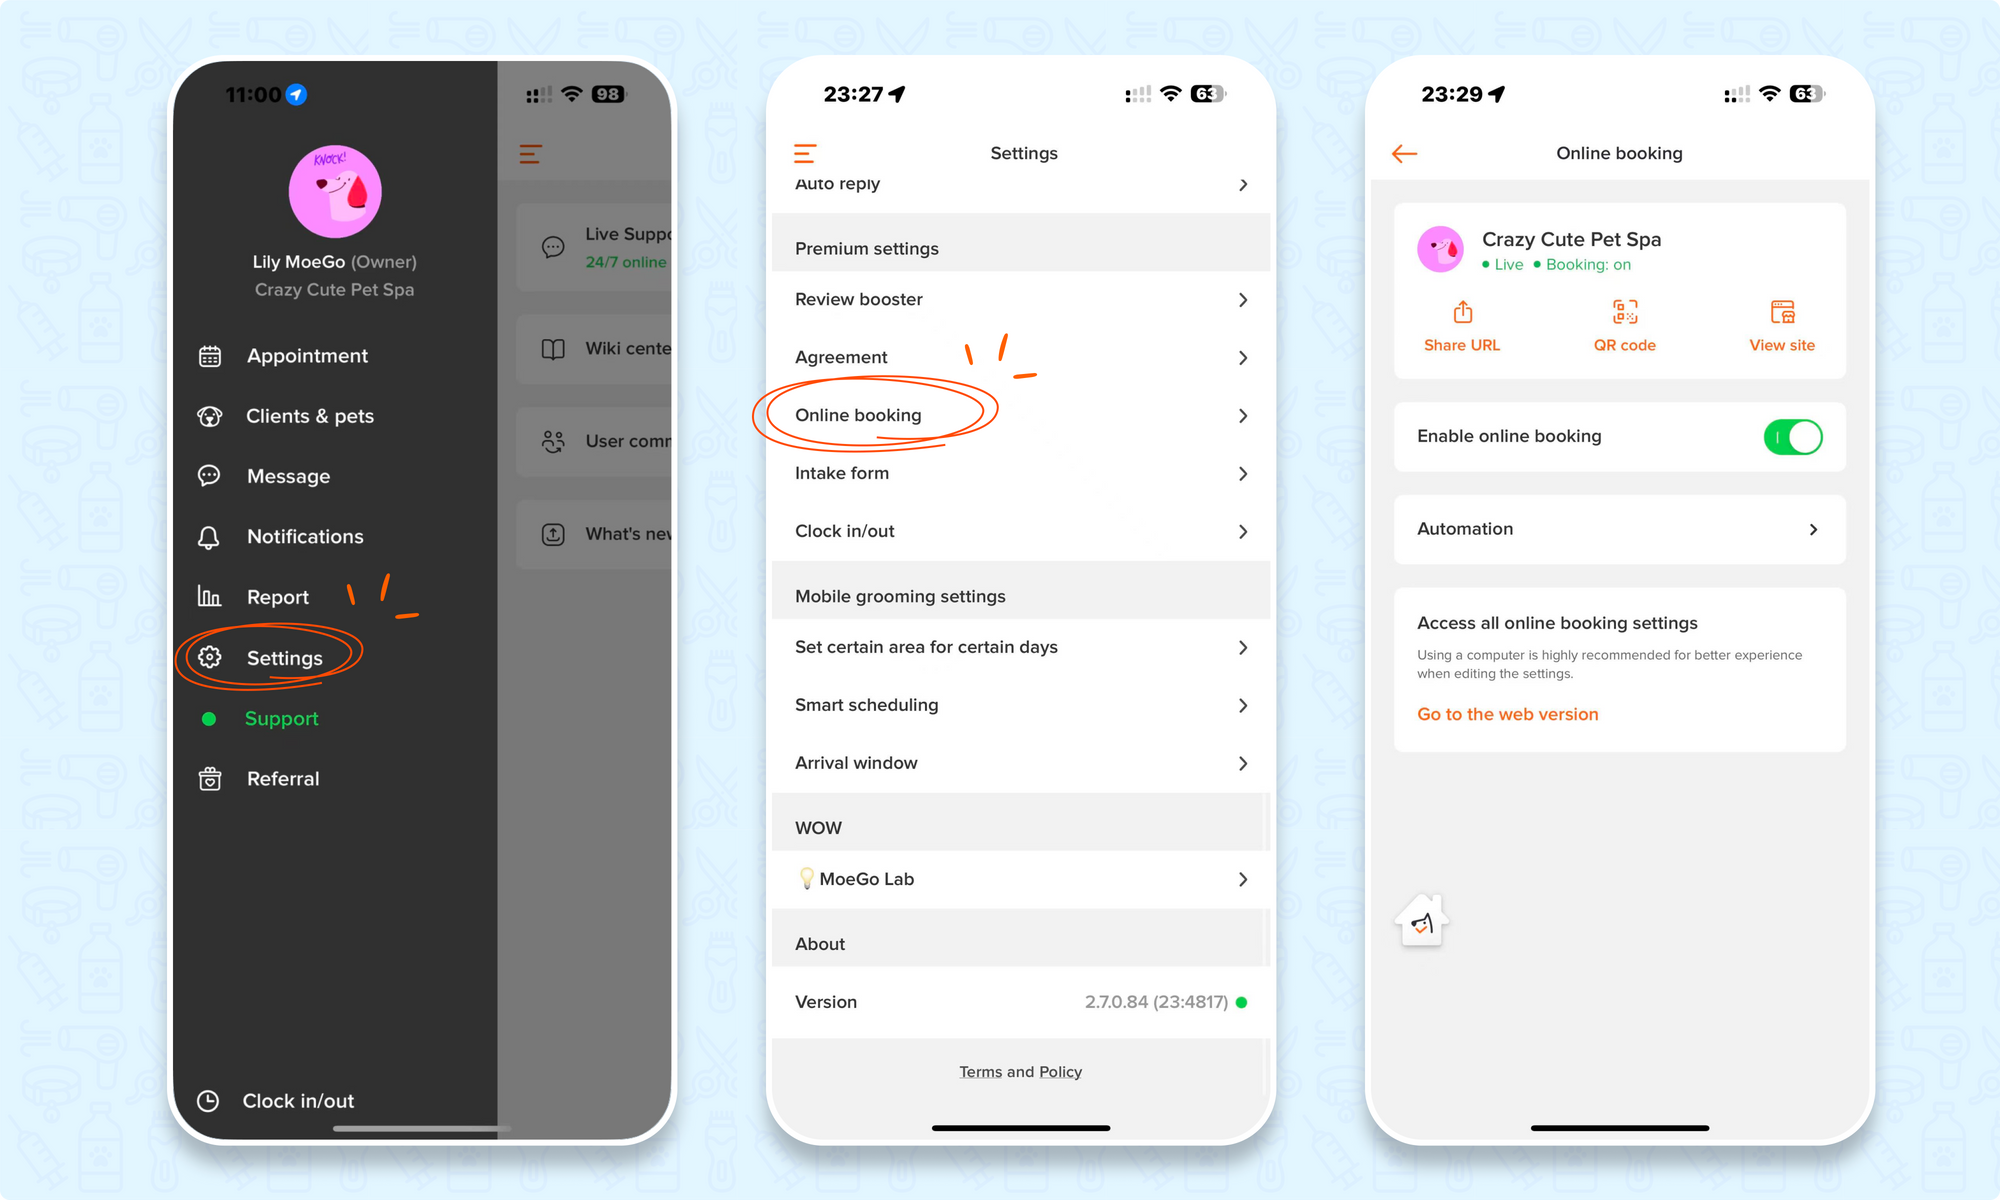
- Click on Settings > Online bookings.
- From there, you can:
- Share your Online Booking site directly through your phone by clicking on < Share URL >.
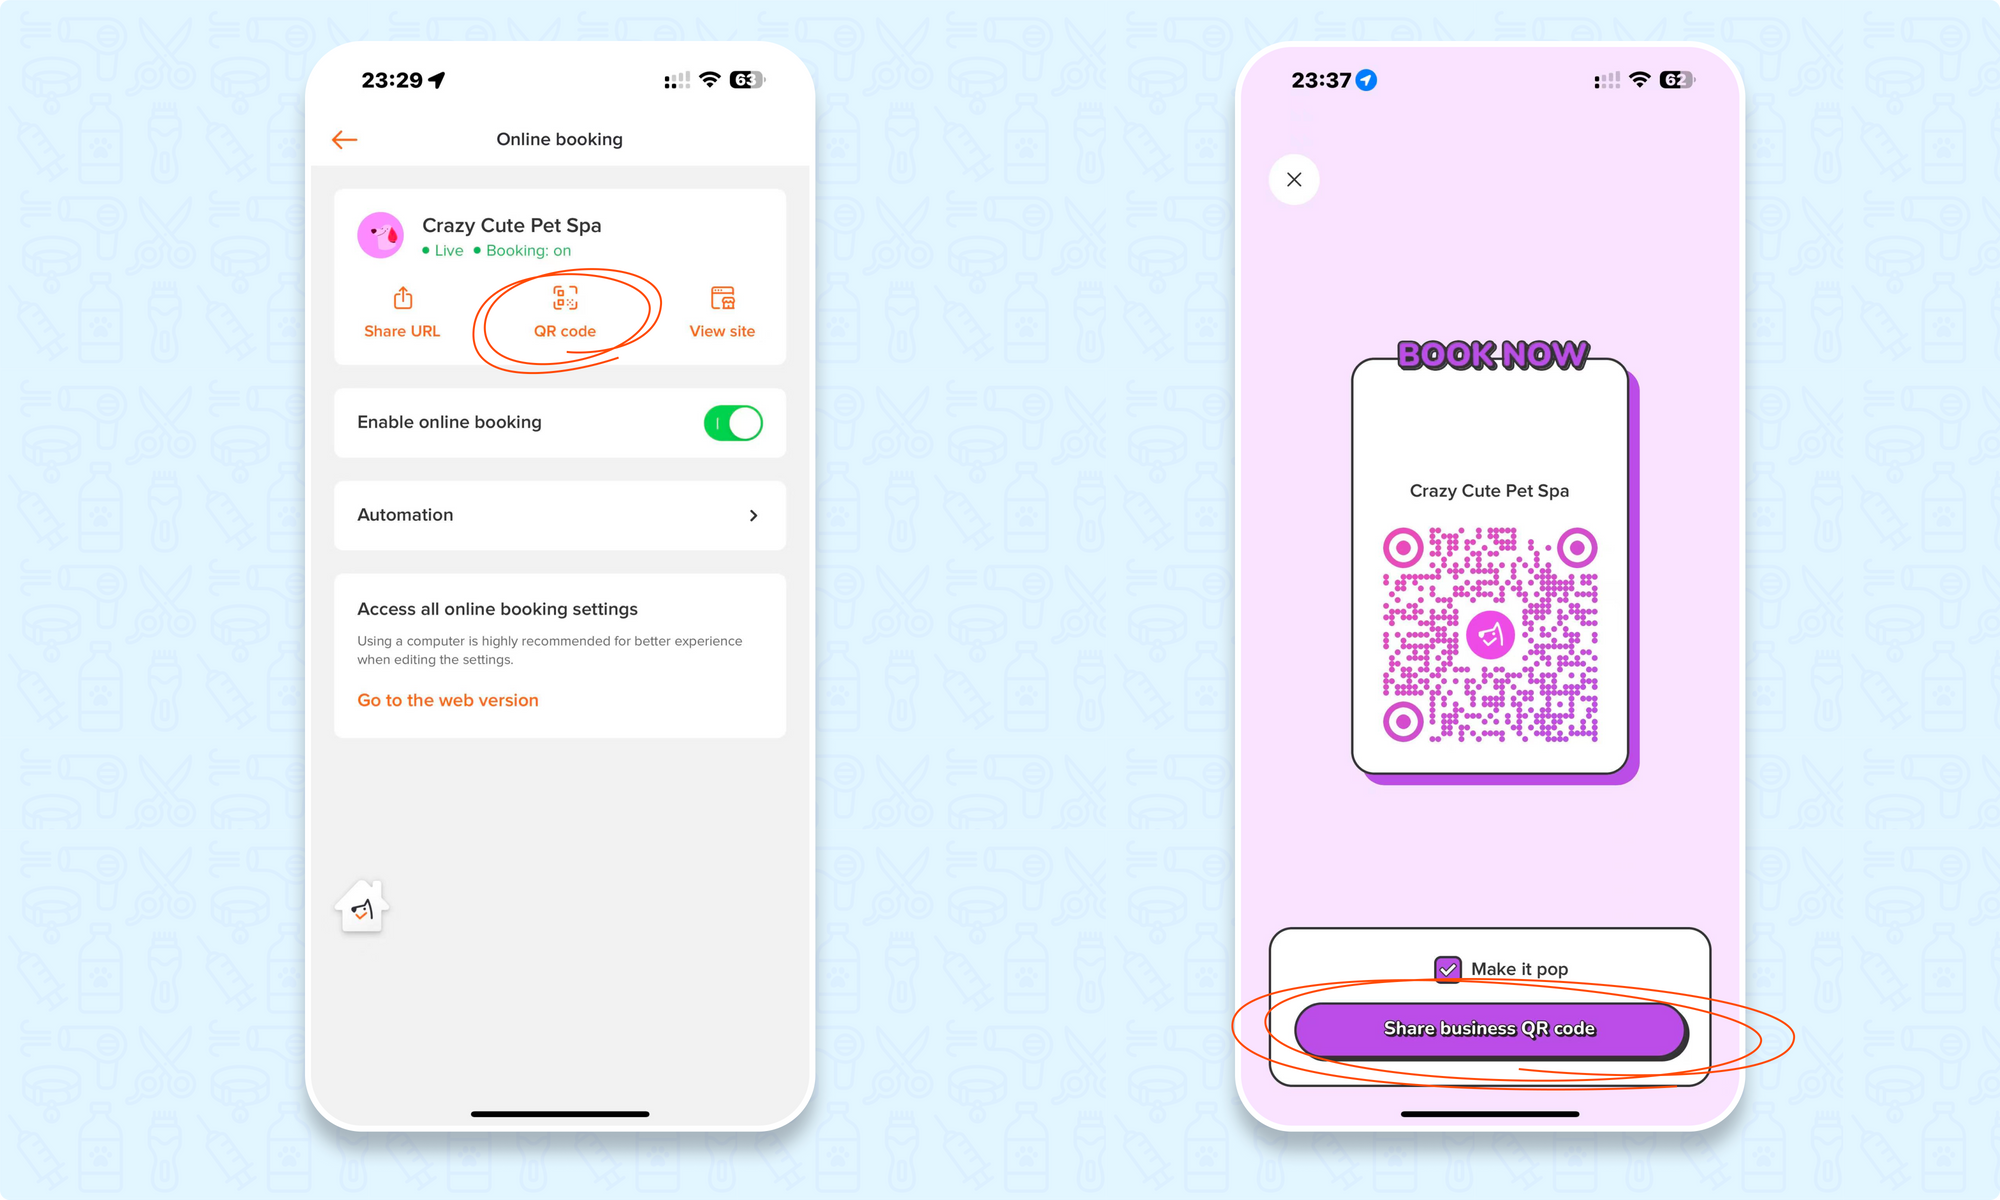
- Save the QR code to your album for your Online Booking Site by clicking on < QR code > and < Share business QR code >.
- Enable or disable your Online Booking site.
- Configure automation settings. For a comprehensive explanation of the different automatic workflows available to handle booking requests, click here.
To access all online booking settings, we recommend using the desktop version of MoeGo.
3. Managing Online Booking Requests
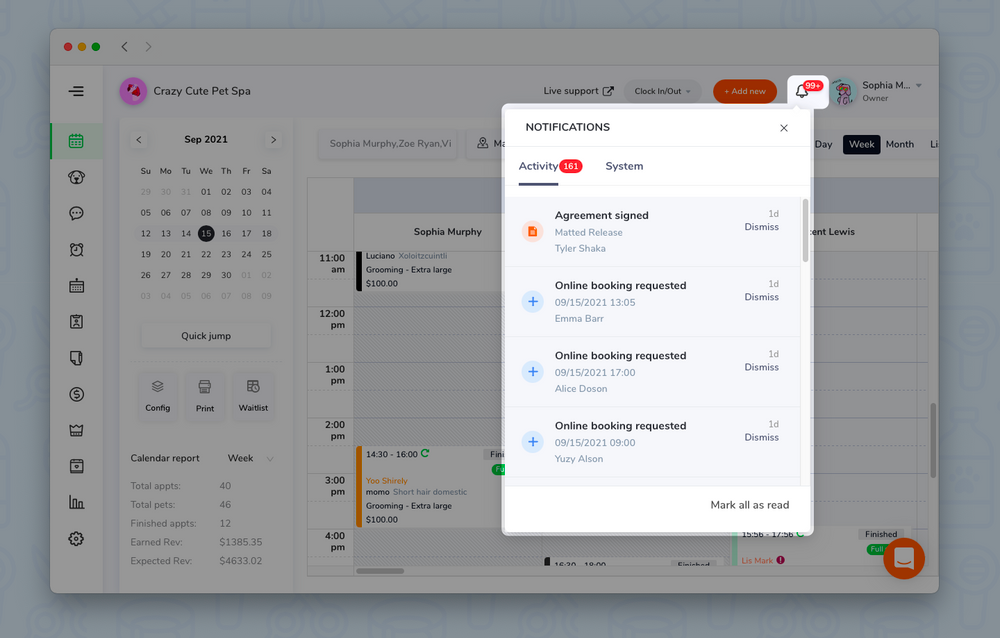
Notifications
Whenever a customer books you through our online booking system, you can always receive a notification and never miss any booking. See Online booking notifications about how to set up and where to view those notifications.
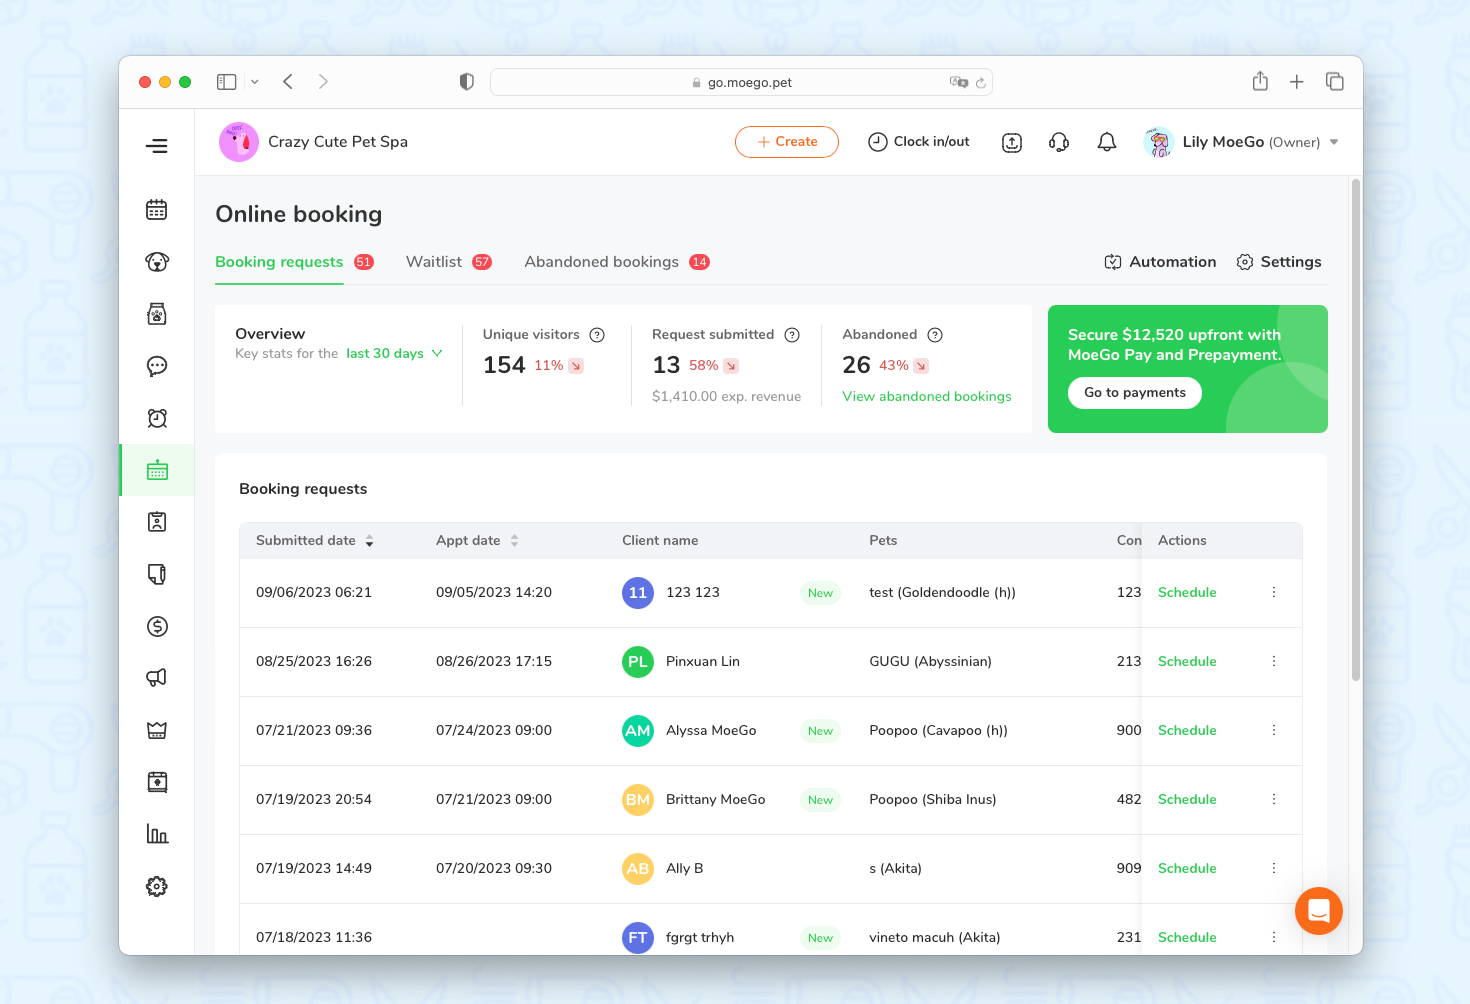
Dashboard for requests and waitlists
All of your booking requests and waitlist information will be displayed on your dashboard. Here is a guide on how to check your online booking reports and use the automatic workflow to manage booking requests with ease: Online Booking Dashboard.
Approve, decline, or move requests to the waitlist
When clients successfully submit a booking request from your online booking page, you have the option to approve, decline, or move the request to the waitlist. You can refer to this guide for more information on how to handle your online booking requests: Online Booking Request
Using Automation to approve, decline, or move requests to the waitlist
MoeGo provides you with Automation settings that allow you to automate the workflow for handling booking requests. This eliminates the hassle of manual request management. For a detailed explanation of the various automatic workflows available for handling booking requests, click here.
Abandoned Booking List
MoeGo provides you with the opportunity to recover unsuccessful booking attempts made by customers who visited your booking site, for various reasons. You can turn these abandoned bookings into successful ones, by checking the MoeGo Abandoned Booking List. This allows you to view your abandoned clients, reach out to them to schedule appointments, track your recovery performance regularly, identify trends, and optimize strategies to enhance booking recovery over time.
4. Online Booking Integrations
MoeGo is equipped with several third-party tools to enhance the booking management process, making it smoother and more efficient.
Google Analytics Integration
Monitor and evaluate your online booking performance through Google Analytics. See Google Analytics Integration Guide .
Reserve with Google
Being the first platform in the pet industry to offer this integration, our collaboration with Google provides you with the opportunity to add a "BOOK ONLINE" button to your Google Business Profile and other locations where your business appears on Google Search and Maps. When clicked, this button will redirect potential clients to your MoeGo Online Booking site, making it easier for them to schedule appointments with you.
To enable this integration, simply follow the verification steps outlined on Reserve with Google guide.
By exploring each of these sections and integrating the features into your business operations, MoeGo Online Booking aims to simplify your management tasks, enhance customer experience, and elevate your brand's online presence.