
As businesses handle appointments in their unique ways, we offer a variety of availability settings to supercharge your online booking experience. This gives you the flexibility to match your business needs and rhythm effortlessly.
💡 Please note: Setting up online booking availability is only available to set up on the desktop.
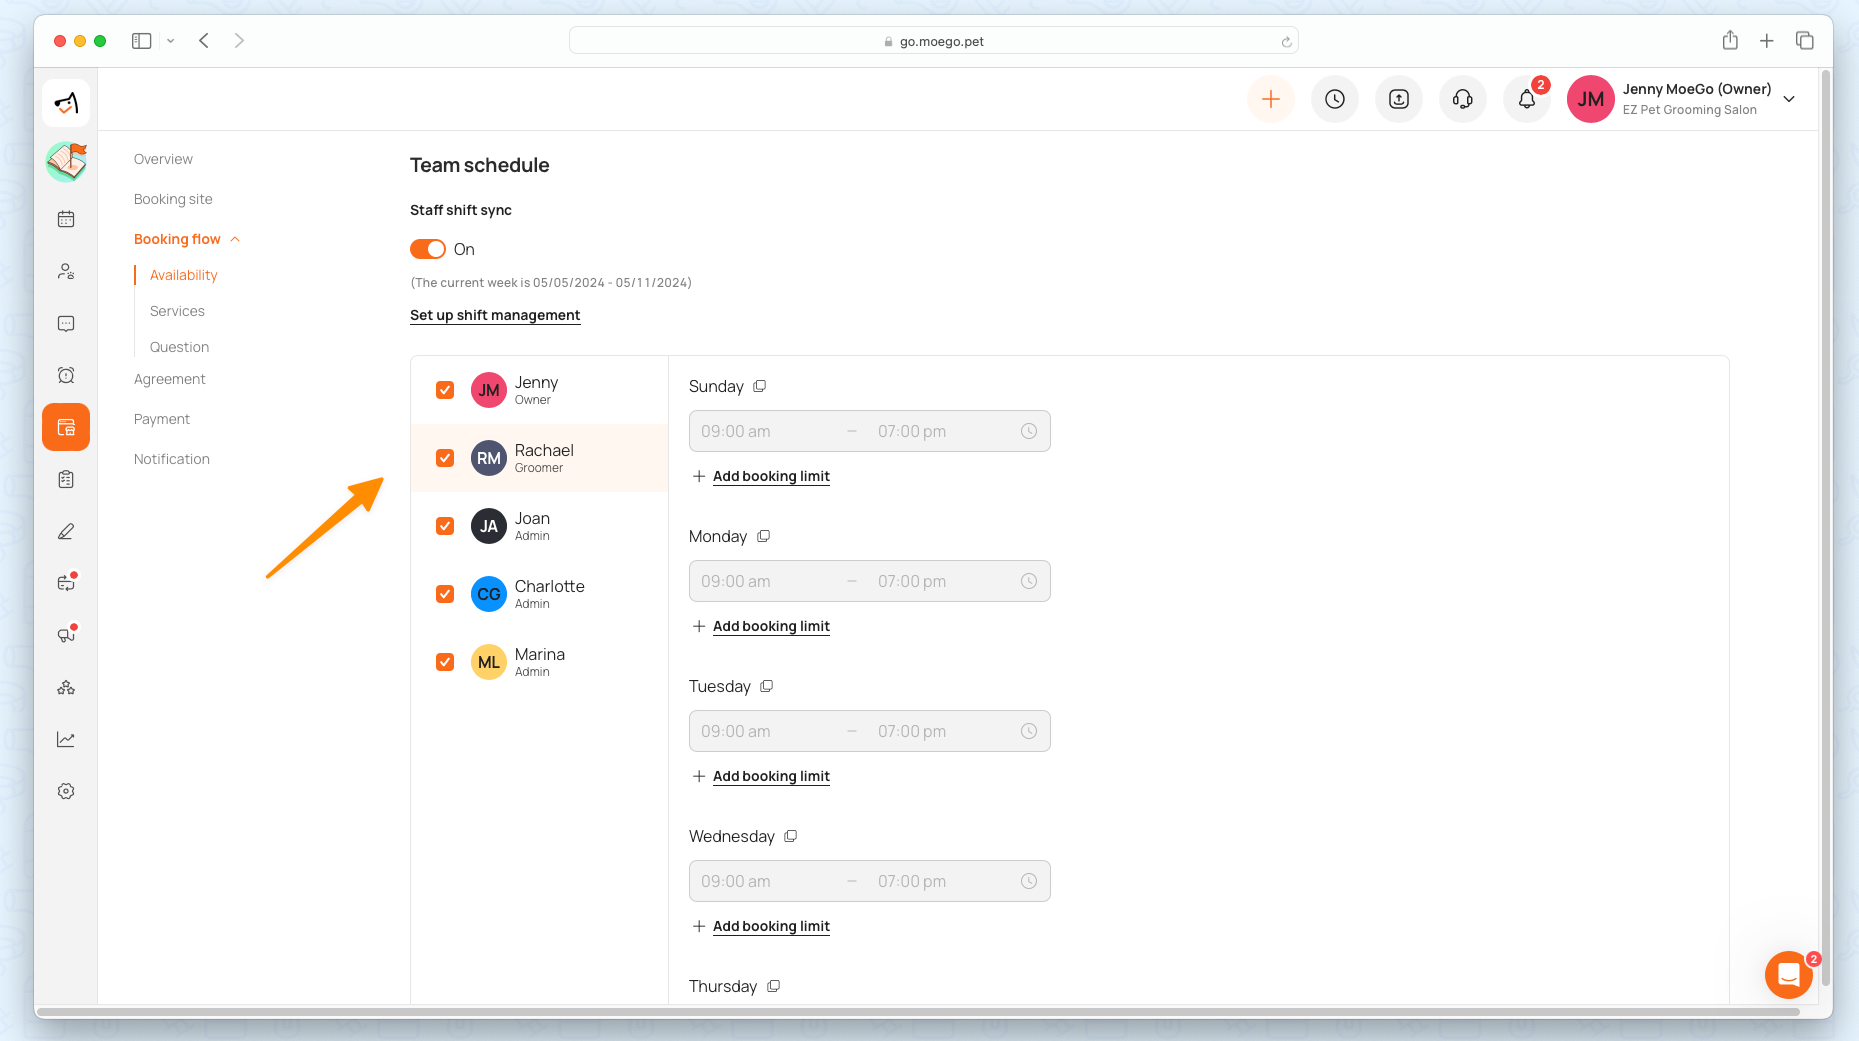
Set up available staff for Online Booking
You can enable/disable staff for Online Booking by checking or unchecking the checkbox before the staff’s names. When the staff is disabled for online booking, clients will not see the option for the disabled staff on the booking page.
Disable staff from online booking
By default, all staff shown on the calendar are available for online booking. To disable staff from being able to be booked online, simply:
- Go to Online Booking > Settings> Availability.
- Click on the checkbox before the staff names.
- The staff is now disabled from online booking.
Availability Type 1: By working hours
Say goodbye to overlapping and double-booked appointments
💡Note: By-working-hour type is available for both salon and mobile businesses.
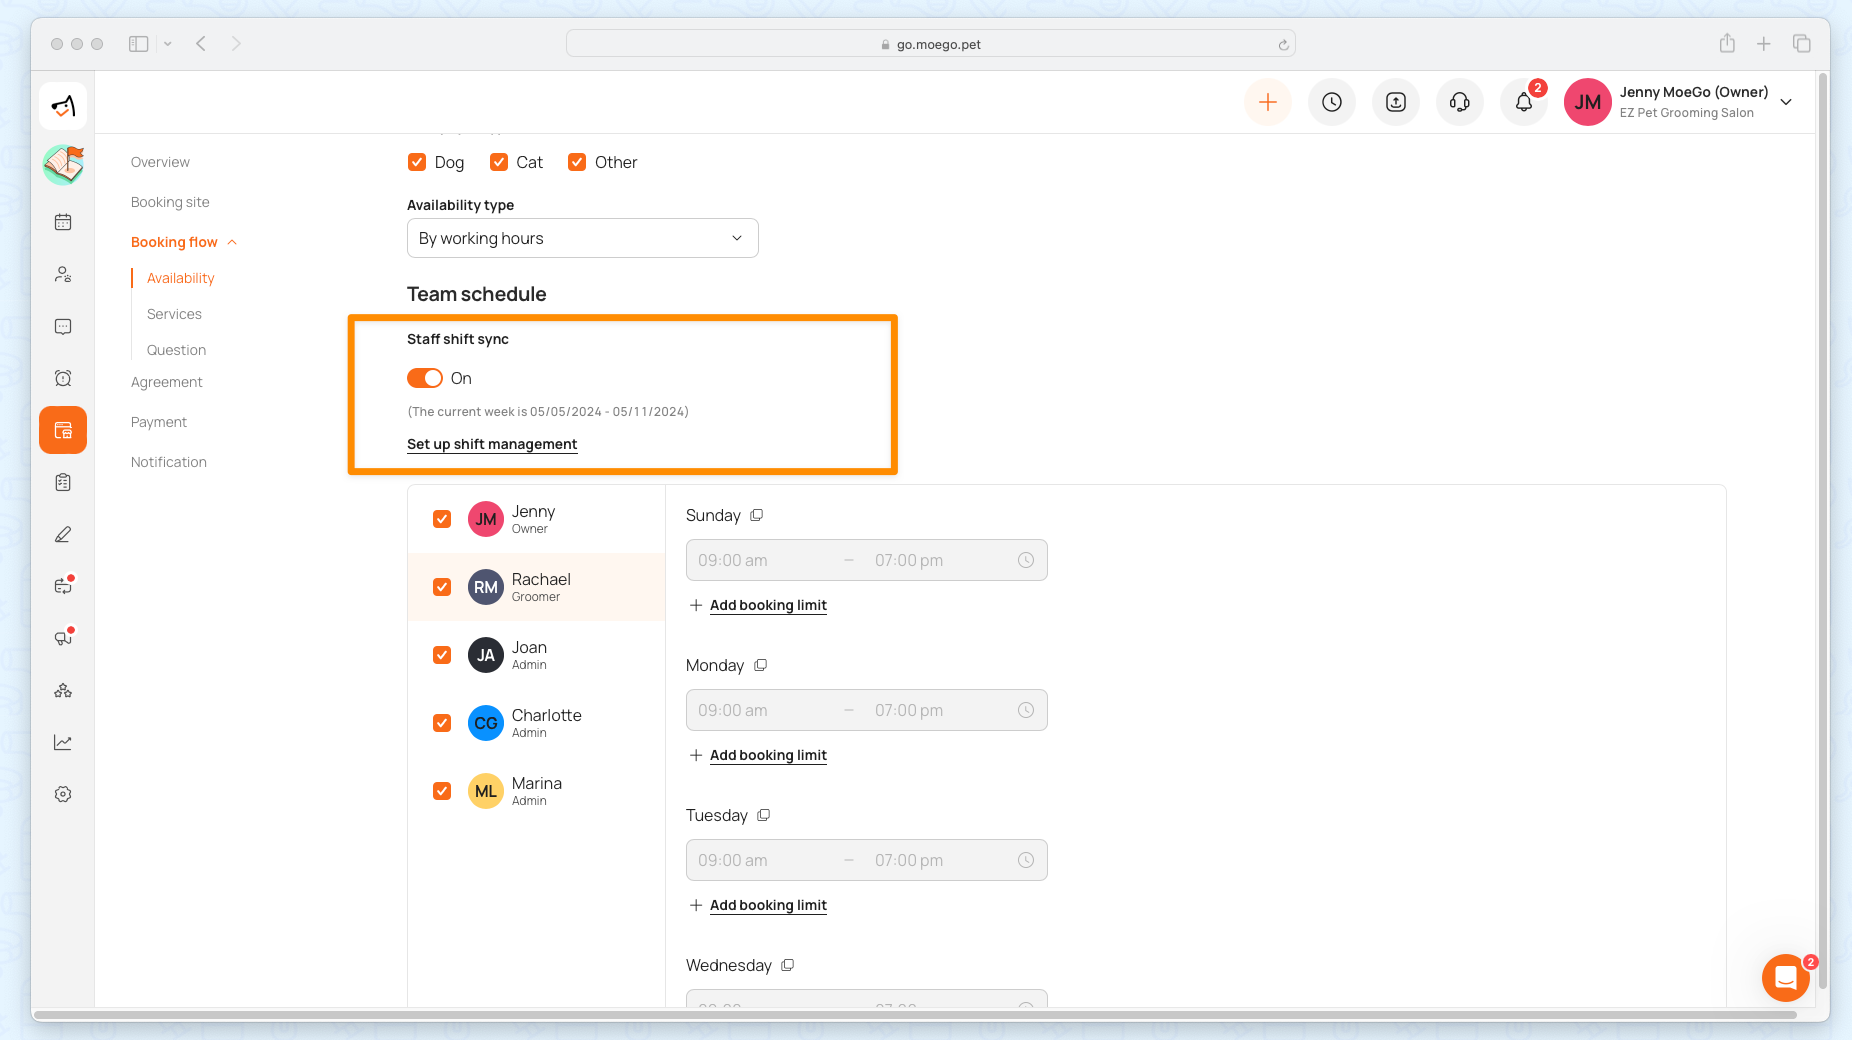
Option 1: Sync to shift management
You can sync up your staff's working hours with your online booking schedule. Click here to know more about shift management.
- Go to Online Booking > Settings > Availability
- Select < By working hour > in the Availability type
- Toggle < Staff shift Sync > to sync to the staff’s working hour
- Click on < Set up shift management > to quickly jump to set it up
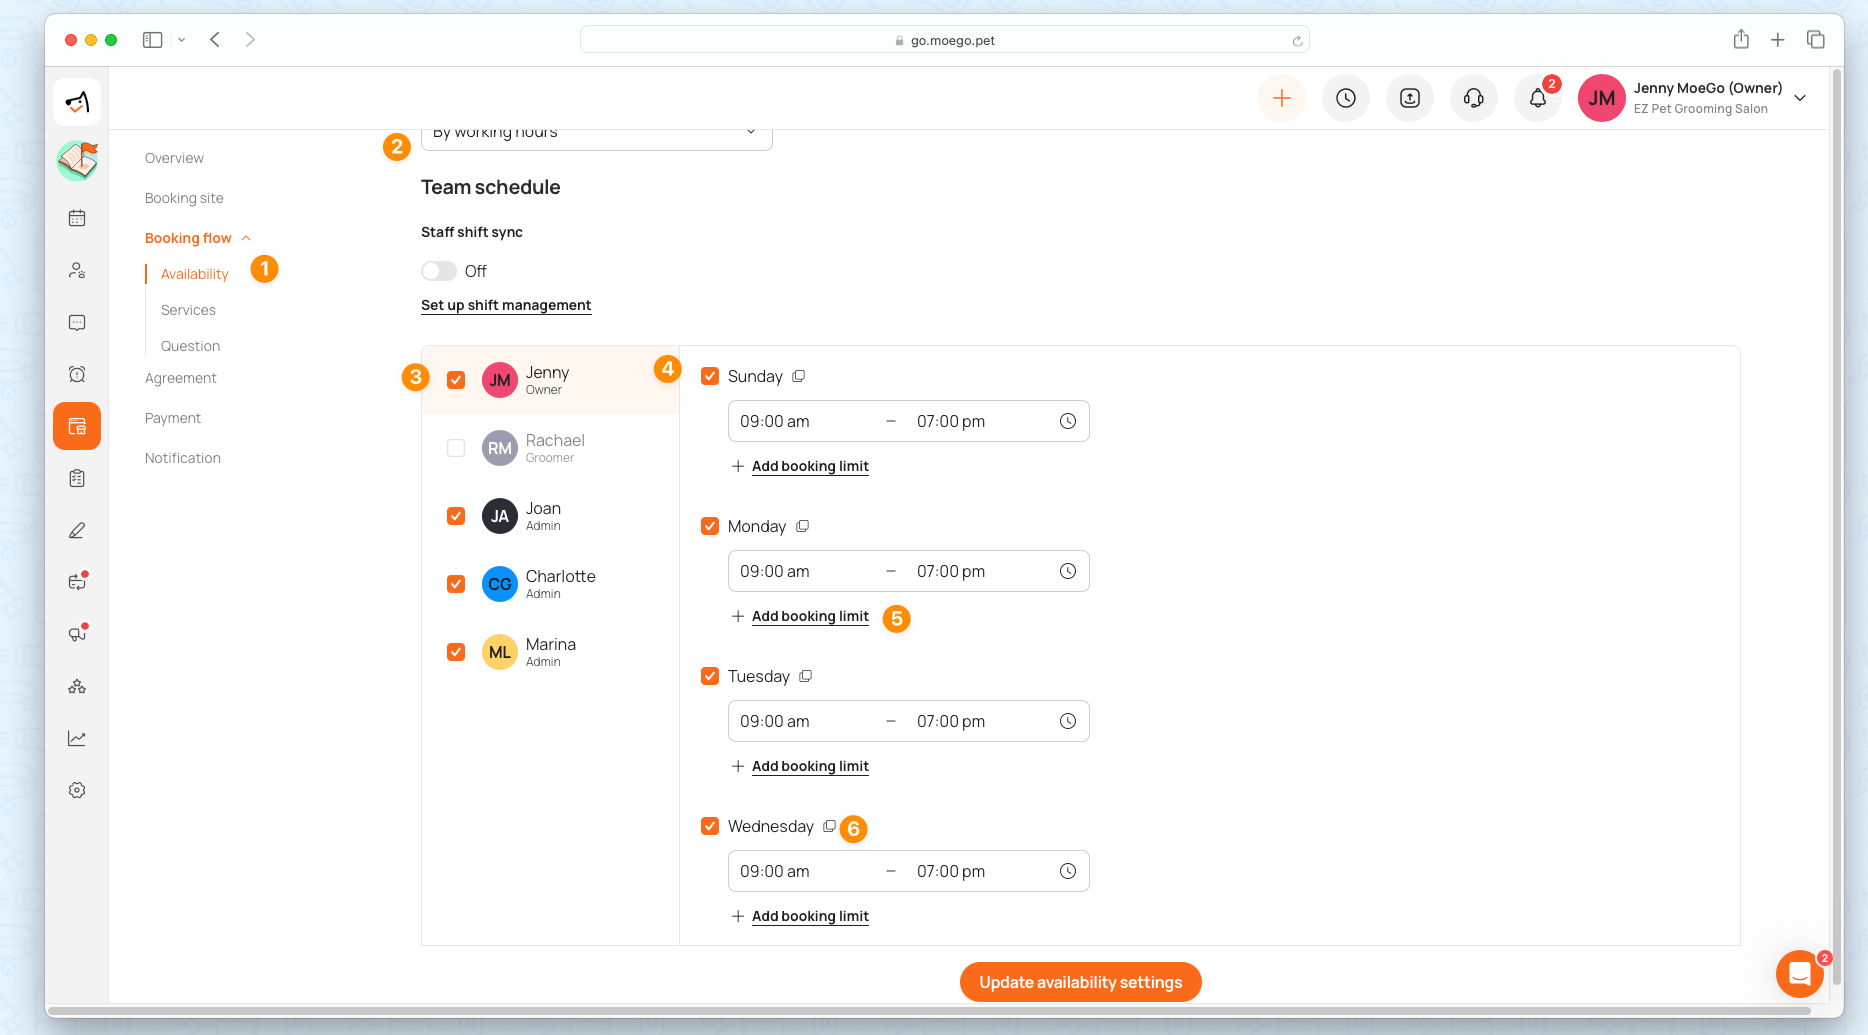
Option 2: Manually set up the staff availability
- Go to Online Booking > Settings > Availability
- Select < By working hour > in the Availability type
- Select the < Staff member >
- Click on the checkbox before the day of the week to enable the staff for online availability that day and set up the available hours for online booking
- < De-select the day > to disable the staff's availability for online booking that day
- Add a booking limit by selecting < + Add booking limit > (optional )
- Click on the < duplicate icon > before the day to < copy time and limit > to any day of the week (optional)
Date and time preference settings
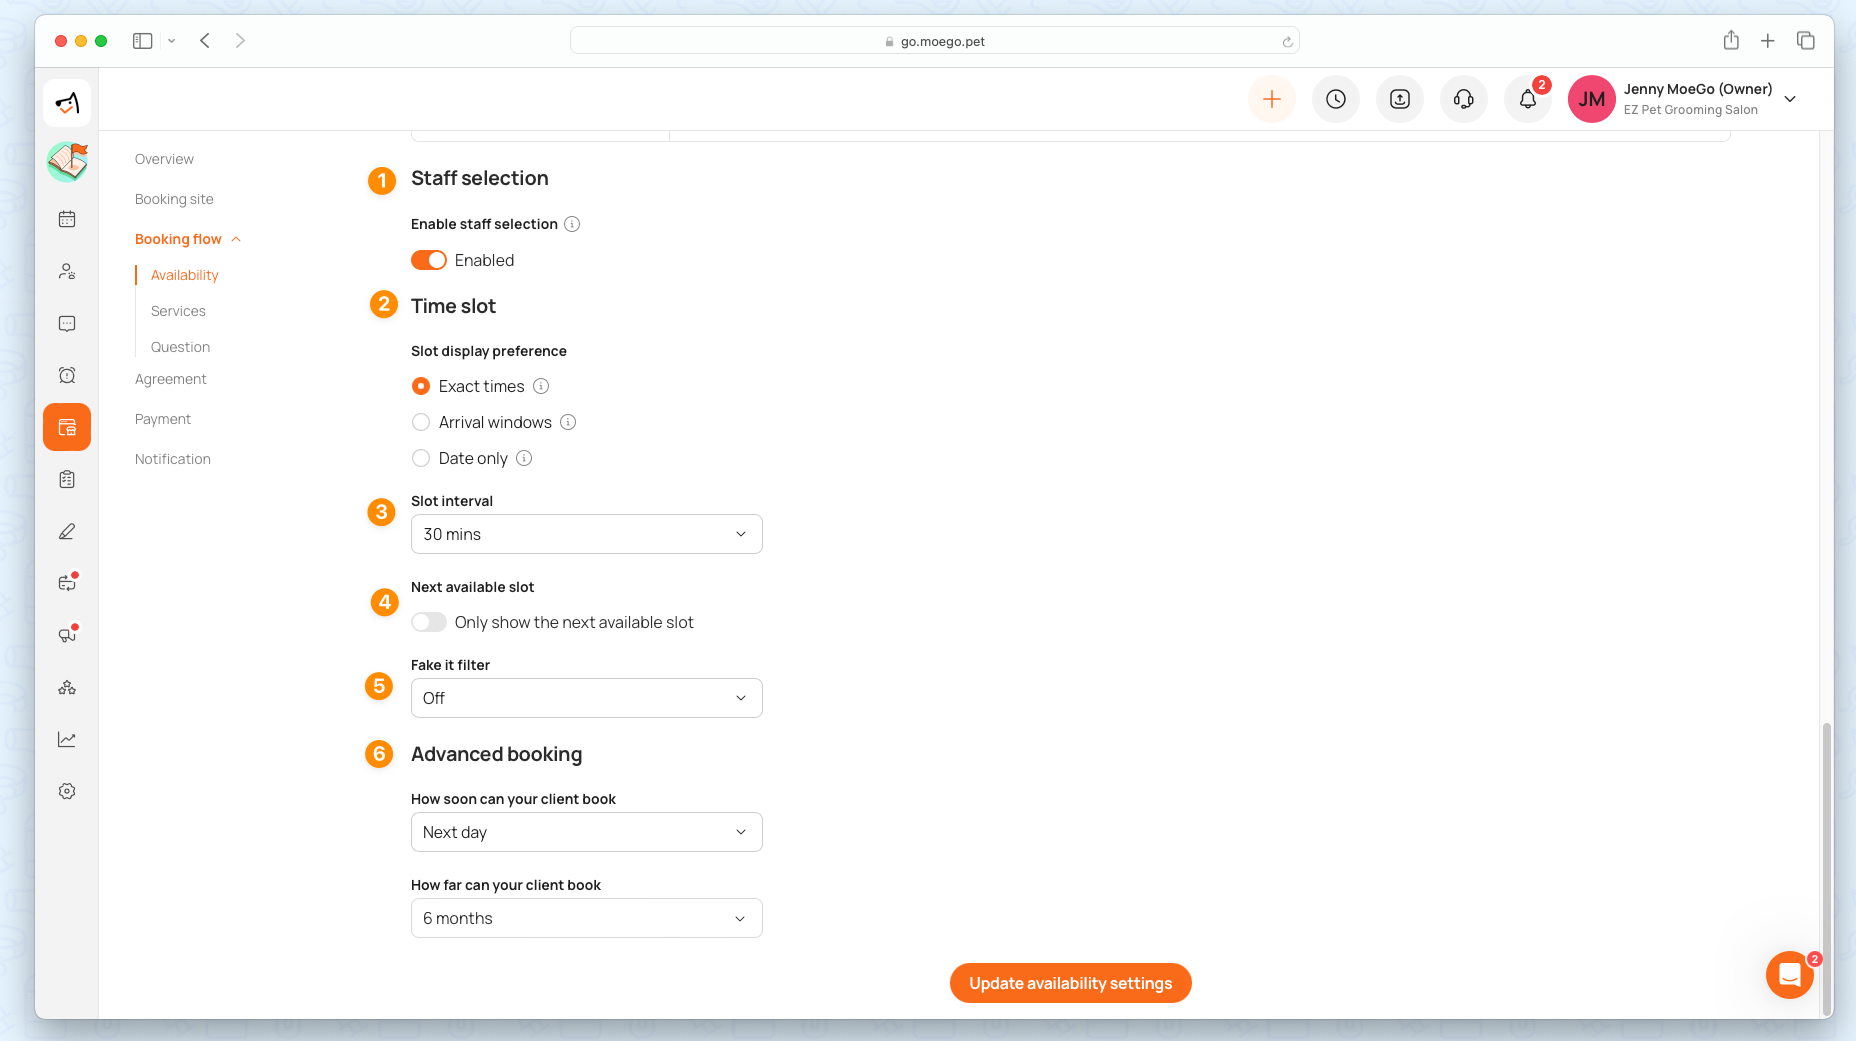
- Staff Selection: Select the < toggle > to enable or disable the staff selection option
- 💡 Please note: Once toggled off, clients can’t choose staff when booking online. The system will auto-assign available staff to pending requests, but clients will not be notified. You can re-assign them when accepting requests and notify clients as needed.
- Time slots - display preference: Select between three configuration options for time slot preferences.
- Exact times: Provide your start time exactly and accurately
- Arrival windows: Give your estimated start time with an arrival window and configure the window to be displayed. Set buffer time intervals before and after the service start time separately. For instance, the arrival window of 15 minutes before and 30 minutes after the 11:00 AM slot will be displayed as 10:45 AM to 11:30 AM.
- Date only: The client will choose an available date without a specific time. When the request is accepted and scheduled, the notification will include the specific time details.
- Time slot - slot interval: Set the amount of time between offered time slots. This is to offer flexibility for traffic or delays. You can decide how the slots are displayed and it will show for the notification in online booking as well.
- 💡Please note: This is different from the arrival window for auto messages and reminders that will show x minutes before the start time + x minutes after the start time.
- Only show the next available slot: once toggled on, it displays only the immediate next available appointment for each staff every day, so clients can only book for the earliest slots of the day selected. This will greatly reduce gaps between appointments.
- Fake it Filter: Make your business look more "busy" so clients will be more eager to book the "remaining" slots. Set up your availability as:
- Off: Do not apply any filters to your online booking availability
- Slightly busy: We'll remove roughly 25% of your online booking availability
- Moderately busy: We'll remove roughly 40% of your online booking availability
- Extremely busy: We'll remove roughly 50% of your online booking availability
- Advanced bookings:
- How soon can your client book: The soonest time for advanced booking period allowed for your client
- How far can your client book: the maximum advance booking period allowed for your client
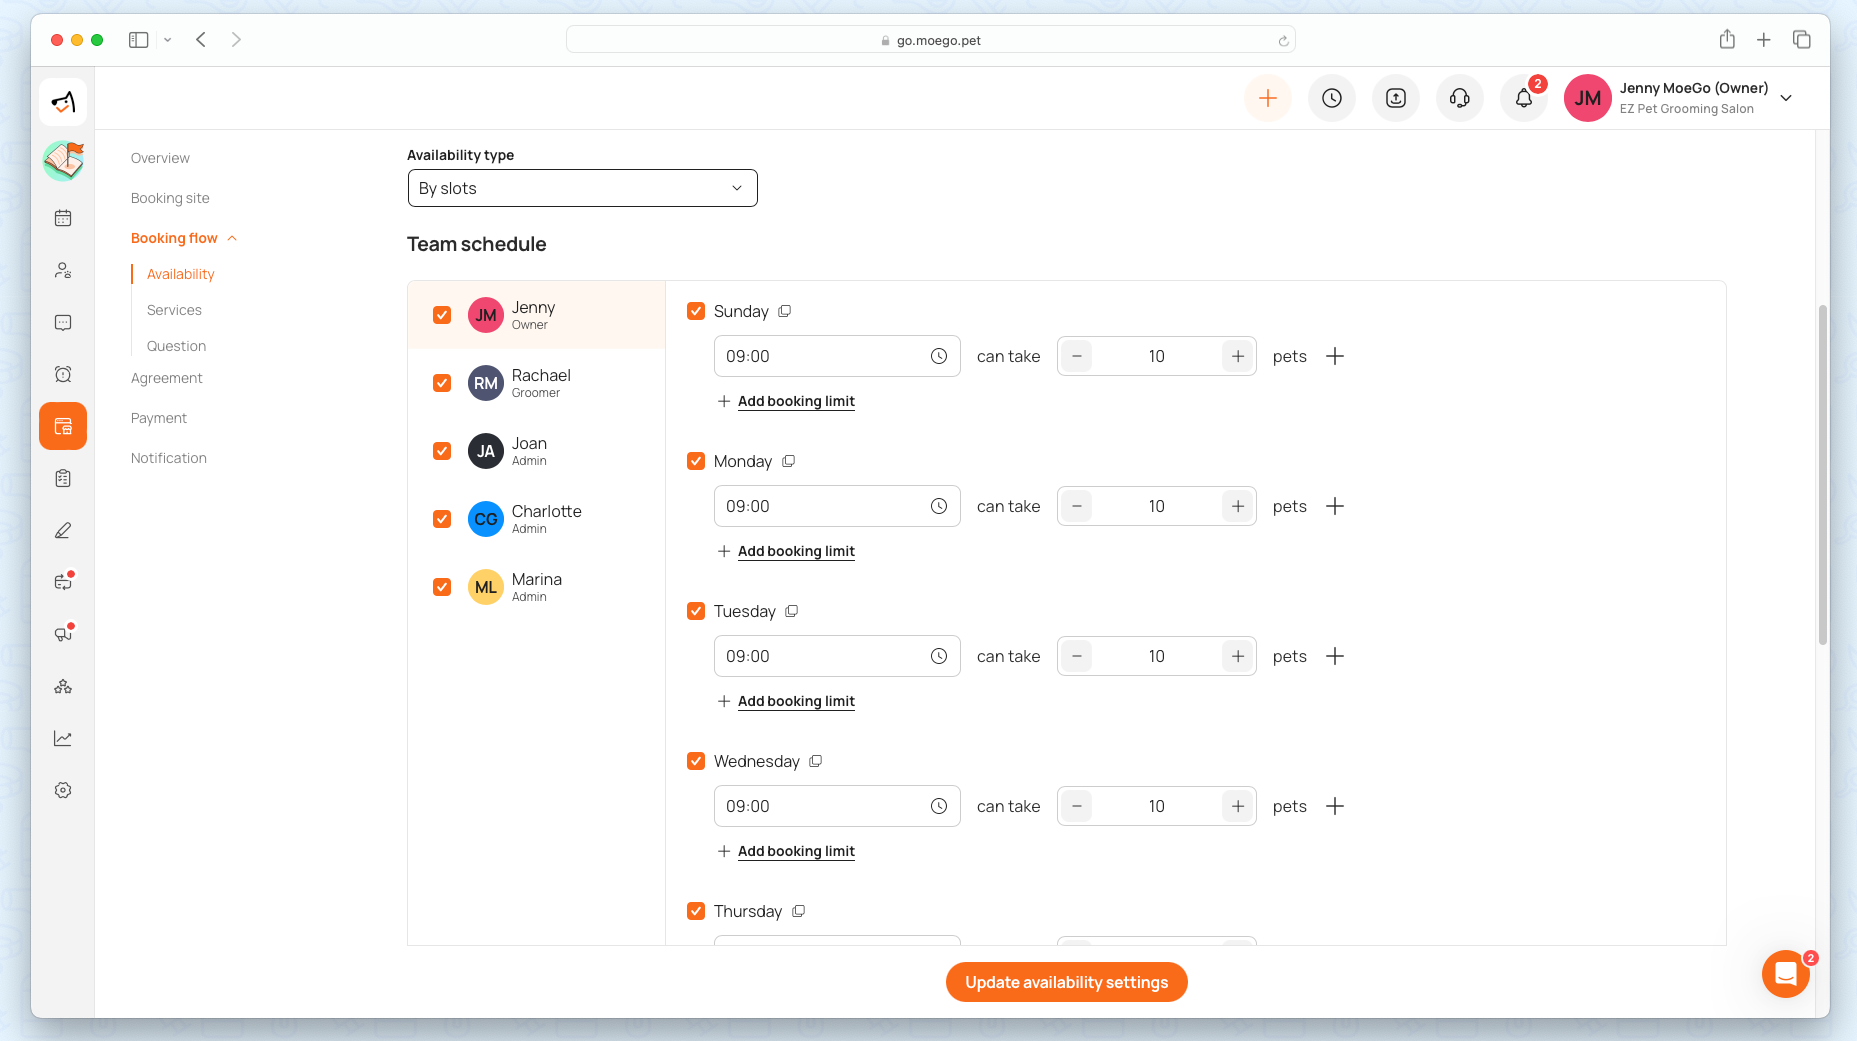
Availability Type 2: By slots
Different customers can choose the slot repeatedly up to the limit you set, even drop off in groups!
💡Note: By-slot type is available for salon businesses only.
Option 1: Sync to shift management
You can sync up your staff's slot availability with your online booking schedule. Click here to know more about shift management.
- Go to Online Booking > Settings > Availability
- Select < By slot > in the Availability type
- Toggle < Staff shift Sync > to sync
- Click on < Set up shift management > to quickly jump to set it up
Option 2: Manually set up the staff availability
- Go to Online Booking > Settings > Availability
- Select < By slots > in the Availability type
- Click on the < checkbox before the day > of the week to enable the staff for online availability that day or < De-select the day > to disable the staff's availability for online booking that day
- Working hour conflicts: the staff is not working on this day of the week, which is set up by the general working hours under the shift management. But it can still be saved with conflicts shown.
- Add a booking limit by selecting < + Add booking limit > (optional )
- Click on the < duplicate icon > before the day to < copy time and limit > to any day of the week (optional)
Date and time preferences
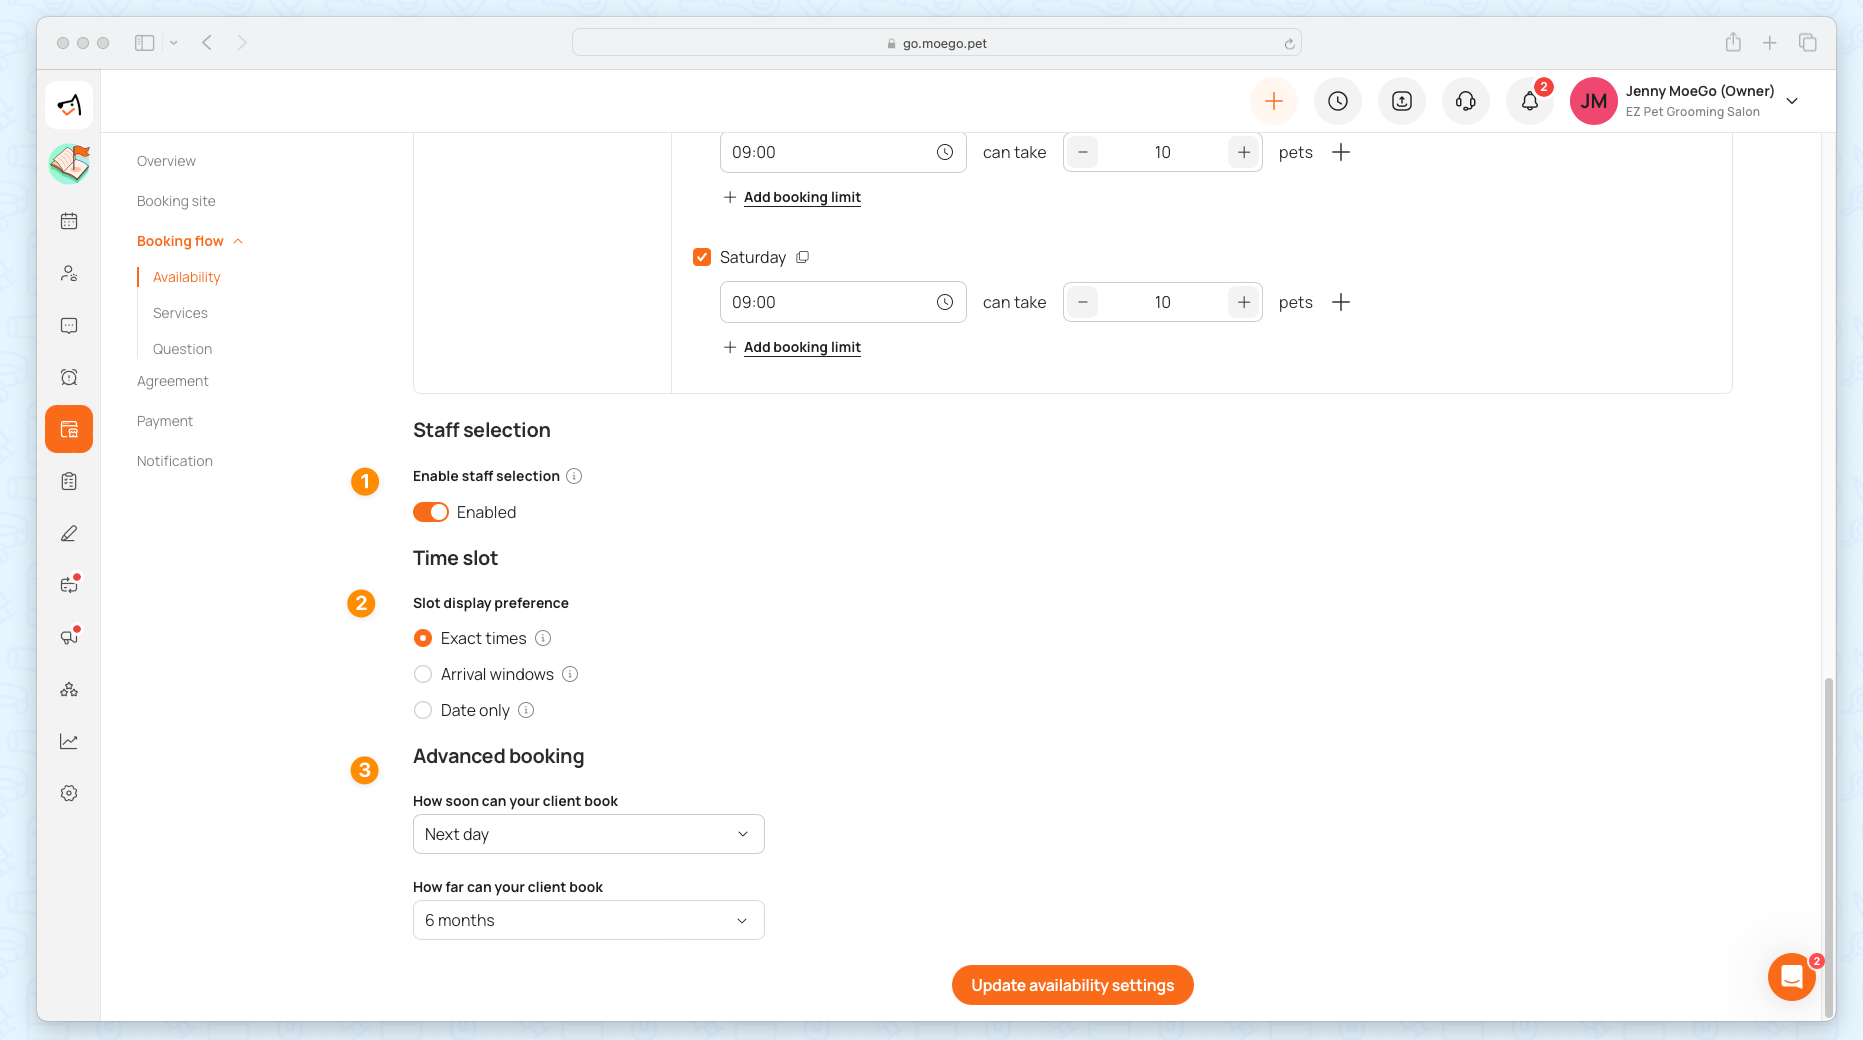
- Staff Selection: Select the < toggle > to enable or disable the staff selection option
- 💡 Please note: Once toggled off, clients can’t choose staff when booking online. The system will auto-assign available staff to pending requests, but clients will not be notified. You can re-assign them when accepting requests and notify clients as needed.
- Time slots - display preference: Select between three configuration options for time slot preferences.
- Exact times: Provide your start time exactly and accurately
- Arrival windows: Give your estimated start time with an arrival window and configure the window to be displayed. Set buffer time intervals before and after the service start time separately. For instance, the arrival window of 15 minutes before and 30 minutes after the 11:00 AM slot will be displayed as 10:45 AM to 11:30 AM.
- Date only: The client will choose an available date without a specific time. When the request is accepted and scheduled, the notification will include the specific time details.
- Advanced bookings:
- How soon can your client book: The soonest time for advanced booking period allowed for your client
- How far can your client book: the maximum advance booking period allowed for your client
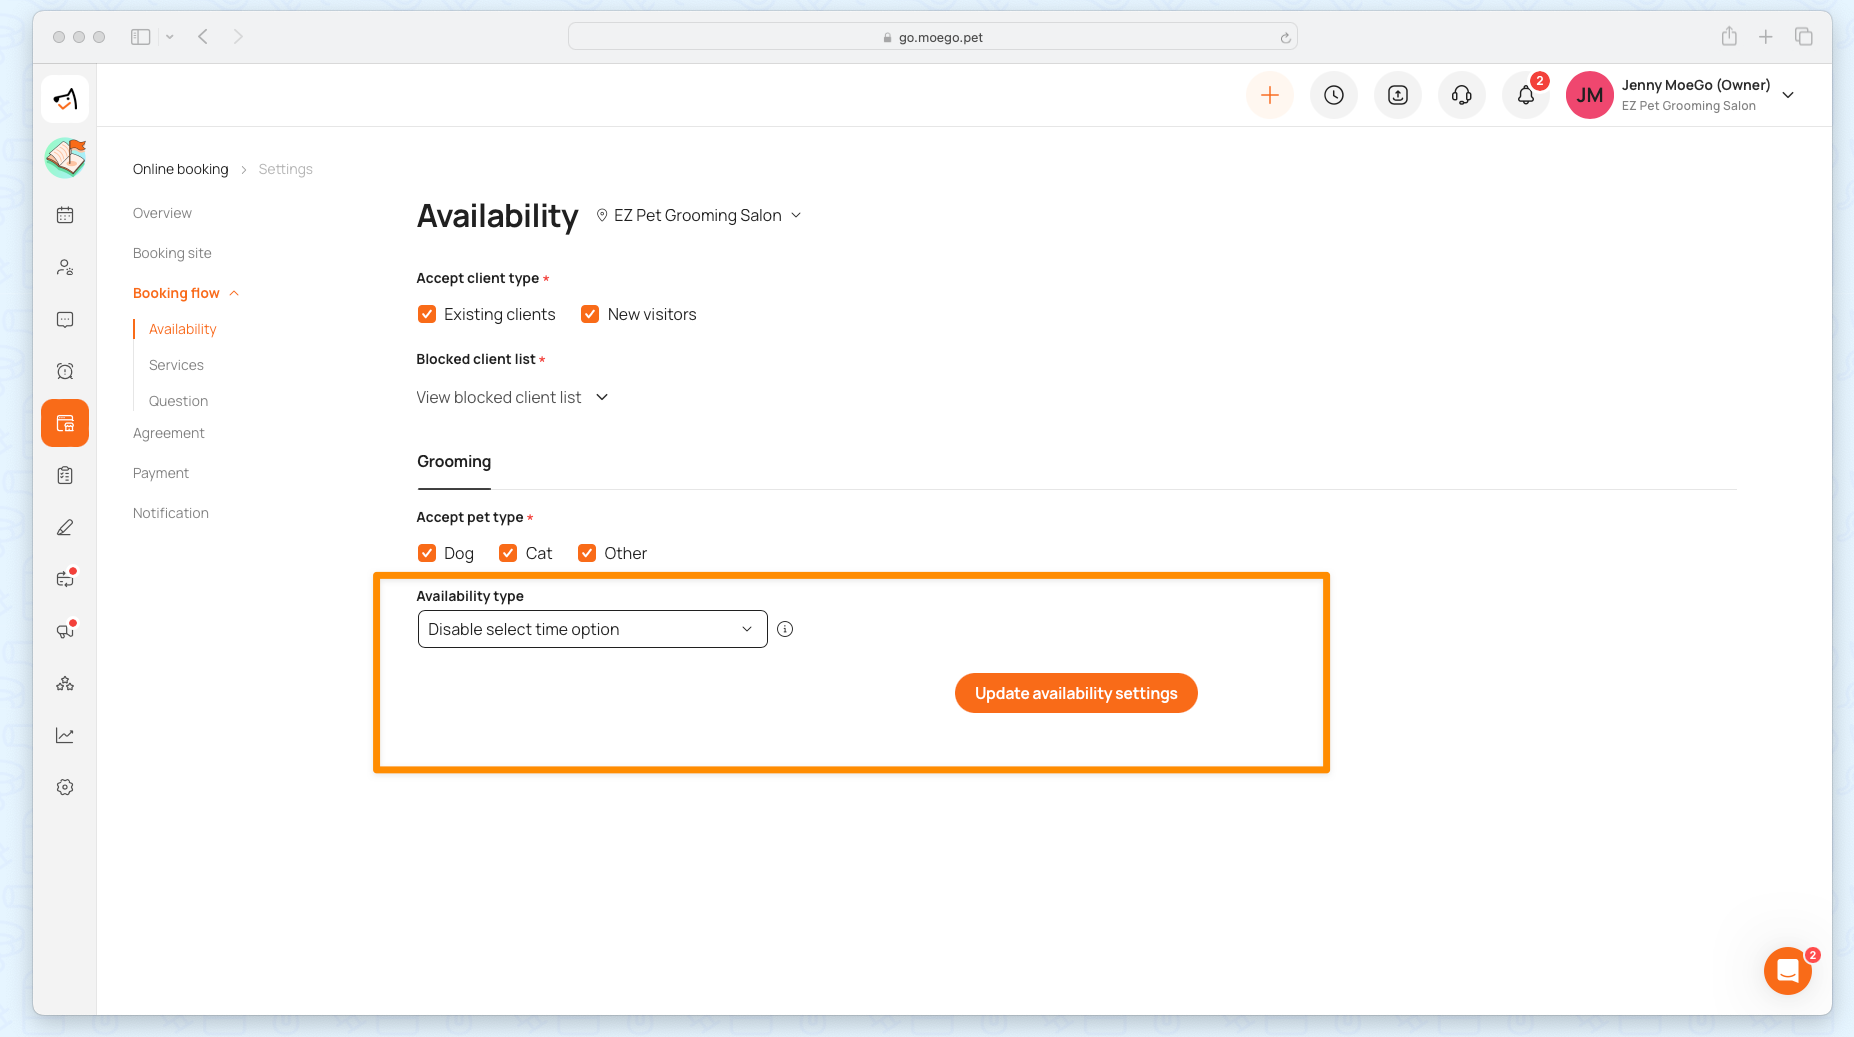
Availability Type 3: Disable select time option
By accurately reflecting your true availability, you gain greater control over your customers' bookings, enabling you to accommodate breaks, meetings, or special occasions effortlessly.
When you apply the "Disable select time" option, clients cannot select booking times online. Instead, they submit a request without specifying an exact date and time. You can then schedule it later from the booking request list at your convenience.
💡Please note: The disable-select-time option is available for both salon and mobile businesses.
- Go to Online Booking > Settings > Availability
- Select < Disable select time option > in the Availability type
Set up booking limits
Booking Limits allow businesses to set maximum appointment slots for pet sizes or breeds. This ensures balanced workloads, prevents overbooking, and helps maintain service quality.
Learn more about booking limits.
Auto-assignment of staff and time slots to requests
Understanding Auto-Assignment
With "Date Only" or disabled Staff Selection, bookings made by clients won't have a pre-selected staff member or time slot.
The system automatically assigns the next available time slot and staff member to these bookings, marking them as pending requests.
- Date Only with Staff: The system will prioritize assigning the earliest available time slot to the groomer selected by the client.
- Specific Time without Staff: the system will prioritize assigning preferred groomers. If the preferred groomer is not available, it will be assigned following the sort of staff list.
- Date Only and without Staff: the system will first attempt to assign the booking to the client’s preferred groomer at their earliest available time. If the preferred groomer is not available, the system will then assign the next available groomer on the staff list who meets the criteria.
Identifying Auto-Assigned Appointments
In your calendar view or appointment list, look for the icon indicating that the staff/time slot has been auto-assigned by the system. This icon helps in quickly recognizing appointments that need review or confirmation.
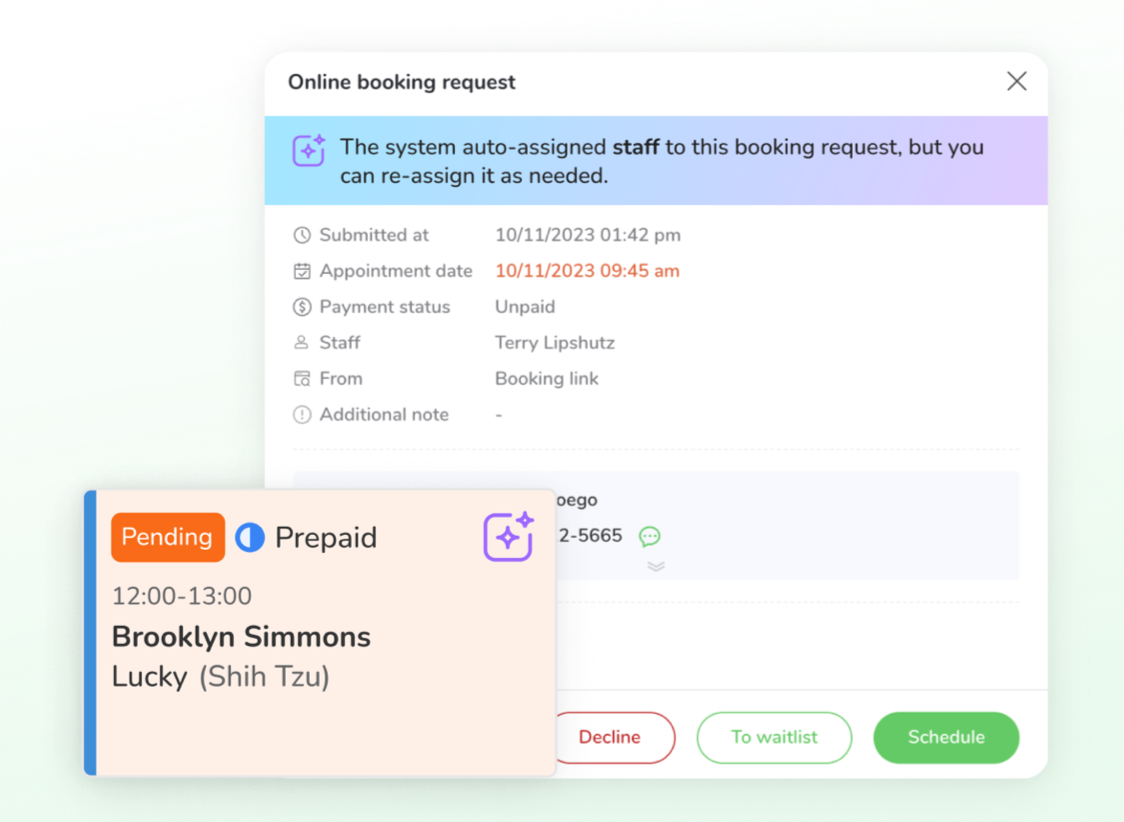
Reviewing and Modifying Assignments
Click on < Schedule > in the pending requests list to view the auto-assigned details.
The system will tell you if any information was auto-assigned in the banner on the appointment details.
You can modify the:
- Time slot
- Staff member
- other details of the appointment before confirming.
This step ensures that the assignment aligns with your scheduling needs and client preferences.
Confirming the Appointment
After reviewing and adjusting the auto-assigned details, confirm the appointment. Confirmation finalizes the time slot and staff member for the client's booking.
Client Notifications
Before confirming the booking, auto notifications sent to clients will not include the auto-assigned details.
Once you confirm the booking, the notification will be updated to include the final details, such as the assigned staff member and time slot.
Troubleshooting Online booking availability
The online booking available time slots are defined by a set of settings:
- Staff available time is not available / no staff for certain services
- Closed dates / Closed holiday
- Block on the calendar / Existing appointments on the calendar
- Booking limits on the pets
- For mobile businesses with "smart scheduling", the availability will also be defined by your smart scheduling parameter setting, as well as how far the new appointment to your existing appointments
- For mobile businesses with a "certain area for certain days", the availability will also be defined by your settings of certain areas for certain dates. If you are not going to a certain area on certain dates, that date will not be available for your customers to select from
Videos of customer experience when booking online with the different availability types
- Availability type 1 - By working hours
- Availability type 2 - By slot
- Availability type 3 - Disable select time option
FAQ
Q1. Do the date overrides apply to online booking by slot?
Answer: The setting of override does not affect by slot result at all. Only blocks and business closed dates can reject online booking requests when clients book by slot.
Q2. Which plan gives you access to use these features?
Answer: All plans can turn on “Sync with staff working hours” in online booking.
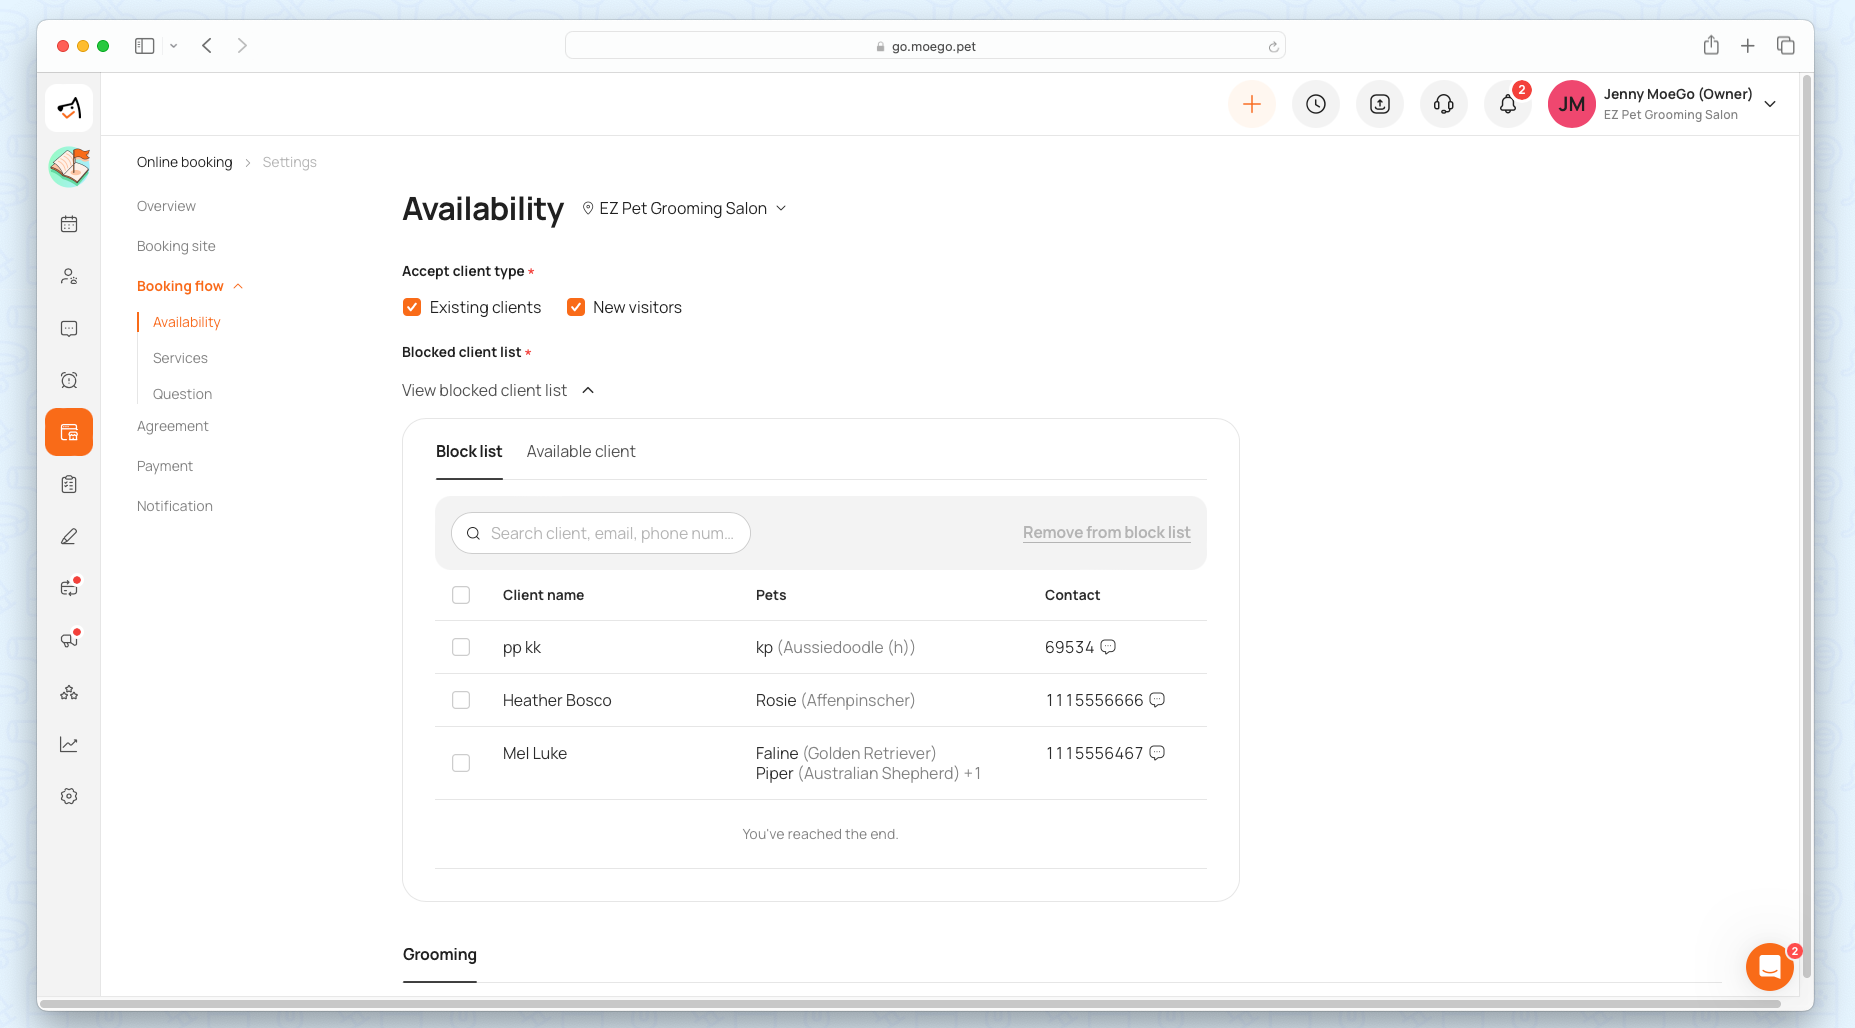
Q3. How can I prevent specific clients from being available from booking online? Is there a block list?
Answer: Yes! You have the option of adding specific clients to the online booking block list. To add a client to the block list go to online booking on the desktop > settings > availability> blocked client list > available clients > search for the client(s) > add to the block list.
Once a client is added to the block list, they will see every day as fully booked when attempting to make an online booking request.
The MoeGo team is always here 24/7 if you have any further questions.