

MoeGo Pay makes it easy for you to add a customer's Card on File with a few clicks! The saved card information can be utilized for future transactions, while eliminating the need for customers to repeatedly input their payment details.
It guarantees that you still earn your deserved revenue with last-minute cancellations and no-shows. It also streamlines the payment processes, making transactions swift, secure, and hassle-free.
🌟 Highlights of Card on File
- Quickly check if the client has a card on file by the shield icon.
- Flexibly collect Card on File information by 5 methods (detailed below).
- Enable your client to fill out the card details and submit the encrypted info.
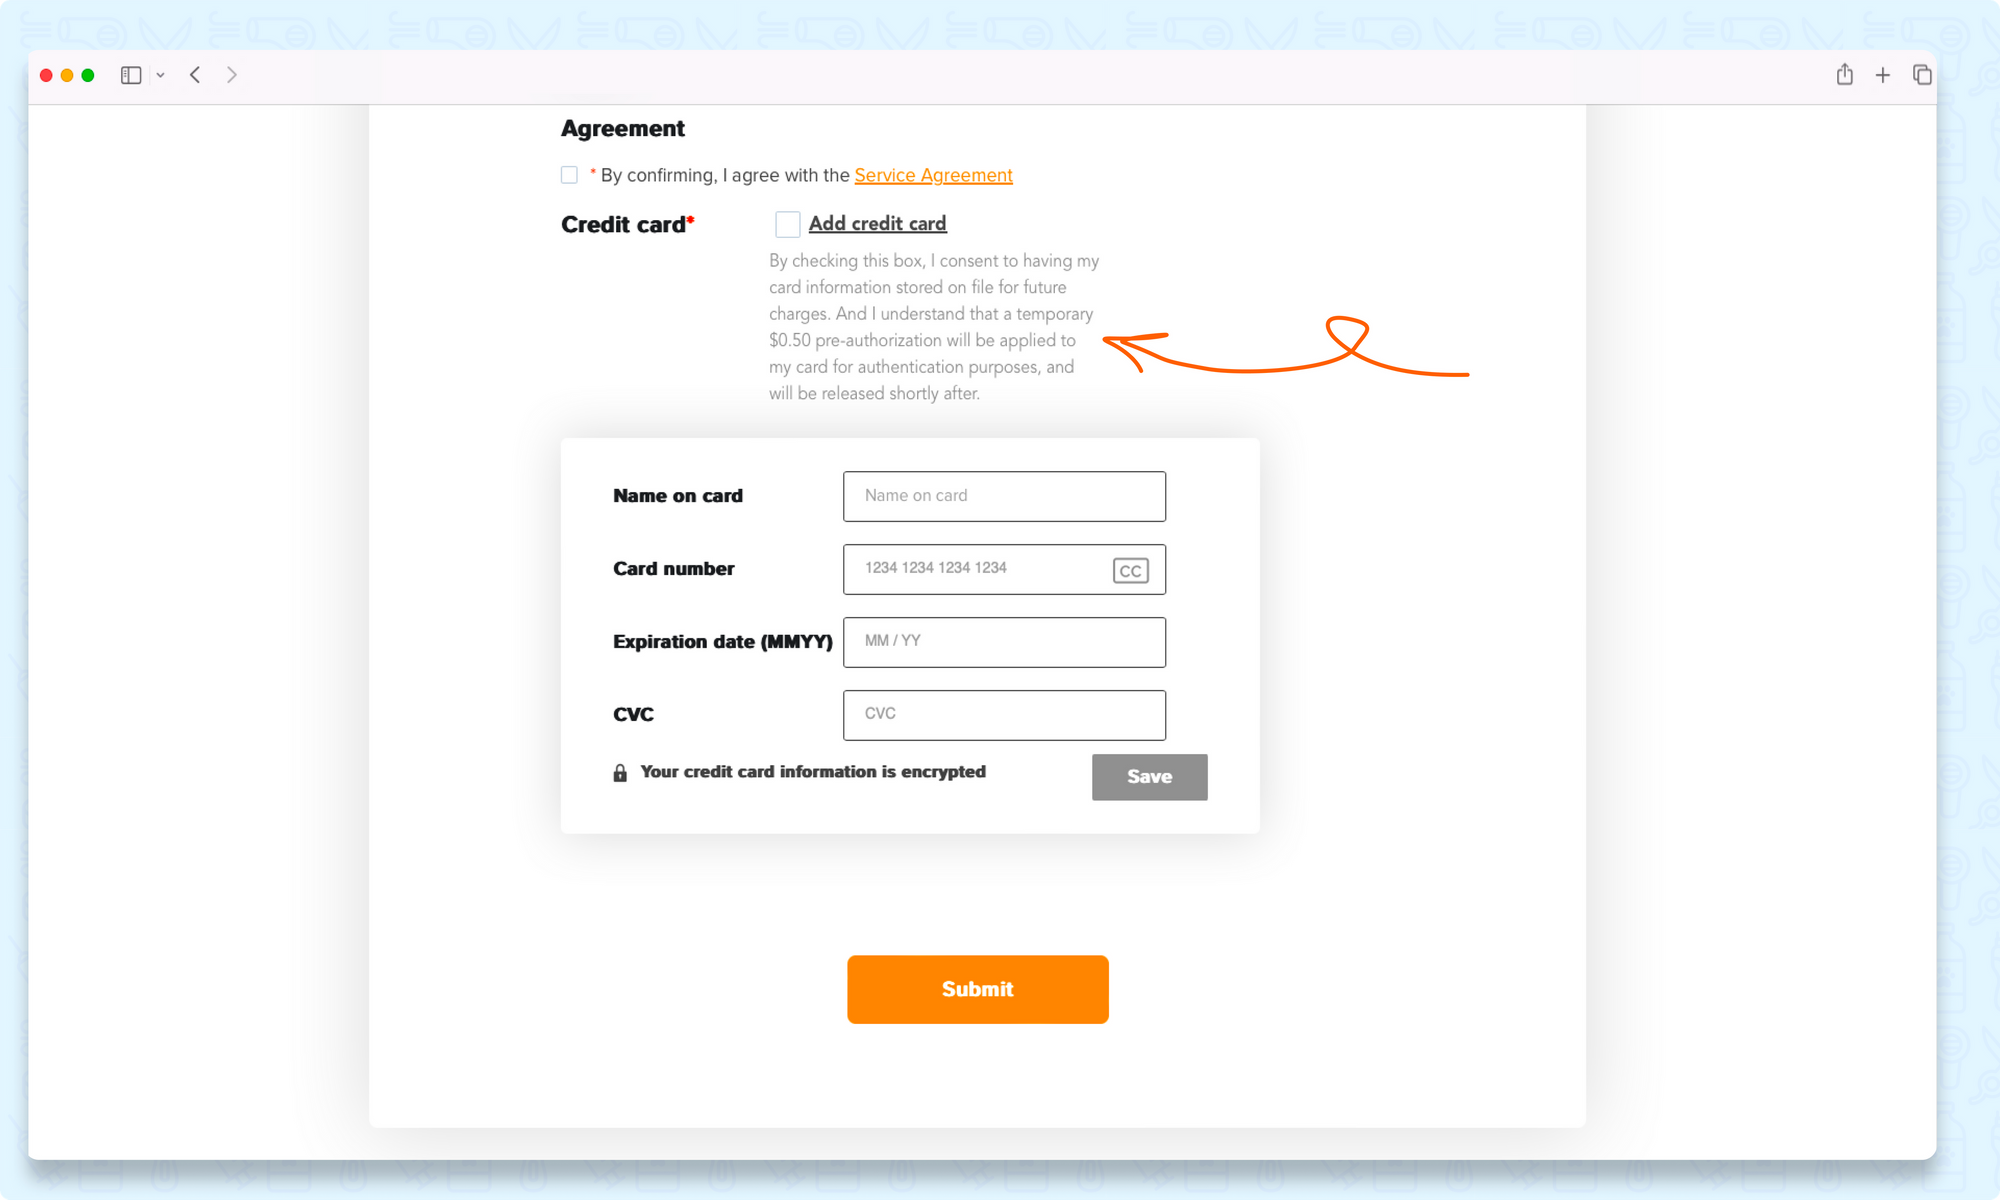
- Once enabled the Card Authentication option, all cards added will be authenticated through a $0.50 pre-auth (immediately dropped). This guarantees the validity of stored cards for seamless payments. Click here to know more details.
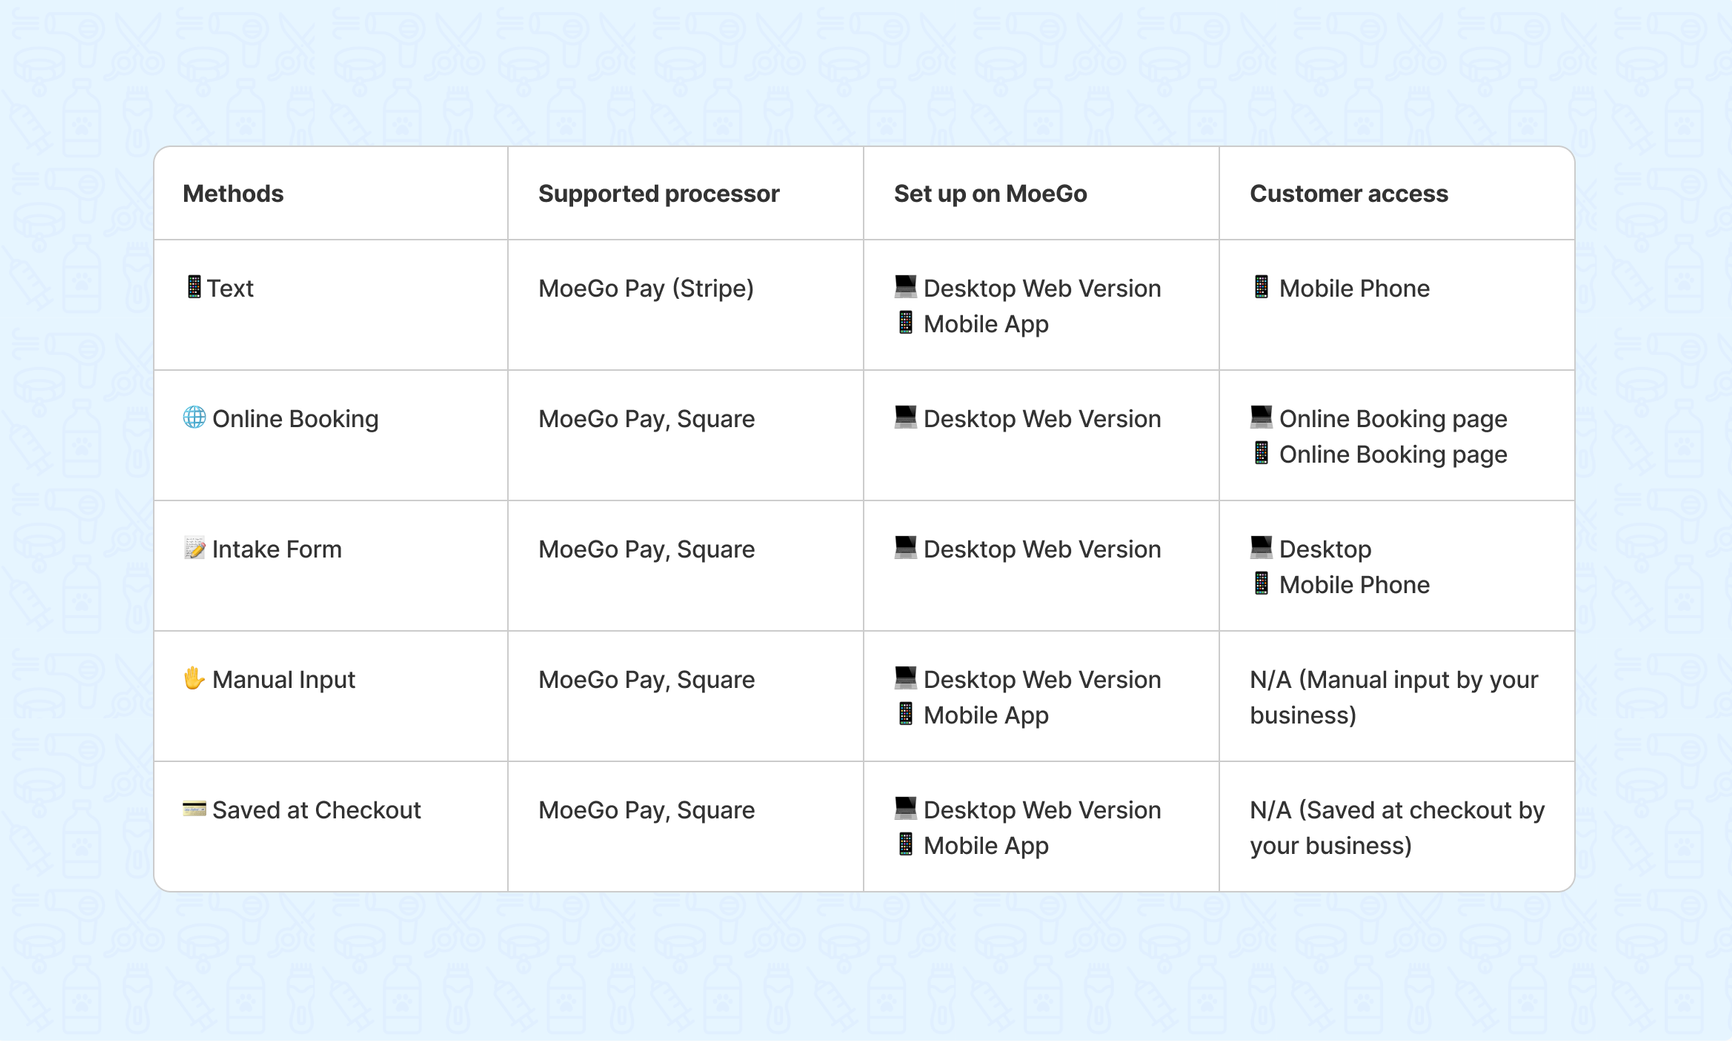
Recognizing that you may have varying preferences and needs, MoeGo offers 5 convenient ways through which you can set up the Card on File request or requirement. For your customers, they may add their Card on File on their phones or computer by the unique link in your Text, in Online Booking, or through the Intake Form.
📱 Text:
Send payment requests via text, whether it's to individuals or a group. Customers can add their card information with a few taps, enhancing their overall experience.
There are three ways to send a quick request, all available for both Desktop (Web Version) and App:
- From appointment detail
- From client profile
- From message center
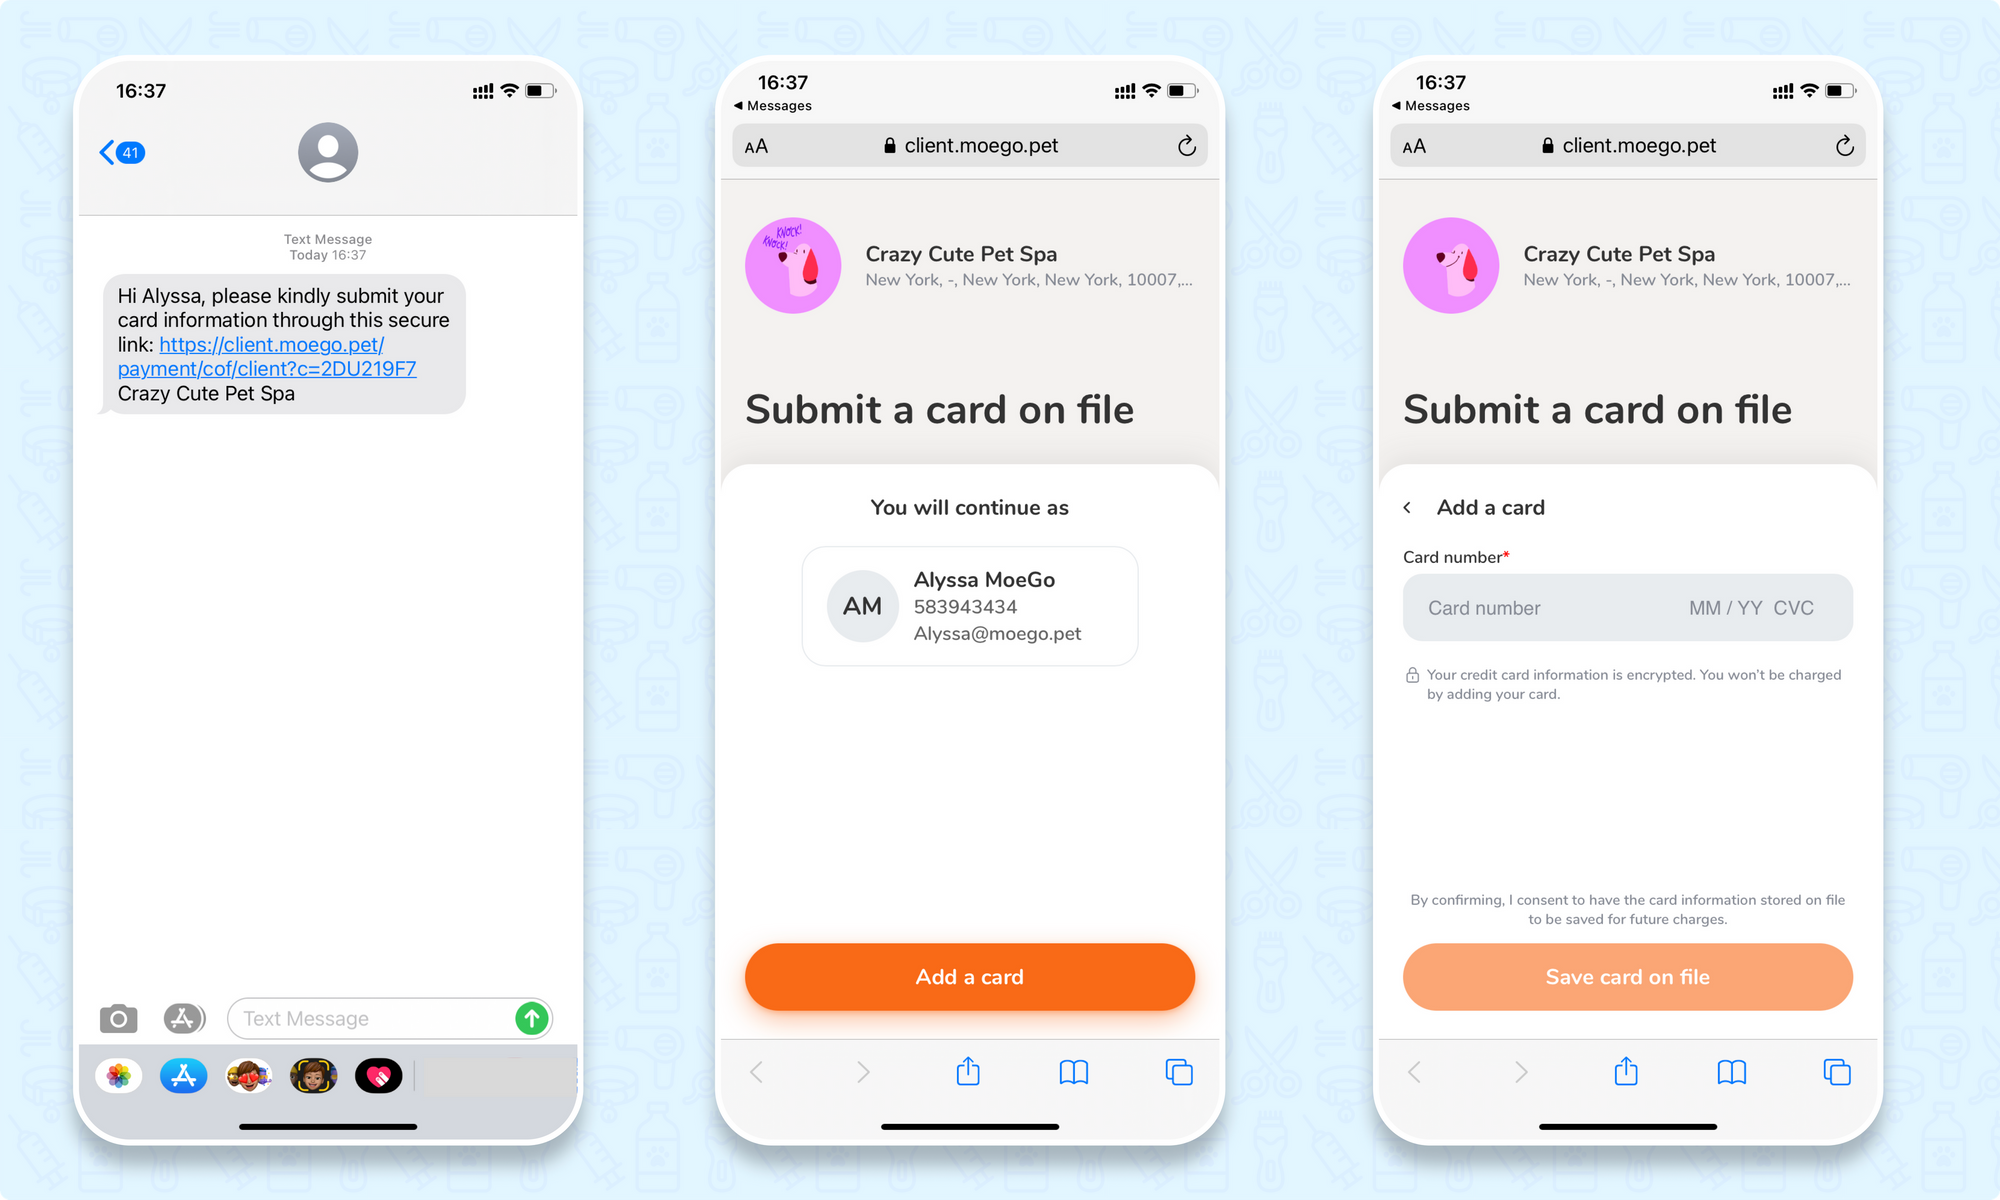
Please note that the secured link in these requests is unique to each client, do not share it with another client.
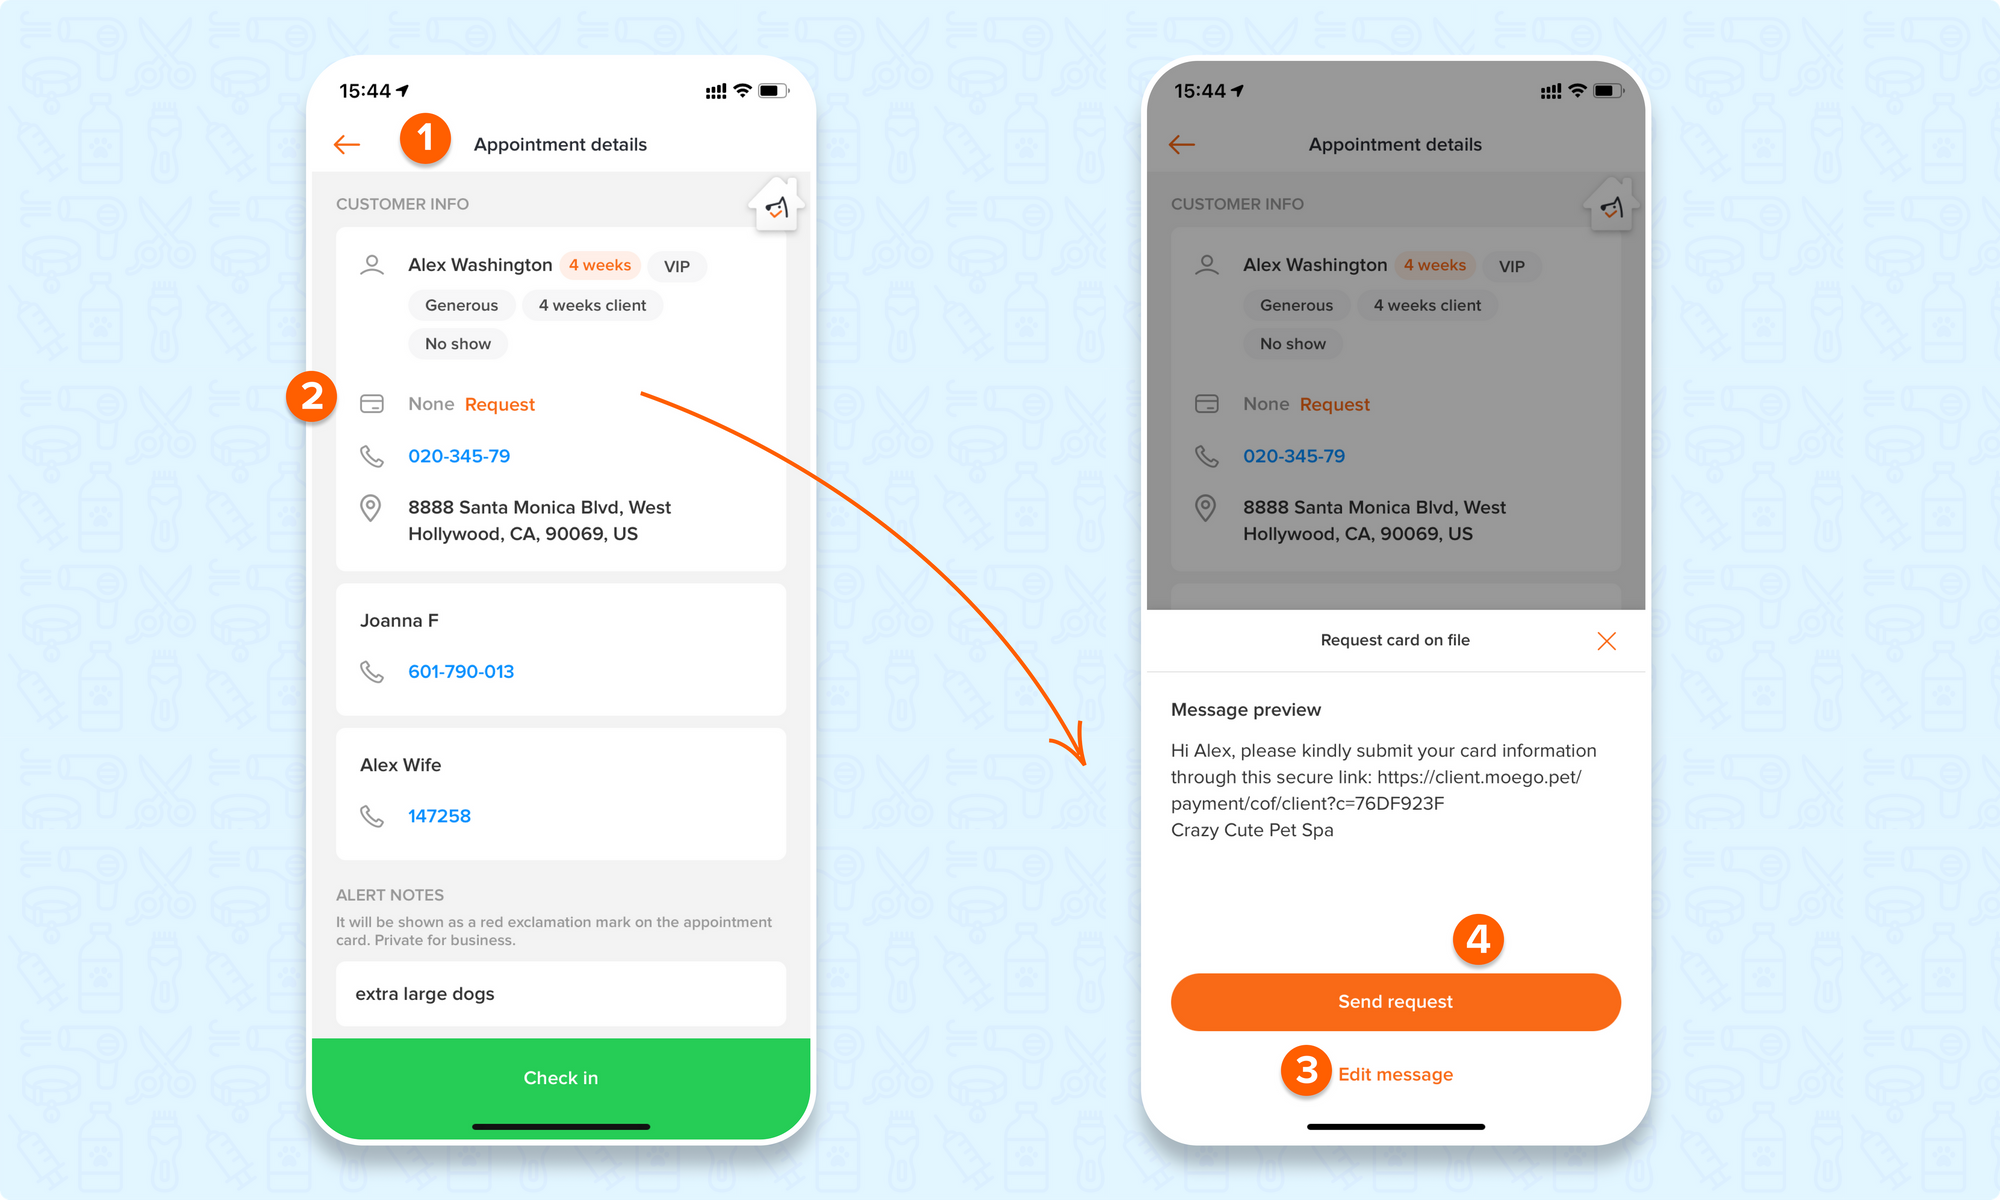
Option 1: Send a request from appointment detail
From the Desktop (Web Version):
- Go to the appointment details
- Click on the grey card-on-file icon
- Click on < Request card info >
- Edit the message(optional)
- Confirm to < Send request >

From the Mobile App:
- Go to the appointment details
- Click on < Request >
- Edit the message (optional)
- Confirm to < Send request >
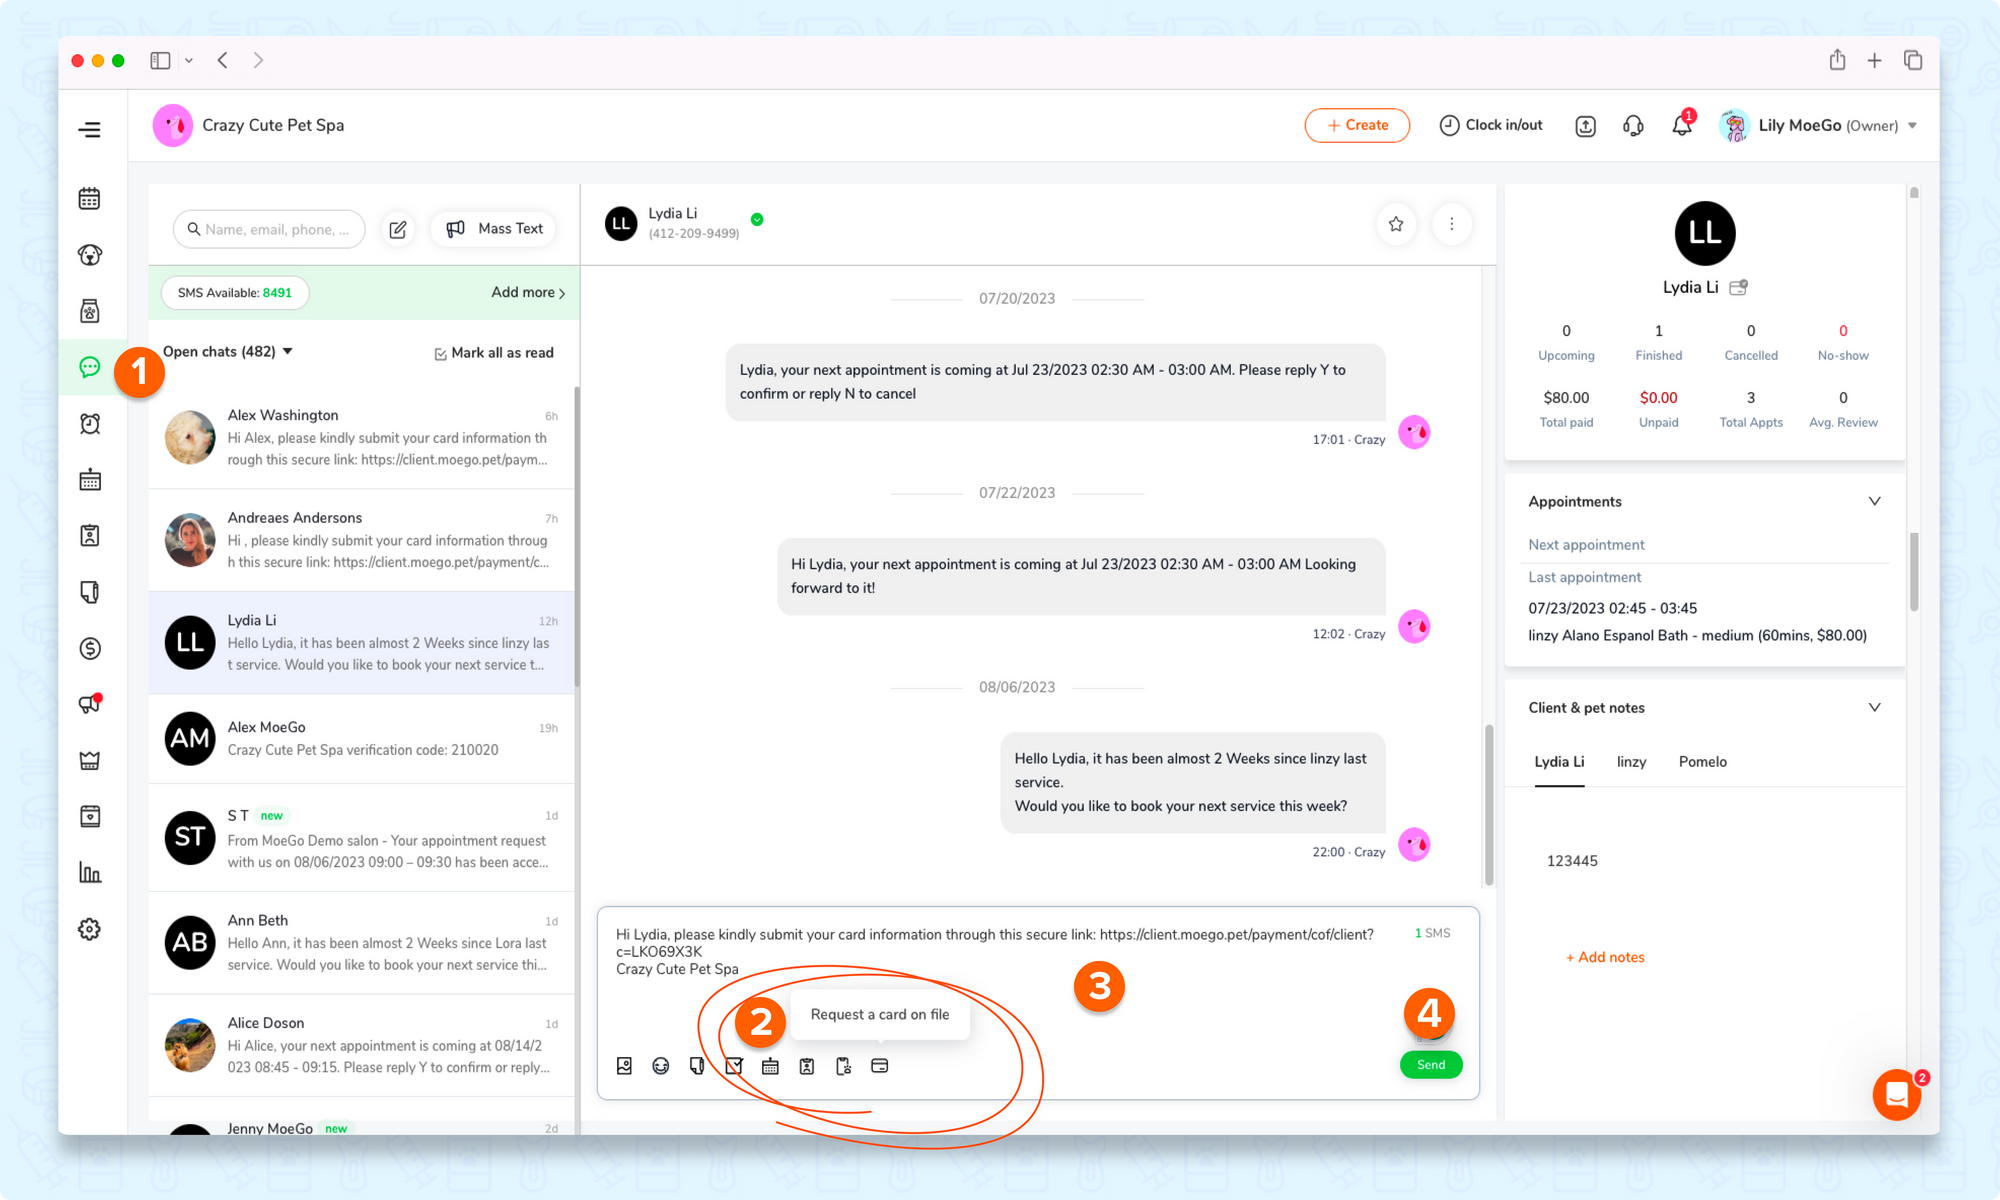
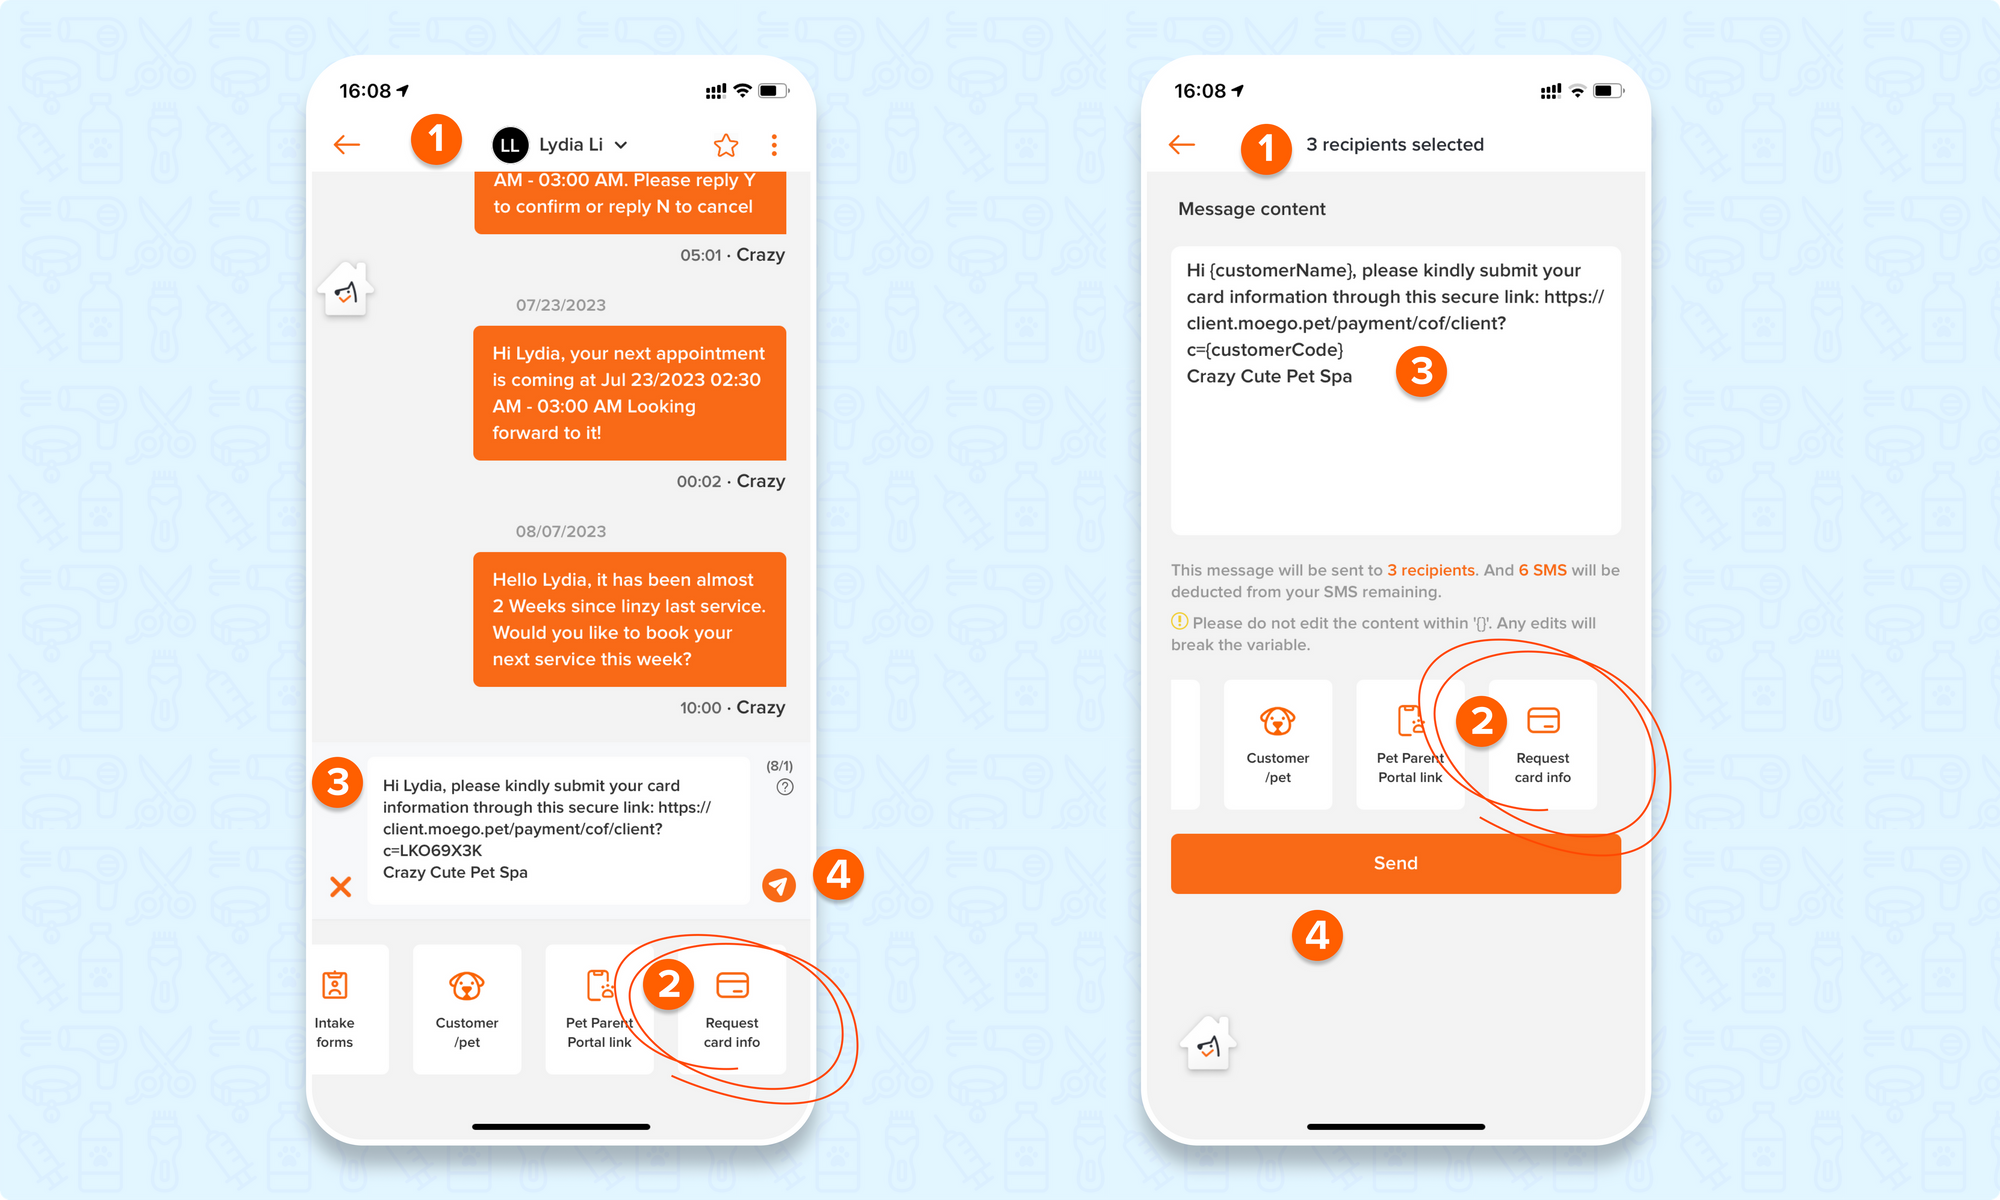
Option 2: Send a request from the message center
It can be sent as individual text or mass text.
Send individual text from the Desktop (Web Version):
- Go to the message center
- Click on the request a card on file icon
- Edit the message(optional)
- Select < Send >
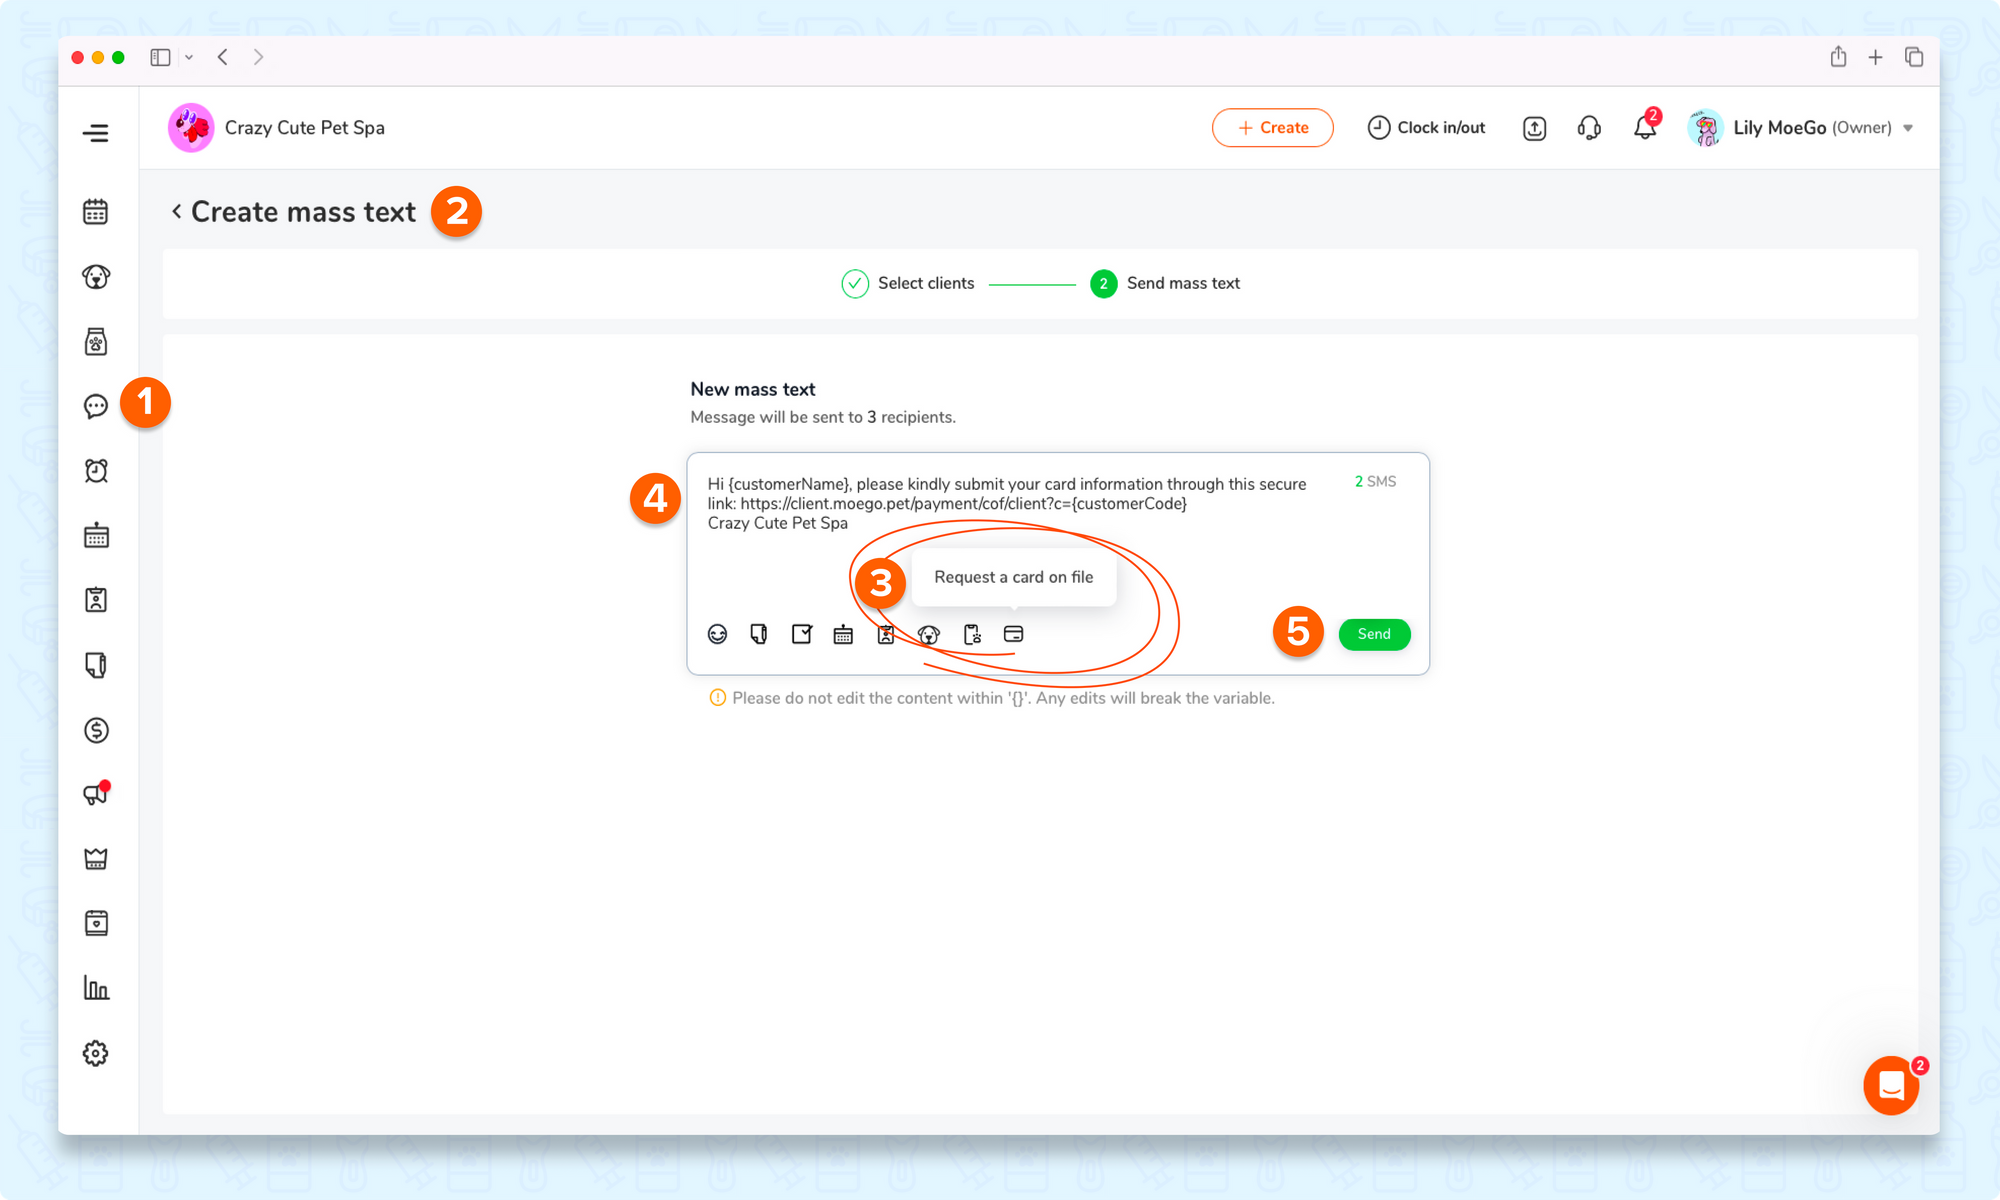
Send mass text from the Desktop (Web Version):
*Please note: The secured link is unique to each client. Please do not edit the content within '{}'. Any edits will break the variable.
- Go to the message center
- Select < Mass text >
- Click on the request a card on file icon
- Edit the message(optional)
- Select < Send >
Send individual text & Mass text from the app:
*The secured link is unique to each client. Please do not edit the content within '{}'. Any edits will break the variable.
- Go to the message center
- Select the appropriate client message or select the < + > icon on the top-right of the screen to start a < New chat > or a < Mass text >
- Select the < + > icon at the bottom left of the screen to open the widgets menu
- Select < Request card info > icon
- Edit the message (optional)
- Select < Send >
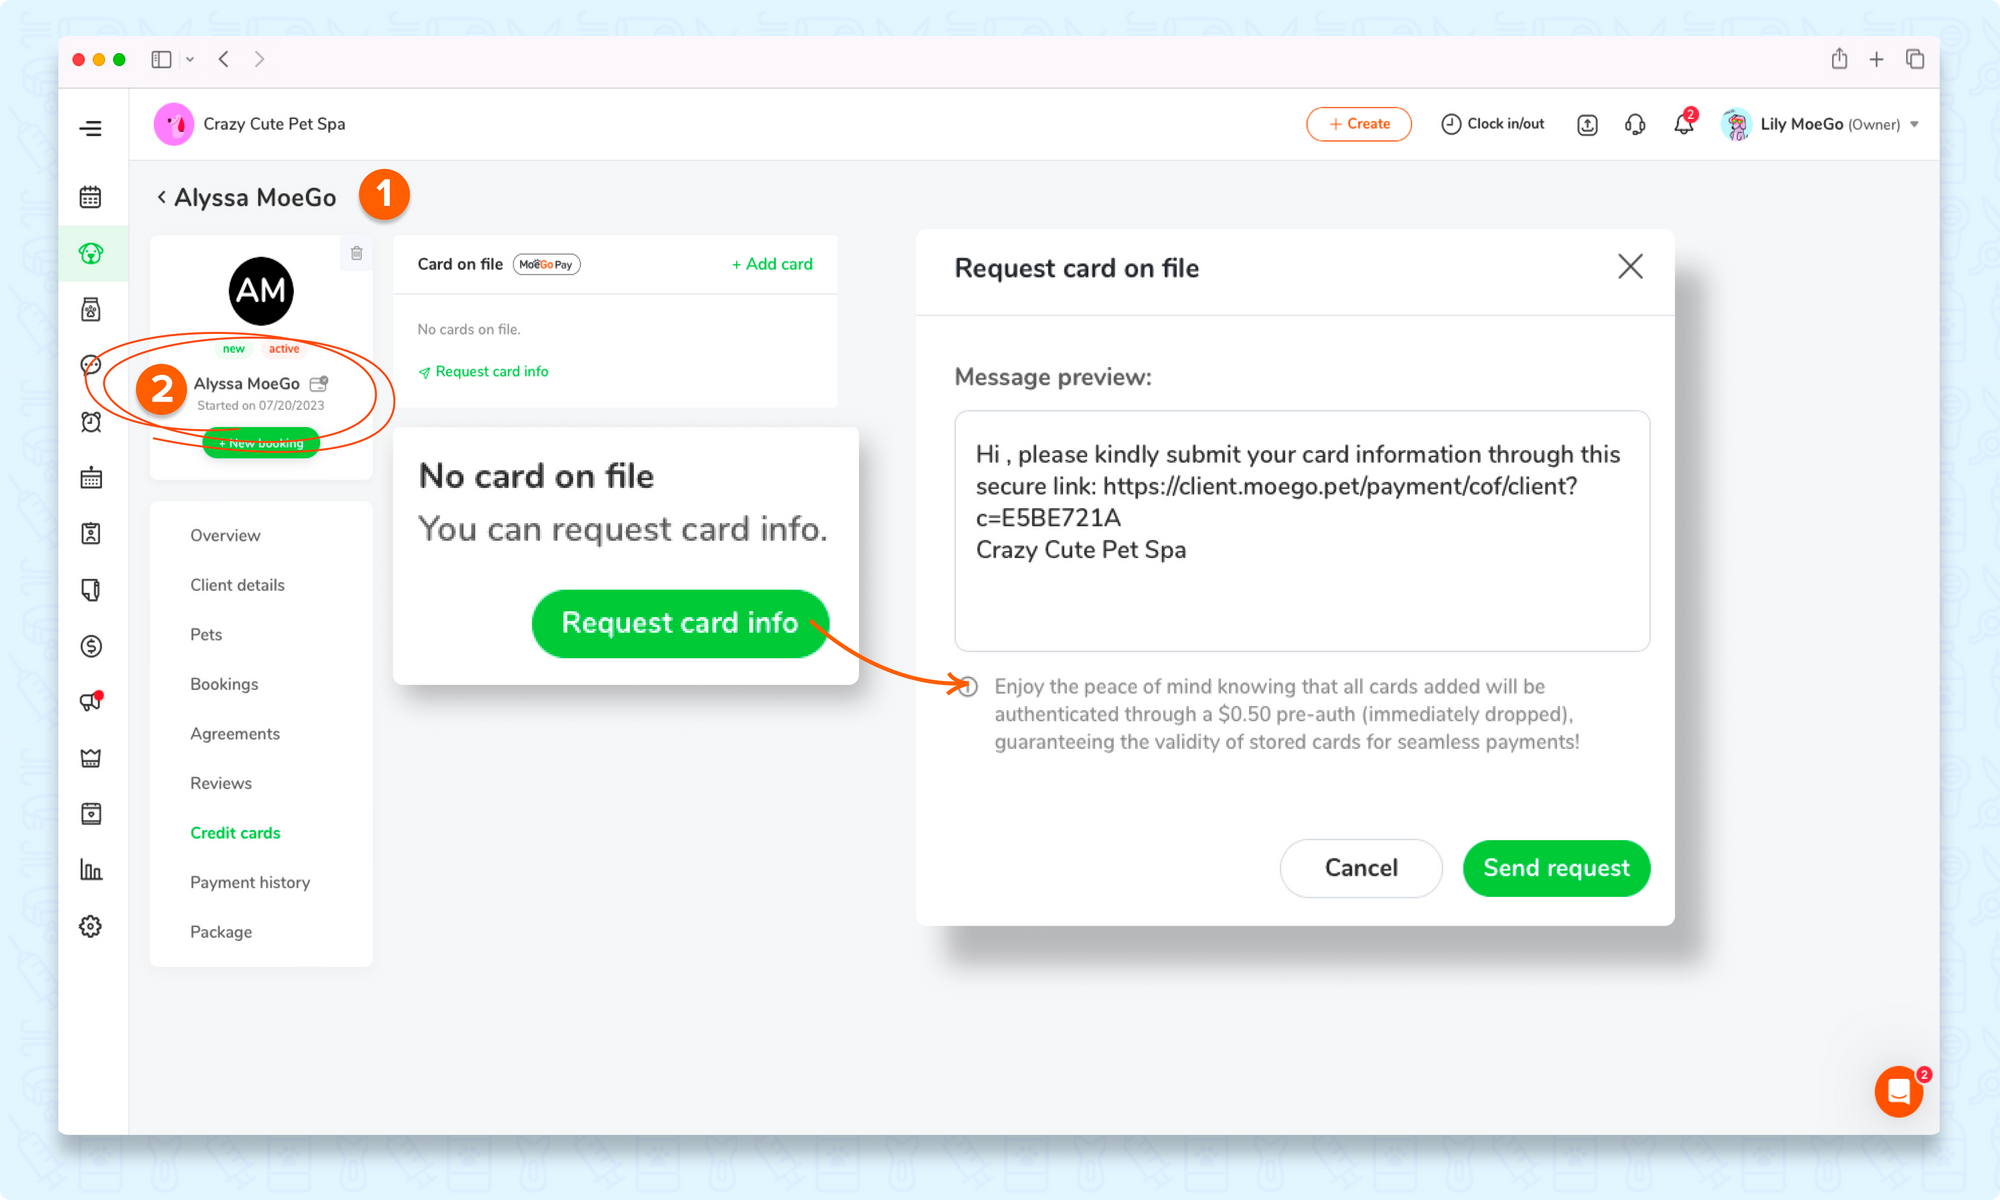
Option 3: Send a request from the client profile
From the Desktop (Web Version):
- Go to the client profile to send request two different ways:
- Hover over the greyed-out credit card icon and select < Request card info > and then select < Send request >
- Select < Credit cards > and < Request card info > to send the request
From the Mobile App:
- Go to the client profile to send a request in two different ways:
- Select the < credit card icon > and select < Send request >
- Scroll down to the Card on file section and select < Card on file > banner. Select < Add a card > then select < Send request >in
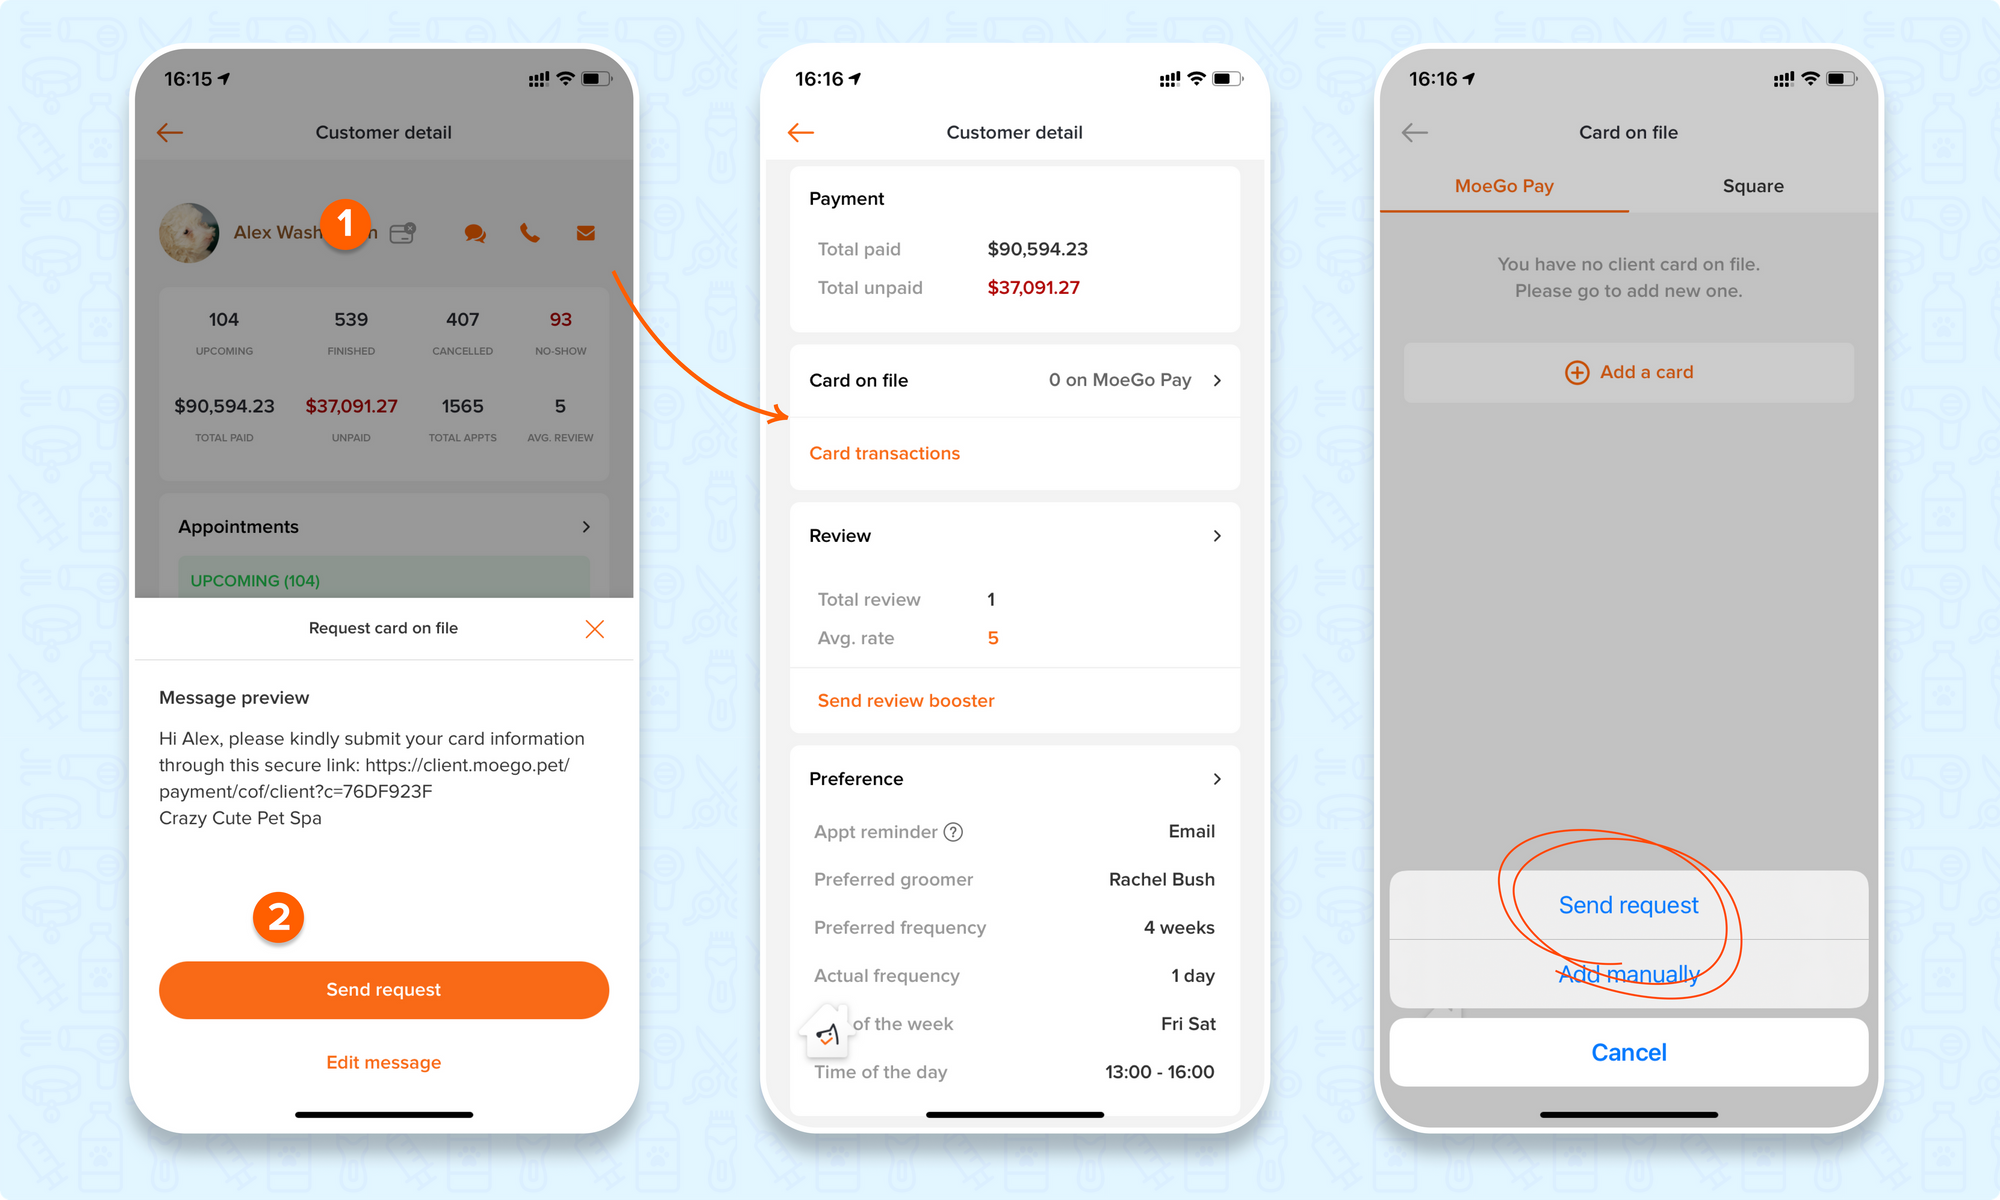
How your customers submit a Card on File
No matter which way you choose to send the request from the above three, your clients will receive a text message with a secured link.
Once open it, they will be guided to safely fill out the card details and submit the encrypted info to your end for future charges.
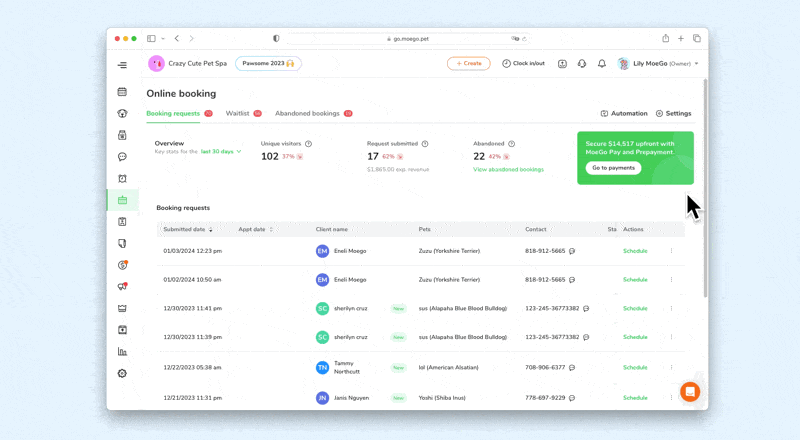
🌐 Online Booking:
Seamlessly integrate saved cards during the booking process, allowing your customers to breeze through reservations without the hassle of re-entering payment details.
Enable it for all Online Booking clients
- Go to Online Booking > Setting > Payment > Payment requirement
- Click on < Require card on file (No-show protection) >
- Edit your no-show policy in the text box
Enable it for selected Online Booking clients
- Go to Online Booking > Setting > Payment > Customized Payment Options by Clients
- Select a client group/client groups by the checkbox or advanced filters. You can choose from < New Visitors > and/or < Existing clients with filters >.
- Click on < Require card on file (No-show protection) >
- Edit your no-show policy in the text box
At the final step of online booking, the client will need to look through the no-show policy and add the card info to submit the request. Once the booking request is successfully submitted, the credit card payment information can be stored.
Here is what will clients see during the booking process:
📝 Intake Form:
Simplify data collection by offering the option to save card information right from your intake forms.
- Go to Intake form > Settings, and select one intake form to set it up.
- Scroll down to < Credit card submission > and select the checkbox to show the question.
- Click the next checkbox for "Required to answer" so this question needs to be filled out before submitting the intake form.
(Click here to get more info about the intake form set up)
You are free to create a new intake form for card-on-file or require it on the existing intake forms. You may share the intake form link in the way you prefer, including sending text, posting on social media, etc.
Once the intake form has been received, the credit card payment information can be stored.
Here is what will clients see when filling out the intake form:
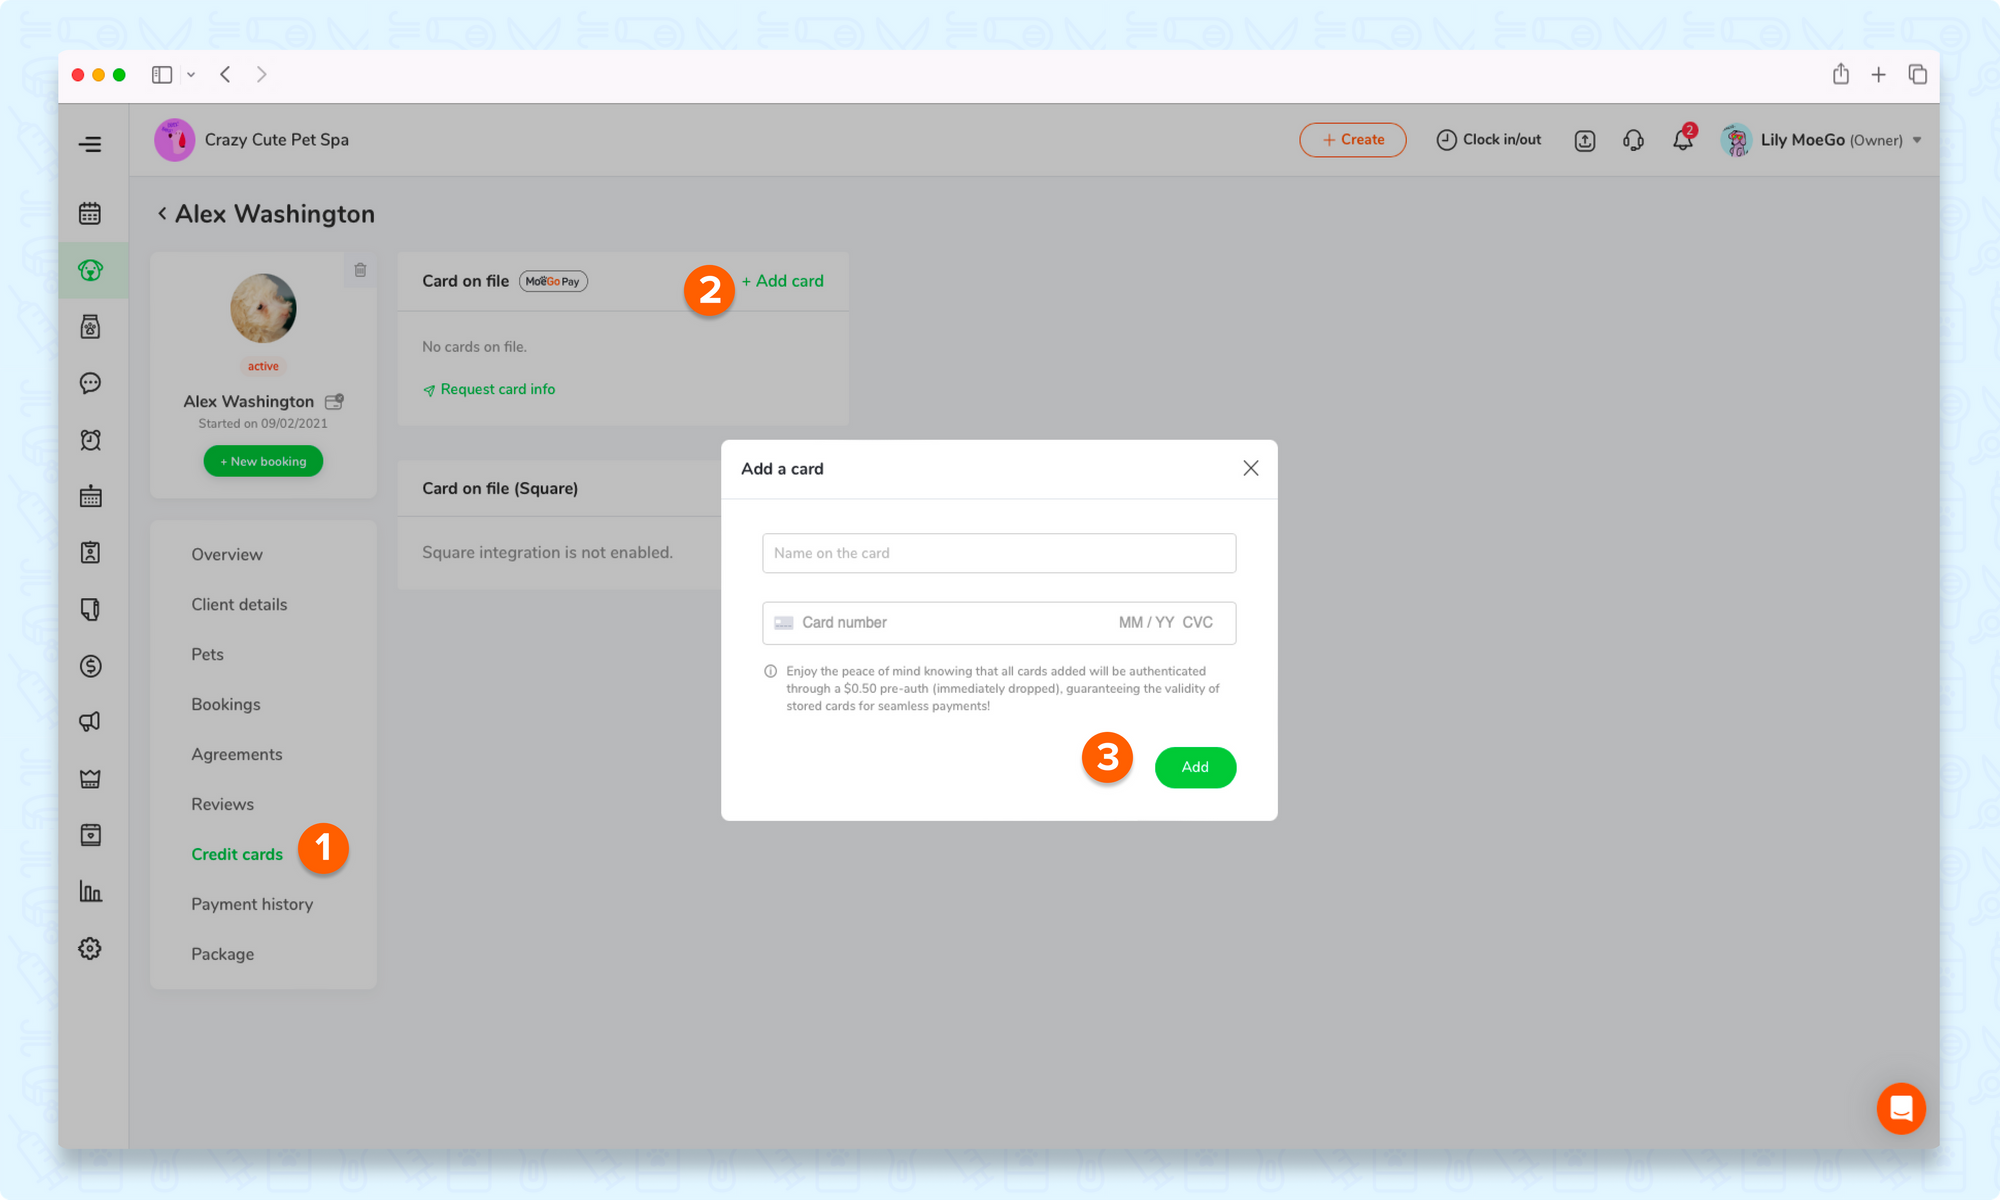
✋ Manual Input:
For in-person interactions, easily input card details using our user-friendly interface. Quick and secure, this method is perfect for any scenario.
Desktop (Web Version):
- Go to client’s profile > Credit cards
- Click on < + Add card >
- Input the card info
- Select < Add >
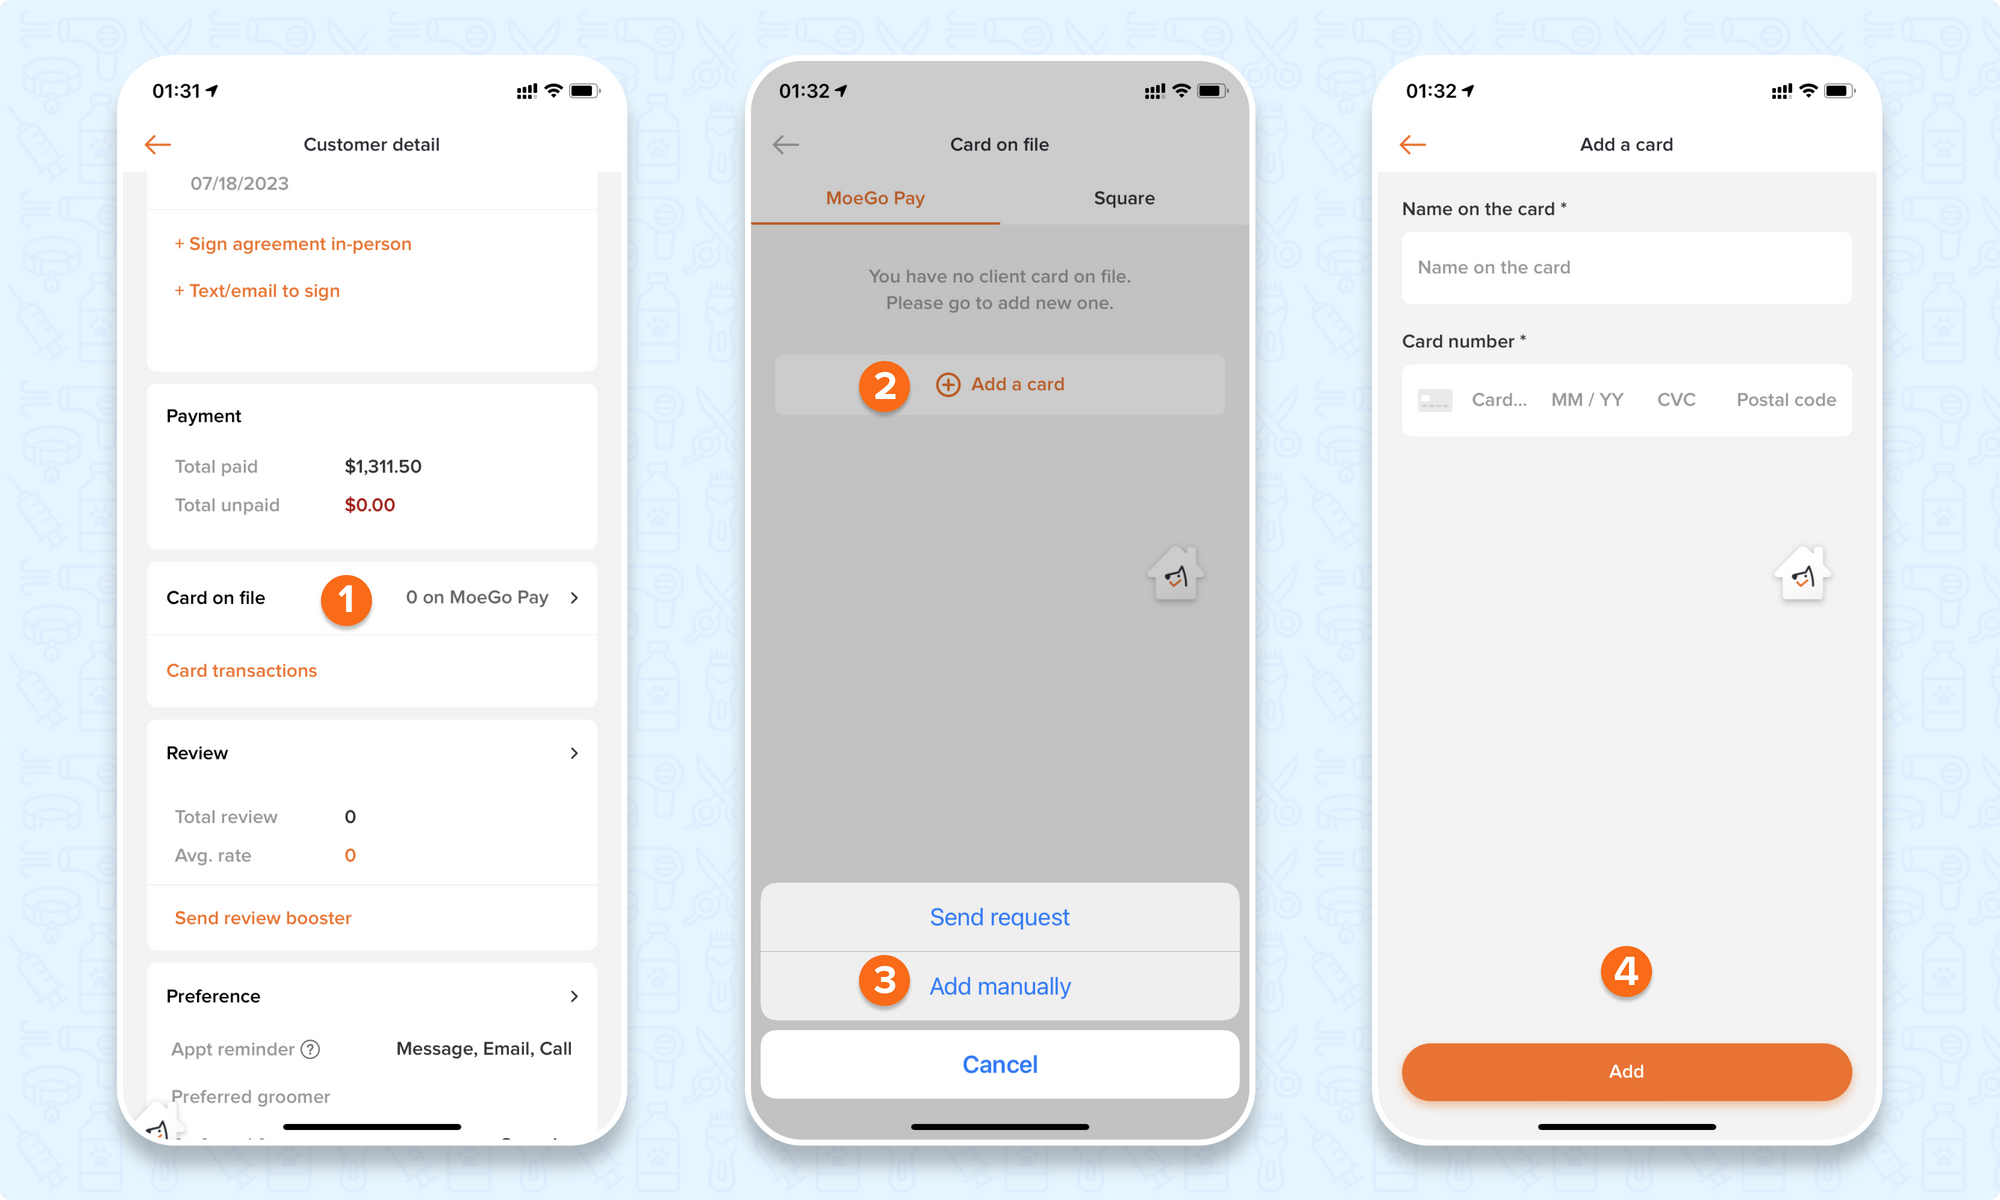
Mobile App:
- Go to client’s profile > Card on file
- Click on < Add a card >
- Click on < Add manually >
- Input the card info
- Select < Add >
💳 Save at Checkout:
Give you the choice to save their cards during the checkout process, promoting repeat business while reducing friction during subsequent transactions.
Desktop (Web Version):
- When checkout, select < Credit card >
- Input the card info
- Check the < Save card on file > box
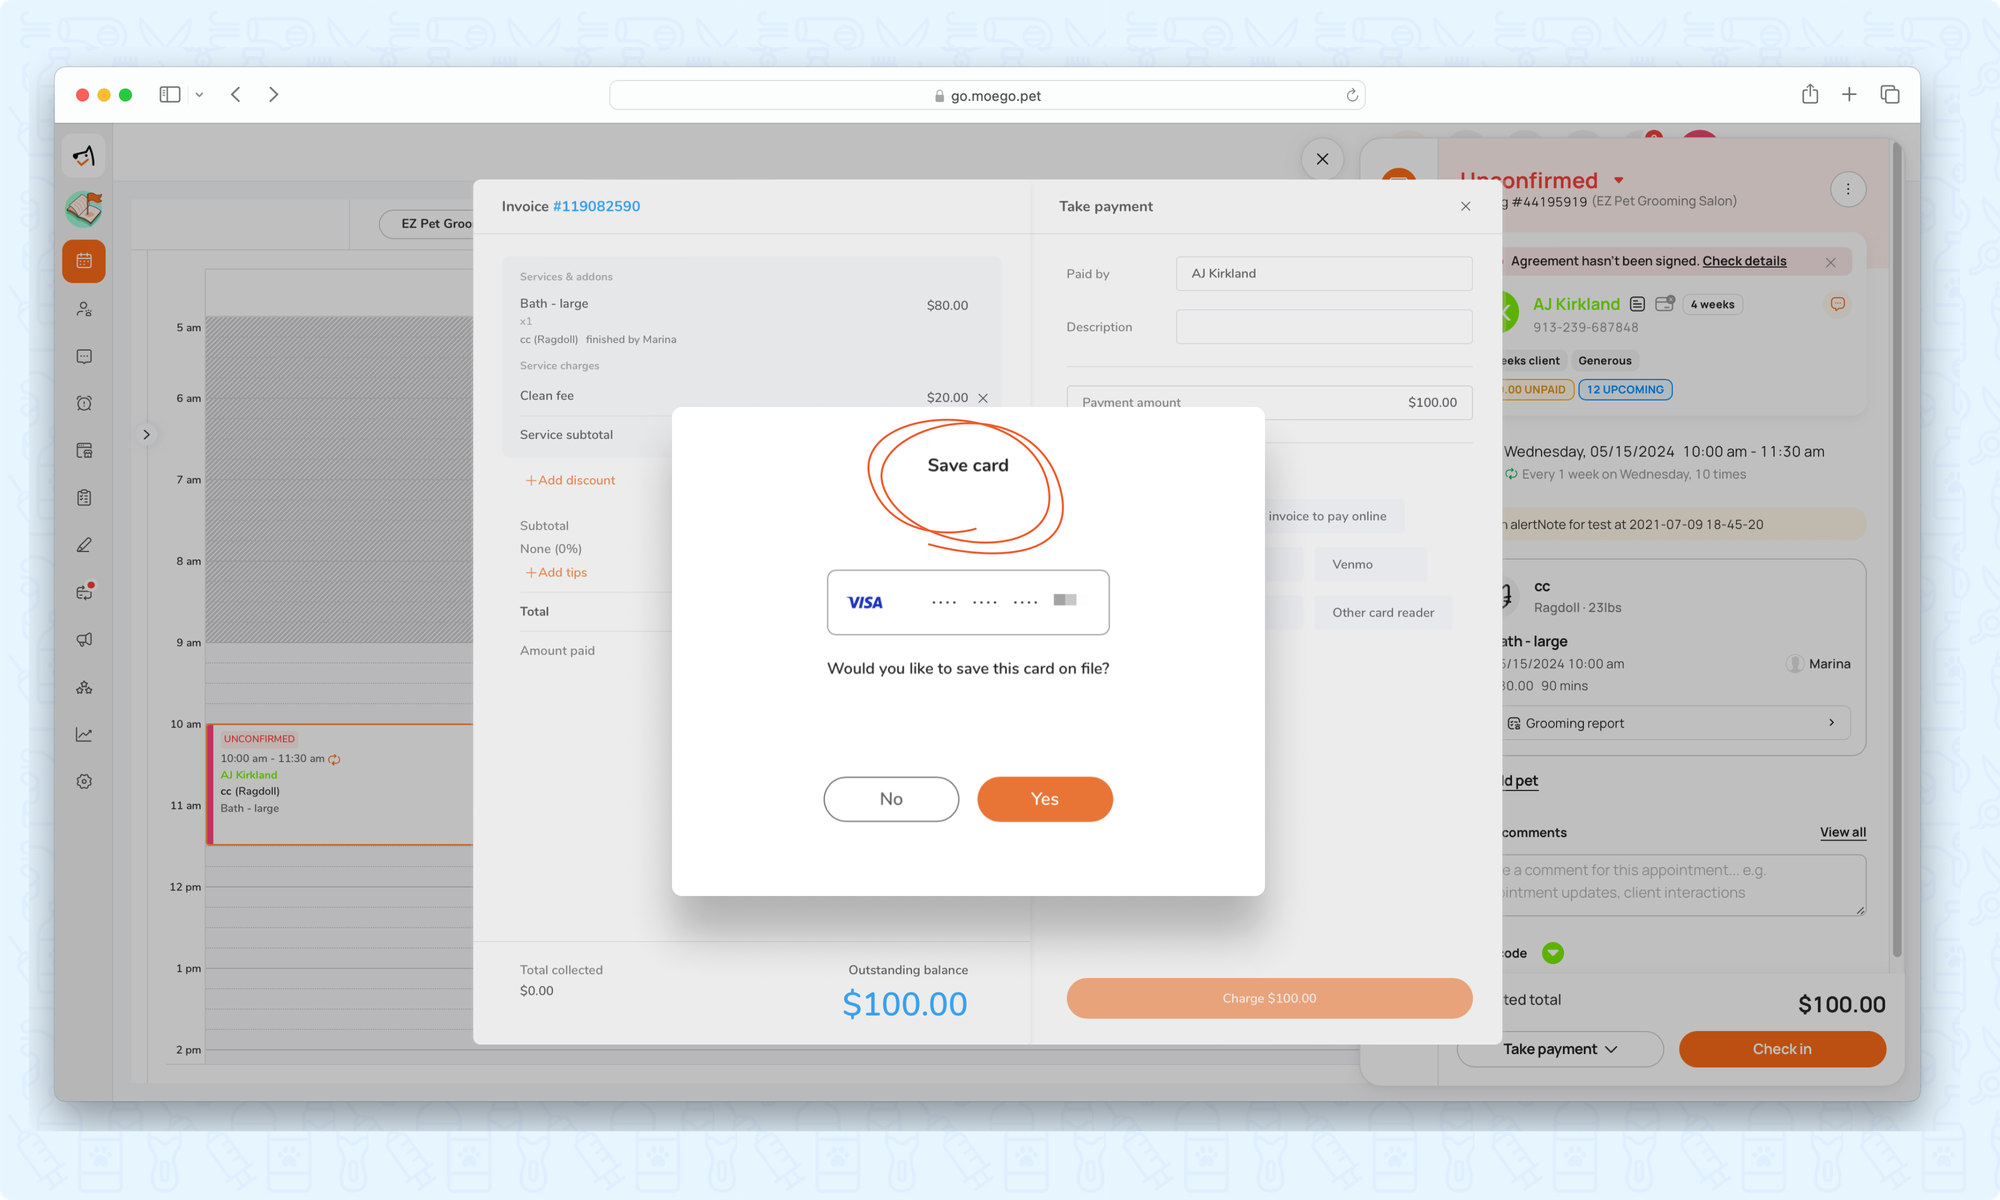
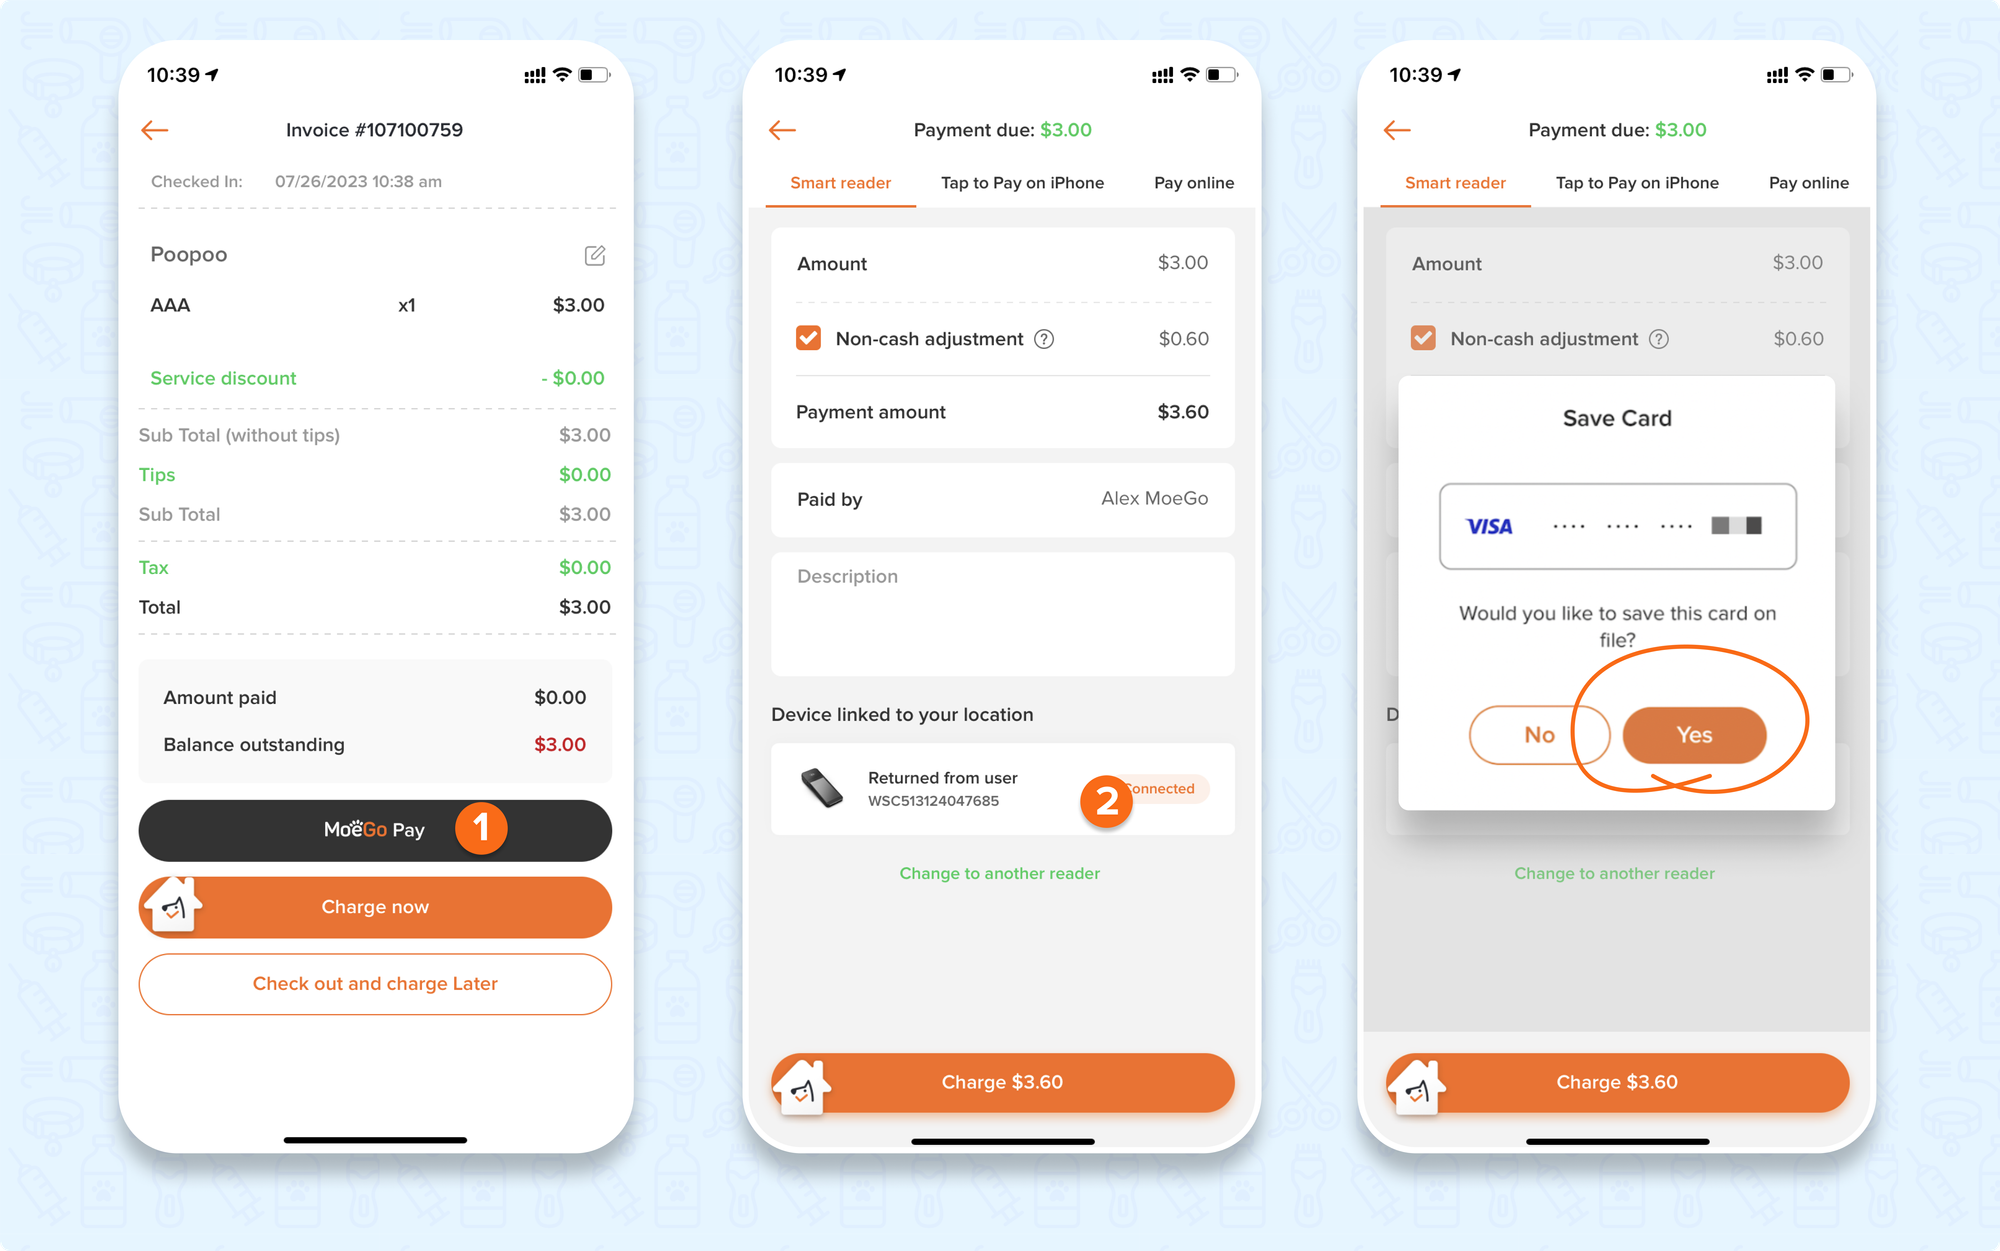
If the client pays by swiping/tapping/ inserting cards with hardware, there is a pop-up asking if you would like to save the card on file. You can click on "Yes" to save it!
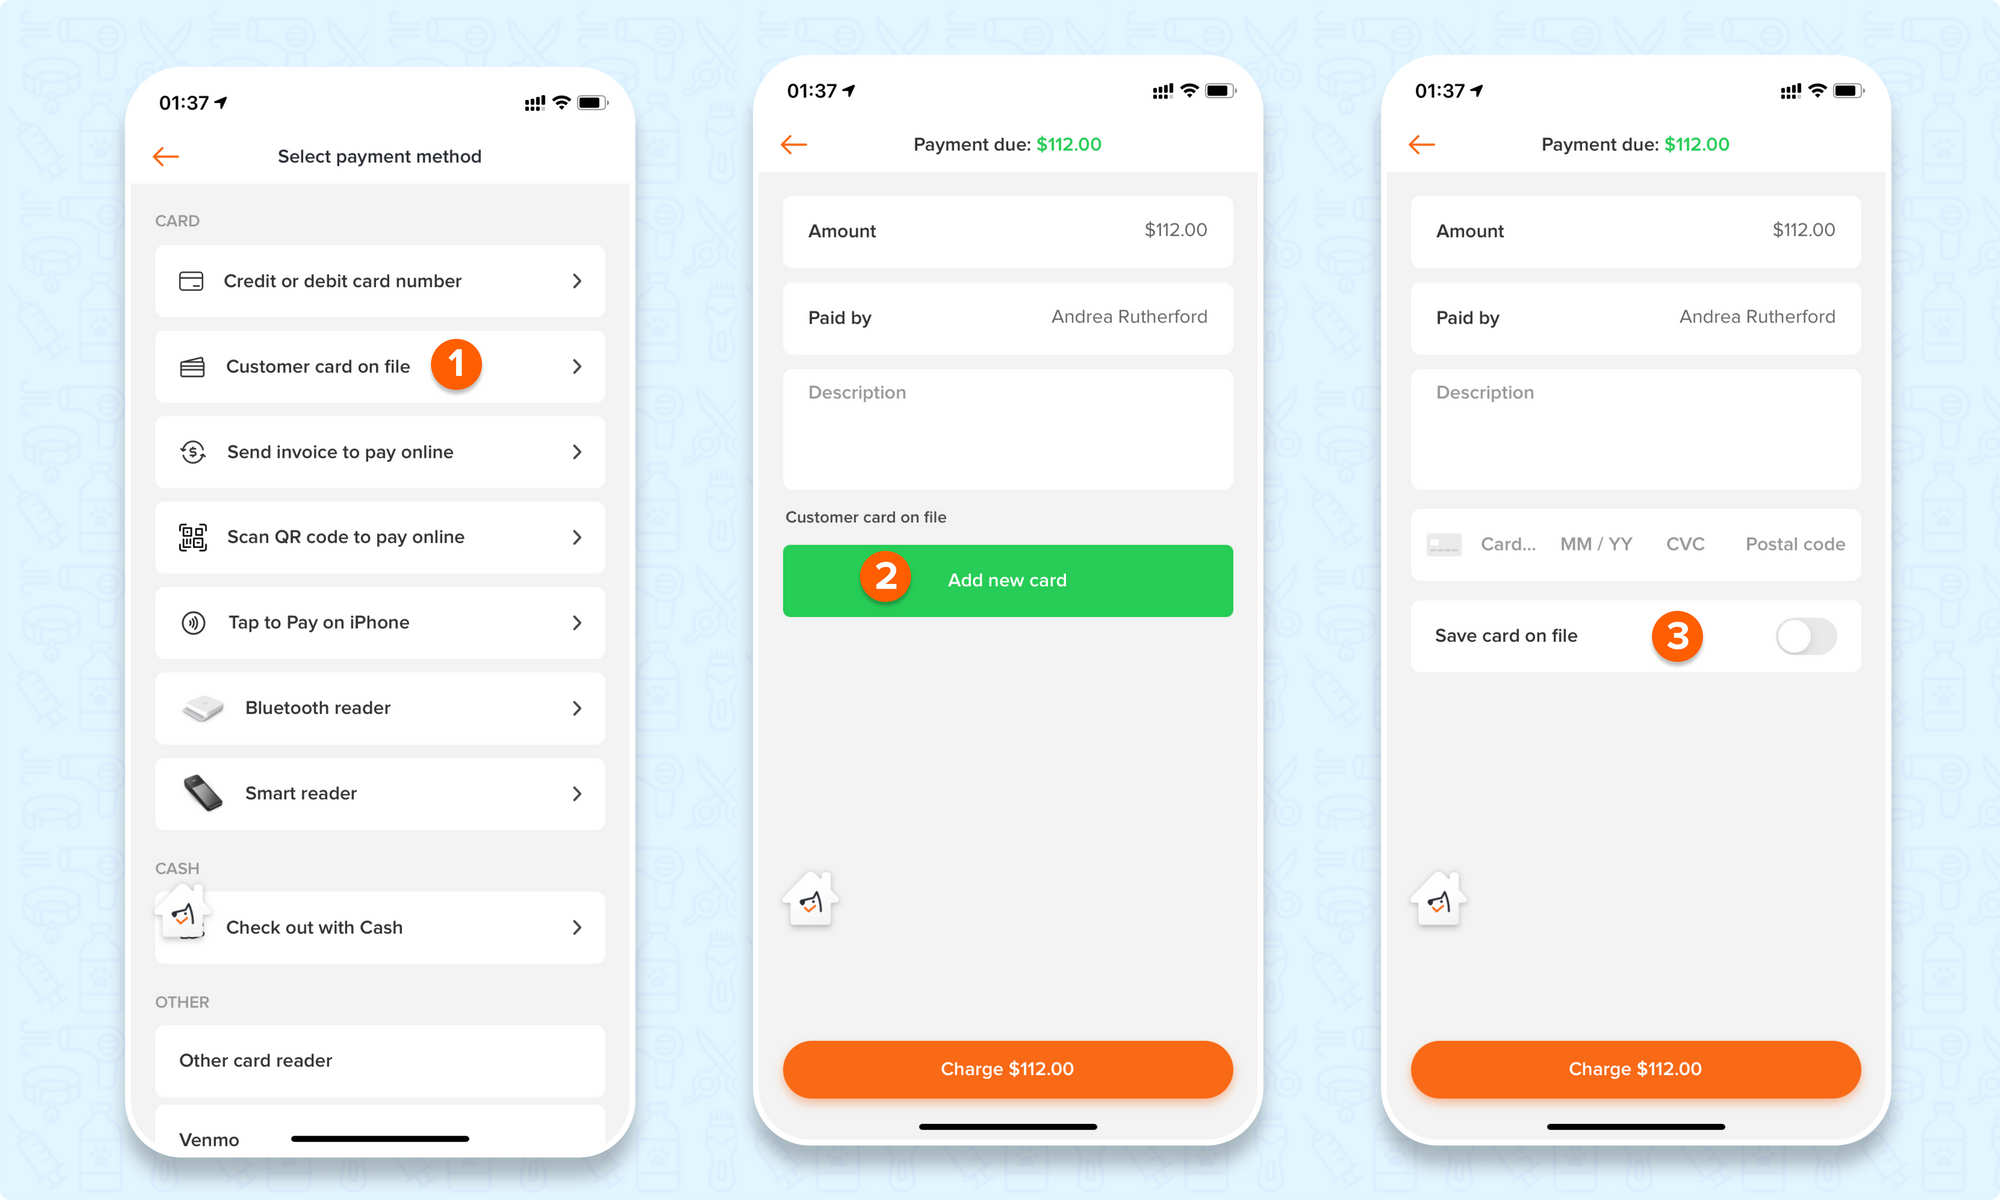
Mobile App:
- When checkout, select < Customer card on file >
- Click on < Add new card >
- Input the card info
- Toggle on < Save card on file >
- Select < Charge >
If the client pays by swiping/tapping/ inserting cards with hardware, there is a pop-up asking if you would like to save the card on file. You can click on "Yes" to save it!
❓ Frequently asked question
Q1. Is it safe to save card info on MoeGo?
Answer: The card info will be saved on the current primary payment processor. Rest assured that MoeGo prioritizes the highest standards of security and compliance, employing robust encryption protocols and adhering to industry regulations.
Q2. Can I send the same link to all clients or put the link on my website?
Answer: The secured link is unique to each client. Please do not share it with other clients, or other's cards will be saved for the same client.
Q3. Can I transfer the card info saved to another processor?
Answer: Since the card info is encrypted by each processor, it is not possible to transfer the card info.
Q4. For Online Booking: If I switch from one processor to another, will the Card on File requirement for Online Booking prompt existing customers to input a new card again?
Answer: Yes, it will require customers to input a new card.
Please note that the cards saved on MoeGo Pay will not be applied to charge through another processor since the card info is safely encrypted by each processor.
Q5. Is there any area limitations for the card-on-file feature?
Answer: It is only available for those areas that support the payment processor. While Stripe is available in the US, the UK, Canada, and Australia, card-on-file is supported in these areas.
But for the UK users who enable card authorization, the card may fail to be saved due to the 3DS issue. Click here to know more details about it.
Q6. Can a client add another card if they have an existing card on file through the Intake Form?
The new card won't be added if there is already an existing card on file.
Q7. Can my clients quick-scan the card number when filling out the card info?
This is available for iOS device users. Click on the autofill button and use the camera.
MoeGo team is always here 24/7 for you if you have any further questions.
